


Types of Windshield Projectors
A windshield projector, also known as a Head-Up Display (HUD), is an advanced automotive technology that projects critical driving information directly onto the windshield. This innovative system allows drivers to access real-time data without taking their eyes off the road, significantly improving safety and convenience. The HUD works by projecting information at eye level using a combination of optics and digital displays.
Windshield projectors are designed to enhance driver awareness by displaying key metrics such as speed, navigation directions, engine performance, and even incoming calls or messages in some modern implementations. These systems can be integrated into the vehicle's onboard computer or added as aftermarket accessories.
HUD1 – Basic Windshield Projector
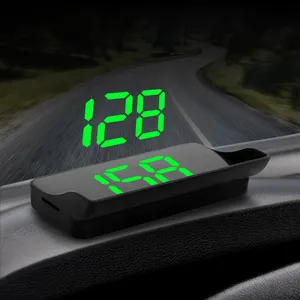
The foundational type of windshield projector, offering essential functionality for improved driving experience. It features a bright display screen that presents vital driving data including:
- Current vehicle speed
- Battery power status
- Navigation directions
- Engine diagnostics
Advantages
- Easy-to-read bright display
- Automatic brightness adjustment
- User-adjustable positioning
- Eye sensor activation for convenience
Limitations
- Limited feature set compared to advanced models
- Potential glare issues in certain lighting conditions
- No voice control integration
Best for: Budget-conscious drivers, basic navigation needs, traditional vehicles with limited tech integration
HUD2 – Advanced Windshield Projector
This next-generation windshield projector offers enhanced capabilities and smarter integration. While maintaining a less intense projection to reduce visual distraction, it provides more sophisticated features that improve both usability and safety:
- Adaptive display dimming based on ambient light
- Customizable viewing angle adjustment
- Voice-controlled operation for hands-free use
- Integrated GPS for real-time navigation
- Smartphone connectivity for call and message alerts
Advantages
- Seamless integration with vehicle systems
- Hands-free voice command support
- Precise location-based navigation
- Less intrusive display design
- Modern smartphone connectivity options
Limitations
- Higher cost compared to basic models
- Steeper learning curve for full functionality
- Potential compatibility issues with older vehicles
Best for: Tech-savvy drivers, performance vehicles, frequent travelers, and those needing constant navigation
| Feature | HUD1 | HUD2 |
|---|---|---|
| Display Brightness | Bright, high-contrast screen | Adjustable intensity, less intense |
| Adjustability | Position adjustable | Angle and position adjustable |
| Sensors | Eye sensor, Light sensor | Advanced light sensor, proximity detection |
| Control Options | Manual controls only | Voice control + touch/gesture options |
| Connectivity | Basic vehicle integration | Bluetooth, Wi-Fi, smartphone sync |
| Navigation | Basic direction indicators | Full GPS with turn-by-turn guidance |
| Price Range | $100–$250 | $300–$800+ |
Expert Tip: When selecting between HUD1 and HUD2, consider your driving habits. If you frequently travel long distances or need constant navigation updates, investing in HUD2 with its GPS integration and voice control will provide significant value. For simple daily commutes, HUD1 may offer all the necessary functionality at a more affordable price point.
Important Note: Always ensure proper installation of any windshield projector to avoid obstructing your field of vision. Improper placement can create glare or distractions that compromise safety. Consider professional installation for optimal positioning, especially for advanced systems like HUD2 where calibration plays a crucial role in effectiveness.
Key Considerations When Choosing a Windshield Projector
When deciding between HUD1 and HUD2, several factors should influence your decision:
- Driving Environment: Urban drivers may benefit more from HUD2's voice control and smartphone integration, while highway commuters might appreciate the clear visibility of HUD1.
- Vehicle Compatibility: Newer vehicles often have built-in mounting points and wiring for advanced HUD systems, making HUD2 integration smoother.
- Usage Frequency: Occasional users may find HUD1 sufficient, while daily drivers or commercial vehicle operators typically benefit more from HUD2's comprehensive features.
- Future-Proofing: HUD2 systems tend to receive software updates and maintain relevance longer due to their smart connectivity features.
Maintenance of Windshield Projector
Windshield projectors are essential components for enhancing visibility and projecting critical driving information directly into the driver’s line of sight. Proper maintenance ensures optimal performance, longevity, and safety. Below is a detailed guide to maintaining windshield projectors effectively.
Key Maintenance Practices
| Maintenance Task | Frequency | Recommended Tools/Products |
|---|---|---|
| Cleaning Lens & Housing | Bi-weekly | Microfiber cloth, automotive-safe glass cleaner |
| Inspection for Dirt Buildup | Monthly | Soft brush, compressed air |
| Check Electrical Connections | Every 3 months | Multimeter, wire brush, dielectric grease |
| Alignment Adjustment | As needed (e.g., after heavy vibration) | Owner’s manual, screwdriver set |
| Bulb Replacement | When dimming or failure occurs | OEM replacement bulb, gloves (to avoid oil transfer) |
| Structural Integrity Check | Every 6 months | Visual inspection, flashlight |
Common Issues & Solutions
- Flickering Light: Indicates loose wiring or failing bulb – inspect and replace if necessary.
- Distorted Image: Could be due to misalignment or dirty lens – clean and realign projector.
- No Projection: Check power supply, fuses, and bulb condition – repair or replace accordingly.
- Condensation Inside: Suggests compromised seal – dry unit and check housing for cracks or gaps.
Pro Tips for Longevity
- Always turn off the projector before cleaning or performing maintenance.
- Use gloves when handling bulbs to avoid transferring oils from your skin.
- Store vehicles in covered areas during extreme weather conditions to protect external electronics.
- Keep software updated (if applicable) to ensure compatibility and optimal functionality.
Important: Never use excessive force when adjusting or cleaning the projector. This can damage delicate internal components or misalign the optics permanently. Always follow the manufacturer’s guidelines for maintenance and repairs.
How to Choose a Windshield Projector for Business Use
Selecting the right windshield projector is crucial for businesses that rely on vehicle-based operations or driver-focused applications. A well-chosen projector enhances efficiency, improves safety, and ensures seamless integration with existing systems. Below are detailed considerations to guide business buyers through the selection process.
Display Quality
High-quality display performance is essential for ensuring legibility and usability in various lighting conditions. Look for projectors with high resolution (preferably HD or higher), brightness levels of at least 200 lumens, and strong contrast ratios to maintain visibility under direct sunlight or during nighttime driving.
- Opt for anti-glare coatings or polarized projection surfaces
- Consider ambient light sensors that automatically adjust brightness
- Verify compatibility with heads-up display (HUD) standards if required
Pro Tip: Test the projector in different lighting environments before finalizing your purchase.
Ease of Installation
For large-scale deployment across a fleet or multiple locations, choose models that can be installed quickly without requiring specialized tools or technical expertise. Modular designs and plug-and-play connectivity simplify installation and reduce downtime.
- Look for universal mounting brackets compatible with most windshield angles
- Ensure compatibility with both flat and curved windshields
- Prefer units with magnetic or adhesive mounts for temporary setups
Key Feature: Some models offer wireless installation via suction cup mounts or dash pads.
Durability and Reliability
Business-grade windshield projectors should withstand frequent use, temperature fluctuations, and constant vibration from vehicles. Durable materials like reinforced ABS plastic or aluminum housings ensure longevity, while sealed connectors protect against dust and moisture ingress.
- Check for IP ratings indicating dust/water resistance
- Look for thermal management features to prevent overheating
- Verify shock absorption capabilities for rough road conditions
Durability Note: Units rated for industrial or commercial use typically last longer than consumer-grade options.
Safety Features
A windshield projector must enhance driver awareness without causing distraction. Prioritize models with built-in glare reduction technology, voice-activated controls, and adjustable projection settings that allow drivers to customize display size, position, and opacity.
- Eye-tracking or adaptive positioning features improve focus
- Voice commands minimize manual input while driving
- Auto-dimming functions adapt to changing light conditions
Safety Standard: Ensure compliance with local regulations regarding driver distractions.
Compatibility
Seamless integration with your vehicle’s onboard systems is vital for maximizing functionality. Choose a projector that supports Bluetooth, Wi-Fi, GPS, and voice assistant platforms like Siri or Google Assistant. Compatibility with fleet management software can also provide valuable telemetry data.
- Confirm support for iOS and Android devices
- Check for standard OBD-II or USB-C interfaces
- Ensure compatibility with navigation and telematics apps
Integration Tip: Look for projectors with SDKs or APIs for custom integrations.
Adjustability
Drivers have different preferences and windshield configurations, so flexibility in projection angle, distance, and orientation is important. Adjustable focus rings, tilt mechanisms, and digital zoom features allow for optimal placement of information within the driver's field of view.
- Vertical and horizontal projection adjustments
- Zoom and focus controls for clarity
- Customizable display layouts and HUD themes
User Experience: Models with memory presets for multiple users enhance usability in shared vehicles.
Price and Value
While budget constraints are always a factor, it’s important to balance upfront costs with long-term value. Consider total cost of ownership, including maintenance, replacement parts, and potential upgrades. Evaluate whether additional features like AR overlays or AI-powered alerts justify the investment.
- Compare features per price point across brands
- Factor in energy consumption and battery life
- Assess scalability for future expansion
Value Insight: Higher-priced models often deliver better ROI through enhanced productivity and reduced maintenance needs.
Reviews and Recommendations
Research customer feedback and professional reviews to gauge real-world performance. Pay attention to reports about durability, ease of use, and reliability under continuous operation. Forums and industry-specific review sites can offer insights tailored to your business needs.
- Read case studies from similar industries
- Check forums for common complaints or praise
- Look for third-party certifications or awards
Insider Tip: Reach out to peer businesses for firsthand experiences and recommendations.
Warranty and Customer Support
Robust warranty coverage and responsive customer service are critical when deploying hardware at scale. Look for extended warranties, easy return policies, and access to technical support via phone, email, or live chat. On-site service options may also be beneficial for larger fleets.
- Standard warranty length of 1–2 years is typical
- Premium models may include lifetime support or firmware updates
- Check availability of spare parts and repair centers
Support Tip: Confirm response times and service level agreements before purchase.
Bulk Purchase Advice: When purchasing windshield projectors for an entire fleet or team, consider negotiating volume discounts and requesting demo units first. This allows you to evaluate performance in real-world scenarios before full deployment. Also, inquire about enterprise licensing or centralized management tools for easier control and monitoring.
| Use Case | Recommended Feature Set | Minimum Requirements | Preferred Brands |
|---|---|---|---|
| Fleet Management | GPS integration, Bluetooth, Telematics compatibility | HD resolution, 200+ lumens, adjustable mounting | Garmin, Pioneer, Hudly |
| Delivery Services | Voice control, AR navigation, Night mode | Anti-glare screen, mobile app support | Navdy, WayRay, Garmin |
| Commercial Vehicles | Durability rating, weatherproof design | IP65+, shock-resistant casing | Motex, Navdy, Pioneer |
| Executive Transportation | Customizable HUD, luxury interface | Wireless charging, premium finish | Hudly, WayRay, Garmin |
How to DIY and Replace Windshield Projector Lights
Replacing windshield projector lights is a straightforward task that most vehicle owners can complete at home with minimal tools. This guide provides detailed instructions, practical tips, and important considerations to ensure your replacement project is successful and safe.
Safety Reminder: Always disconnect the battery before working on electrical components. Wear gloves to avoid oil contamination on bulbs and protect your hands from sharp edges or debris.
Step-by-Step Replacement Guide
- Find the Right Replacement Bulbs
- Consult your vehicle’s owner manual for bulb specifications (e.g., H4, H7, or LED type)
- Ensure the replacement bulbs match the wattage, base type, and beam pattern of the original units
- Purchase from a reputable brand to guarantee quality and longevity
- If upgrading to LED or HID systems, confirm compatibility with your vehicle's wiring and projector housing
- Remove the Old Bulb
- Turn off the ignition and open the hood to access the headlight assembly
- Locate the back of the projector unit where the bulb socket is mounted
- Unplug the electrical connector by pressing the release tab and pulling it away
- Twist the bulb counterclockwise (or as specified in the manual) and carefully pull it out
- Inspect the housing for moisture or corrosion while you're inside
- Install the New Bulb
- Handle the new bulb only by its base—oils from your skin can cause hotspots and reduce lifespan
- Gently insert the bulb into the socket, aligning it properly
- Twist clockwise until it locks securely into place
- Reconnect the electrical connector firmly to ensure proper contact
- Double-check that the bulb sits flush and secure in the housing
- Test the Projector Lights
- Before closing up the engine bay, reconnect the battery and turn on the headlights
- Verify both low and high beams function correctly
- Check for consistent brightness and correct beam alignment
- If one side doesn't work, double-check connections or test the bulb in another socket
- Reassemble Everything
- Replace any covers or panels removed during access
- Secure all clips, screws, or fasteners to factory specifications
- Ensure no tools or parts are left near the engine or headlight area
- Wipe down the exterior lens to remove fingerprints or dust for maximum clarity
| Phase | Key Actions | Common Mistakes | Tools Needed |
|---|---|---|---|
| Bulb Selection | Referencing owner manual, confirming fitment | Purchasing incorrect bulb type or incompatible upgrade | VIN lookup tool, online bulb finder |
| Access & Removal | Opening headlight housing, unplugging connectors | Forcing stuck connectors, damaging surrounding components | Trim removal tool, screwdriver set |
| Installation | Proper bulb seating, secure connection | Touching glass portion of bulb, cross-threading socket | Clean gloves, small flashlight |
| Testing | Verifying light output and functionality | Misalignment, poor ground connection | Multi-meter, helper to observe lights |
DIY Tip: If your projector lens has an adjustable leveling system, recalibrate the beam height after installation to prevent glare for oncoming drivers and ensure optimal visibility.
Additional Considerations
- Upgrading Options: Consider upgrading to high-performance halogen, HID kits, or LED assemblies for better brightness and energy efficiency if compatible with your vehicle.
- Moisture Issues: If you notice condensation inside the projector housing, consider replacing seals or adding desiccant packs to prevent fogging and corrosion.
- Alignment: After reassembly, check and adjust the aim of the projector lights using a wall or garage door method or take it to a shop for professional alignment.
- Replacement Schedule: While projector bulbs last longer than standard ones, replace them every 2–3 years or when performance diminishes for safety and compliance.
By following this comprehensive guide, you'll be able to confidently replace your windshield projector lights at home while ensuring safety, functionality, and long-term reliability. Remember to always refer to your specific vehicle’s service manual for exact procedures and torque specifications.
Windshield Projector Installation and Usage FAQ
A1: Installing a windshield projector involves several key steps to ensure optimal performance and safety. Begin by identifying the best mounting location—this is typically on the dashboard or near the top of the windshield where the projection will be visible without obstructing your view. Thoroughly clean the surface with an alcohol wipe or glass cleaner and allow it to dry completely before proceeding.
Most projectors come with either adhesive pads, brackets, or suction mounts. Follow the manufacturer's instructions carefully to secure the device in place. Once mounted, connect the projector to a reliable power source such as a USB port or directly to the vehicle’s electrical system if advanced integration is required.
The final step involves calibrating the projector. Adjust the angle and focus until the image aligns perfectly with the windshield and appears sharp and readable from the driver's seat. This may require some trial and error to achieve the ideal positioning for clear visibility under different lighting conditions.
A2: Yes, many modern windshield projectors offer a range of customization options to tailor the display to individual preferences and driving conditions. Basic adjustments usually include brightness, contrast, focus, and alignment settings to optimize readability in various lighting environments—from bright daylight to nighttime driving.
More advanced models may provide additional features such as:
- Color customization (e.g., switching between red, green, blue, or white displays)
- Projection theme selection (sports, classic, minimalist, etc.)
- Adjustable information layout (speed, navigation, fuel level, engine diagnostics)
- Size and position adjustment of the projected image
It’s important to note that the level of customization varies significantly between models. Entry-level projectors may only allow basic brightness control, while high-end units often integrate with smartphone apps or onboard vehicle systems for more sophisticated personalization.
A3: While windshield projectors are engineered to perform reliably in a wide range of environmental conditions, extreme weather can impact their effectiveness. Here’s how different conditions affect performance:
| Weather Condition | Impact on Projection | Recommendations |
|---|---|---|
| Sunny / Daylight | Moderate glare may reduce contrast | Use maximum brightness setting; adjust angle to minimize reflections |
| Rain / Snow | Moisture on windshield may distort image | Ensure windshield is clean and dry; consider water-resistant models |
| Fog / Mist | Reduced visibility due to condensation | Dehumidify interior; use anti-fog solutions on windshield |
| Nighttime | Optimal visibility with proper brightness | Lower brightness to avoid over-glare and eye strain |
Manufacturers design these devices to withstand typical temperature fluctuations and humidity levels found inside vehicles. However, prolonged exposure to extreme heat or freezing temperatures may affect internal components over time. It's advisable to consult the product specifications for operating temperature ranges before installation.
A4: Windshield projectors are generally compatible with most vehicles, but there are several factors to consider when determining suitability:
- Windshield Angle: Vehicles with steeply angled windshields may require specific projector models designed for curved surfaces.
- Mounting Space: Compact cars or those with minimal dashboard space might benefit from smaller, low-profile projectors or suction mount alternatives.
- Power Source Availability: Ensure there is an accessible power outlet or wiring harness for continuous operation.
- Vibration Levels: Off-road vehicles or motorcycles may need vibration-resistant mounts to prevent image shaking.
Some projectors are designed specifically for certain vehicle types:
| Vehicle Type | Recommended Projector Features |
|---|---|
| Cars & SUVs | Dashboard mounting, adjustable projection angle |
| Motorcycles | Waterproof casing, vibration dampening mounts |
| Commercial Trucks | Durable build, extended power cable options |
| Classic Cars | Discreet design, retro-style housing options |
Before purchasing, always check the manufacturer's compatibility list and read user reviews for insights into real-world installation experiences with similar vehicle models.
A5: The primary goal of a windshield projector is to enhance situational awareness while minimizing distraction. When properly installed and configured, these devices can provide critical information within the driver’s natural field of vision without requiring them to look away from the road.
Key features that help reduce distractions include:
- Adjustable Brightness: Ensures the display remains visible without being overly bright at night.
- Customizable Information: Allows users to prioritize essential data like speed, navigation, or warning alerts.
- Head-Up Display (HUD) Technology: Projects images at apparent distances beyond the windshield, reducing eye refocusing effort.
- Minimalistic Design: Clean interfaces with large fonts and simple icons improve readability at a glance.
To avoid distraction:
- Never adjust settings while driving—pull over safely first.
- Avoid projecting too much information at once; keep the display uncluttered.
- Position the projector so it doesn’t block traffic signs, signals, or other critical views.
- Choose a model with automatic ambient light sensors for seamless brightness adaptation.
While windshield projectors can be very effective tools, they should never replace attentive driving habits. Always prioritize visual attention to the road and surroundings over any heads-up display content.