


Types of Water Pipe Temperature Gauges
A water pipe temperature gauge is a crucial tool that helps users monitor the temperature of water flowing through pipes. Understanding the different types available ensures you select the most appropriate gauge for your specific application.
Digital Temperature Gauge
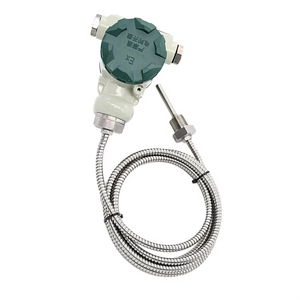
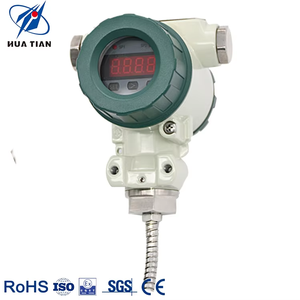
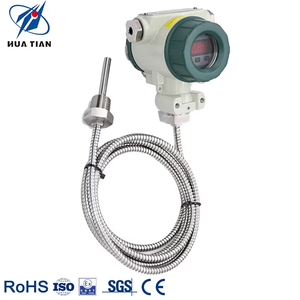
Digital temperature gauges utilize electronic sensors to measure temperature and display readings on a digital screen with high precision.
Key features: Easy-to-read display, high accuracy, data logging capabilities, wireless connectivity options
Best for: Applications requiring precise readings and modern monitoring systems
Dial Temperature Gauge
These analog gauges use a Bourdon tube or diaphragm element to sense temperature, with a mechanical link transferring motion to a pointer on a calibrated dial.
Key features: Simple design, reliable operation, no power required, visual at-a-glance readings
Best for: General-purpose applications where simplicity and reliability are paramount
Thermocouple Temperature Gauge
Consisting of two different metal wires joined at one end, these gauges generate voltage proportional to temperature differences between measuring and reference points.
Key features: Wide temperature range, durability in harsh conditions, fast response time
Best for: Industrial applications with high-temperature requirements
Resistance Temperature Detector (RTD)
RTDs feature electrical resistance that changes with temperature, providing exceptional accuracy and stability over time.
Key features: Superior accuracy, excellent stability, wide operating range
Best for: Precision applications, automated systems requiring exact temperature control
Bimetallic Temperature Gauge
Using two bonded metals with different expansion rates, these gauges translate temperature changes into mechanical movement of a pointer on a dial.
Key features: Cost-effective, durable construction, simple operation, no external power required
Best for: Basic monitoring applications with budget constraints
| Gauge Type | Accuracy | Temperature Range | Response Time | Power Required |
|---|---|---|---|---|
| Digital | ±0.1°C to ±1°C | -50°C to 300°C | Medium | Yes (battery/mains) |
| Dial | ±1°C to ±2°C | -50°C to 500°C | Medium to Slow | No |
| Thermocouple | ±0.5°C to ±2°C | -200°C to 1600°C | Fast | Yes (for display) |
| RTD | ±0.1°C to ±0.5°C | -200°C to 600°C | Medium | Yes |
| Bimetallic | ±1°C to ±3°C | -70°C to 500°C | Slow | No |
Expert Tip: For critical applications where temperature control is essential, consider using redundant temperature gauges of different types. This provides a backup system and allows for verification of readings across different measurement technologies.
Specifications and Maintenance of Water Pipe Temperature Gauges
Key Specifications
Understanding the technical specifications of water pipe temperature gauges is essential for selecting the right tool for your application. Here are the critical specifications to consider:
Critical Specifications Overview
| Specification | Description | Importance |
|---|---|---|
| Dial Size | Ranges from 63mm to 250mm, affecting visibility and reading ease | High for manual monitoring locations |
| Temperature Range | Specific measurement range (-50°C to 600°C) based on application needs | Critical - must exceed expected operating conditions |
| Accuracy | Precision of readings, typically ±0.1°C to ±3°C depending on type | Critical for process control applications |
| Material | Stainless steel, copper, plastic - each with different properties | High - affects durability and corrosion resistance |
| Connection Type | Threaded, flanged, or welded connections for system integration | High - must be compatible with existing infrastructure |
| Mounting Method | Insertion, surface mounting, or immersion options | Medium - depends on installation requirements |
| Response Time | Speed at which gauge reflects temperature changes | High for rapidly changing conditions |
| Display Type | Analog, digital, or remotely transmitted display options | Medium - based on user preference and monitoring needs |
| Power Supply | Battery, mains power, or self-powered (mechanical) | Medium - affects installation flexibility |
Maintenance Requirements
Proper maintenance is essential for ensuring the longevity and accuracy of water pipe temperature gauges. Following these maintenance procedures will help maintain optimal performance:
Essential Maintenance Practices
- Regular Inspection - Conduct visual inspections monthly to identify damage, wear, or corrosion that could affect readings.
- Cleaning - Clean the gauge surface and connection points quarterly using a soft cloth and mild detergent. Avoid harsh chemicals that could damage sensitive components.
- Calibration - Calibrate temperature gauges annually or according to manufacturer specifications using certified temperature standards.
- Connection Inspection - Check all fittings and connections quarterly for leaks, loose components, or signs of wear.
- Environmental Protection - Shield gauges from extreme conditions, including humidity, dust, and corrosive environments with appropriate housing.
- Vibration Monitoring - Ensure gauges are not subjected to excessive mechanical shock or vibration that could affect accuracy.
- Proper Storage - When not in use, store temperature gauges in cool, dry environments away from direct sunlight.
Warning: Never exceed the specified temperature range of your gauge, as this can permanently damage the sensing element and render readings inaccurate. Always ensure your gauge's range comfortably exceeds your system's operational range.
How to Choose Water Pipe Temperature Gauges
Selecting the optimal water pipe temperature gauge requires careful consideration of several factors. This systematic approach will help you identify the most suitable gauge for your specific application needs.
Project Requirements Analysis
Begin by thoroughly assessing your specific temperature monitoring needs:
- Temperature range required (minimum and maximum values)
- Accuracy level needed for your application
- Environmental conditions (humidity, exposure to elements)
- Reading frequency and monitoring requirements
- Integration with existing systems or controls
Technical Compatibility
Ensure the gauge will function properly with your existing infrastructure:
- Pipe material and thickness compatibility
- Connection type and size requirements
- Data acquisition system compatibility (if applicable)
- Power supply availability and requirements
- Space constraints and mounting options
Performance and Reliability
Evaluate the performance characteristics essential for your application:
- Required measurement accuracy (±°C tolerance)
- Long-term stability and drift characteristics
- Response time requirements
- Calibration intervals and procedures
- Expected lifespan in your operational conditions
Practical Considerations
Consider the practical aspects of installation, use, and maintenance:
- Installation complexity and required expertise
- Maintenance requirements and accessibility
- Replacement part availability
- Total cost of ownership (purchase + maintenance)
- Manufacturer support and warranty terms
Selection Tip: When in doubt between two similar options, choose the gauge with slightly higher specifications than your minimum requirements. This provides a safety margin and accommodates potential future changes in your system's operating conditions.
Decision Matrix: Gauge Type by Application
| Application Type | Recommended Gauge Type | Key Consideration |
|---|---|---|
| Residential water heating | Dial or Digital | Ease of reading, durability |
| Industrial process control | RTD or Thermocouple | Precision, integration with control systems |
| Commercial HVAC | Digital with data logging | Remote monitoring, trend analysis |
| High-temperature applications | Thermocouple | Extended temperature range |
| Outdoor water systems | Weather-resistant Digital or Dial | Environmental durability |
| Critical safety systems | Redundant RTD systems | Reliability, accuracy, fail-safe operation |
How to DIY and Replace Water Pipe Temperature Gauges
Installing or replacing a water pipe temperature gauge is a manageable DIY project with the right preparation and tools. Follow this step-by-step guide for a successful installation.
Installation Procedure
- Select an Optimal Location - Choose a straight section of pipe away from bends, valves, or fittings that could affect temperature readings. Ensure the location provides easy visibility and access for future maintenance.
- Prepare the System - Turn off the water supply and drain the section of pipe where you'll be working. For replacement, carefully remove the old gauge, taking note of its orientation and connection type.
- Clean the Connection Point - Thoroughly clean the threaded portion of the pipe or fitting where the gauge will be installed. Remove any debris, old sealant, or corrosion to ensure a proper seal.
- Apply Thread Sealant - Apply PTFE (Teflon) tape or appropriate pipe thread sealant to the threaded connection of the new temperature gauge. Wrap PTFE tape clockwise (looking at the threads) to prevent it from unwinding during installation.
- Install the Gauge - Carefully thread the temperature gauge into the prepared connection point. Use an appropriate wrench and turn clockwise until snug. Avoid over-tightening, which can damage the gauge or create stress on the connecting threads.
- Position the Display - For dial gauges, rotate the face to the most readable position before final tightening. Most dial gauges can be rotated without affecting the connection seal.
- Test for Leaks - Restore water flow to the system at low pressure and check carefully for any leaks around the gauge connection. If leaks occur, tighten slightly or reapply sealant as needed.
- Verify Operation - Once installed without leaks, allow the system to reach normal operating temperature and verify the gauge provides reasonable readings. Compare with expected values or other temperature measurements if possible.
Safety Notice: Always ensure the system is depressurized before removing or installing temperature gauges. Hot water systems can cause severe burns, so allow adequate cooling time before attempting any work.
Installation Tip: When installing digital temperature gauges with remote sensors, position the sensing element at the center of the pipe flow (typically one-third of the way into the pipe diameter) for the most accurate readings.
Tools and Materials Needed
| Item | Purpose |
|---|---|
| Adjustable wrench or appropriate sized wrench | For removing old gauge and installing new one |
| PTFE (Teflon) tape or thread sealant | To create a watertight seal at the connection |
| Clean cloth | For cleaning the connection area |
| Wire brush (optional) | For removing stubborn corrosion or debris |
| Pipe cutter (if adapters needed) | For modifying pipe sections if required |
| Bucket and towels | For catching water during draining and cleanup |
Frequently Asked Questions
While temperature measurement is their primary function, water pipe temperature gauges provide valuable insights beyond simple readings:
- System Performance Monitoring - Temperature patterns can indicate how efficiently your system is operating
- Preventive Maintenance - Unusual temperature readings often signal problems before they become critical failures
- Water Quality Assessment - Temperature affects water quality parameters, providing indirect insights into potential issues
- Energy Efficiency Analysis - Monitoring temperature trends helps optimize heating/cooling system performance
- Freeze Protection - Low-temperature alerts can prevent pipe damage in cold weather
- Process Verification - Confirming that water-dependent processes are operating at optimal temperatures
The optimal installation method depends on several factors specific to your system:
Location Considerations:
- Install in straight pipe sections at least 10 pipe diameters from bends, valves, or fittings that could create turbulence
- Position gauges where they'll measure representative temperatures (avoid dead zones or areas with minimal flow)
- Ensure visibility for manual reading and accessibility for maintenance
- For most accurate readings, use thermowells that extend into the center of the flow
Installation Best Practices:
- Use appropriate thread sealant compatible with your fluid medium
- Install gauges vertically when possible to minimize sediment accumulation
- For digital gauges, follow manufacturer's instructions regarding sensor positioning and wiring
- Consider vibration isolation for systems with significant mechanical movement
Professional installation is recommended for critical systems where temperature monitoring affects safety or expensive equipment.
Yes, replacing a water pipe temperature gauge is typically a manageable DIY project for those with basic plumbing skills. The process is straightforward if you:
- Ensure you purchase a compatible replacement gauge (same thread size and temperature range)
- Turn off water supply and depressurize the system before beginning work
- Use the correct tools to prevent damage to pipe fittings
- Apply appropriate thread sealant to prevent leaks
- Avoid overtightening, which can damage gauge components
However, professional installation is recommended if:
- The system involves high pressure or high-temperature steam
- Special calibration is required for precise temperature control
- The gauge is part of a safety system or critical process control
- You're uncomfortable working with plumbing or electrical connections (for digital gauges)
Always consult local building codes, as some jurisdictions may require licensed professionals for certain plumbing modifications.
Calibration frequency depends on several factors:
| Application Type | Recommended Calibration Frequency | Notes |
|---|---|---|
| Residential/Basic | Every 1-2 years | Or if readings seem suspicious |
| Commercial | Annually | May be required by facility management protocols |
| Industrial Process | Every 6-12 months | More frequent for critical processes |
| Critical Safety Systems | Every 3-6 months | Or according to regulatory requirements |
Always follow manufacturer recommendations and industry standards for your specific application. Increased calibration frequency is advised for gauges subjected to extreme conditions, frequent temperature cycling, or mechanical shock.