


Types of VW MK4 Kits
A VW MK4 kit is a comprehensive solution for upgrading or personalizing your Volkswagen Golf MK4 (built between 1997 and 2003). These kits are engineered to enhance various aspects of the vehicle, from aesthetics to performance. Choosing the right type of kit can dramatically transform your car’s appearance, driving dynamics, or comfort level.
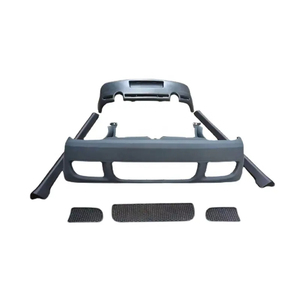
Body Kits
VW MK4 body kits are among the most popular upgrades for owners looking to give their cars a more aggressive or modern look. A complete body kit typically includes:
- Front bumper with integrated air dams
- Rear bumper with diffuser-style elements
- Side skirts to reduce visual height and add definition
- Hood options such as flat black or carbon fiber-look panels
These components work together to improve the car's aerodynamic profile, reducing drag at higher speeds and increasing stability. Many enthusiasts choose body kits made from polyurethane or fiberglass for durability and flexibility under impact.
Advantages
- Enhanced visual appeal
- Improved aerodynamics
- Better protection against minor road damage
Limitations
- Can be expensive depending on material quality
- May require professional installation
- Potential fitment issues with low-quality kits
Best for: Enthusiasts seeking a customized look, track-prepped vehicles, or daily drivers wanting a sportier aesthetic
Suspension Kits
The VW MK4 suspension kit allows drivers to adjust ride height and improve handling characteristics. Common types include:
- Coilover suspensions – allowing full adjustability in both ride height and damping
- Lowering springs – provide a modest drop while maintaining factory comfort levels
- Adjustable shocks and struts – ideal for those who want tunable performance without extreme modifications
Each setup serves different driving styles—whether you're aiming for street cruising, autocross, or weekend track events. Proper alignment after installation is crucial to ensure optimal tire wear and handling balance.
Advantages
- Sharper cornering response
- Reduced body roll
- Customizable ride characteristics
Limitations
- Stiffer ride may compromise comfort
- Installation can be labor-intensive
- Higher-end systems can be costly
Best for: Performance-oriented drivers, drifters, and motorsport enthusiasts
Performance Kits
MK4 performance kits are designed for drivers who want to extract more power from their engine. These typically include:
- Upgraded intercooler – reduces intake air temperature for turbocharged models
- Performance exhaust system – increases flow and reduces backpressure
- High-flow air intake system – improves airflow into the engine
- Engine management tuning – optimizes fuel mapping and ignition timing
Together, these components can significantly increase horsepower and torque, especially on modified engines like the VR6 or 1.8T. Some kits also include upgraded clutches and flywheels to handle increased output.
Advantages
- Increased horsepower and torque
- Improved throttle response
- Better engine efficiency
Limitations
- May void manufacturer warranty
- Requires proper tuning to avoid engine damage
- Higher maintenance demands
Best for: Turbocharged models, track-focused builds, and speed enthusiasts
Lighting Kits
VW MK4 lighting kits upgrade your vehicle’s visibility and style. Options include:
- Projector headlights with HID or LED bulbs
- LED daytime running lights for safety and aesthetics
- Cornering fog light setups
- Interior ambient lighting upgrades
Modern lighting solutions not only make your car safer but also align it visually with newer model designs. Many owners opt for sequential turn signals or halo projector rings for a distinctive look.
Advantages
- Enhanced nighttime visibility
- Modernized appearance
- Energy-efficient LED technology
Limitations
- Some installations require wiring modifications
- Compatibility issues with older electrical systems
- Legal compliance with local regulations required
Best for: Nighttime drivers, show cars, and those updating their car’s style
Interior Kits
VW MK4 interior kits allow customization of the cabin environment. These often feature:
- Steering wheel covers or aftermarket wheels (leather, Alcantara)
- Door panel inserts (carbon fiber, wood, aluminum)
- Gear shift knobs and boots (custom materials or colors)
- Seat upholstery kits or custom stitching
Interior kits help create a more luxurious or sporty feel inside the car. They’re particularly popular among owners restoring classic MK4 Golfs or building show cars.
Advantages
- Personalized driving experience
- Increased resale value if done tastefully
- Comfort improvements through better materials
Limitations
- Quality varies widely across brands
- Time-consuming to install fully
- Potentially high cost for premium materials
Best for: Show car builders, restoration projects, and drivers seeking luxury upgrades
| Kits | Main Purpose | Popular Components | Key Benefits | Recommended For |
|---|---|---|---|---|
| Body Kit | Visual enhancement & aerodynamics | Front/rear bumpers, side skirts, hood | Improved styling, reduced drag | Custom looks, track preparation |
| Suspension Kit | Handling improvement | Coilovers, lowering springs, shocks | Sharper handling, lower stance | Performance driving, drifting |
| Performance Kit | Power increase | Exhaust, intake, intercooler, ECU tune | More horsepower, better throttle | Turbo builds, racing applications |
| Lighting Kit | Visibility & style upgrade | Headlights, DRLs, fog lights, LEDs | Improved safety, modern look | Night driving, show cars |
| Interior Kit | Cabin personalization | Seats, steering wheel, trim pieces | Luxury feel, driver comfort | Restoration, daily comfort |
Expert Tip: When selecting a VW MK4 kit, always verify compatibility with your specific model year and engine configuration. Mixing components from different generations can lead to fitment issues and suboptimal performance.
Specifications and Maintenance of VW MK4 Repair Kits
Key Specifications to Consider
When selecting a VW MK4 repair or performance kit, understanding the detailed specifications is crucial for ensuring compatibility, longevity, and optimal vehicle performance. Here's an expanded overview of what to look for:
Brand Variability
VW MK4 kits are available from multiple manufacturers, each offering different quality levels, warranty terms, and engineering standards. Common brands include:
- 1A Auto: Known for high-quality aftermarket components with OE-level fitment.
- Dorman: Offers durable replacement parts designed to meet or exceed OEM standards.
- Volkswagen OEM: Factory-original kits that guarantee perfect compatibility but at a premium price.
Choosing the right brand depends on your budget, driving conditions, and whether you're prioritizing cost-effectiveness or factory-level reliability.
Model Specificity
Each repair kit is tailored to specific functions and vehicle configurations. For example:
- Ignition Coil Kit: Designed to replace worn ignition components, often including coils, connectors, and mounting hardware.
- Suspension Repair Kit: May contain bushings, control arm mounts, sway bar links, and other suspension-related parts.
- Engine Timing Kit: Includes timing belt, tensioners, water pump, and related gaskets for complete engine synchronization maintenance.
Always verify that the model number matches your vehicle’s VIN, year, and engine type to ensure proper installation and function.
Component Condition
Kits may come in various conditions, each with its own advantages:
- New: Factory-fresh parts with full warranties; ideal for critical systems like brakes or engine internals.
- Used: Previously installed parts that can be cost-effective if sourced from reputable suppliers.
- Refurbished: Reconditioned by the manufacturer to perform like new; often tested and warranted.
For safety-critical components, it's generally recommended to stick with new or certified refurbished parts.
Material Composition
The materials used in each kit are selected based on their mechanical properties and environmental resistance. Examples include:
- Steel Components: Used in structural and load-bearing parts such as control arms and brackets due to their strength and durability.
- Rubber Bushings: Found in suspension kits to absorb vibrations and isolate noise from the chassis.
- Plastic Housings: Often used in electrical components like sensors and wiring harnesses for insulation and lightweight design.
- Polyurethane: Sometimes included in bushing kits for improved handling response and longer wear life compared to rubber.
Understanding material choices helps you assess how well the kit will perform under your driving conditions.
| Specification | Criticality | Selection Tips |
|---|---|---|
| OE Compatibility | High | Look for part numbers that match or cross-reference Volkswagen OEM specifications for guaranteed fitment. |
| Included Hardware | Medium | Some kits include all necessary bolts, washers, and gaskets—others require separate purchases. |
| Warranty Coverage | Medium | Longer warranties (1-2 years) often indicate higher-quality construction and confidence in product lifespan. |
| Kit Completeness | High | Full kits typically offer better value than buying individual parts separately; check contents before purchasing. |
Essential Maintenance Practices
Proper care and regular maintenance of your VW MK4 repair kits not only extends component life but also ensures consistent performance and safety:
- Oil change: Every 5,000–10,000 km depending on oil type
- Spark plug replacement: Every 30,000–60,000 km
- Timing belt replacement: Typically every 100,000–160,000 km
Important: When replacing one major component (e.g., timing belt), consider replacing associated parts (tensioner, water pump) at the same time. This prevents uneven wear and avoids future labor costs.
How to Choose a VW MK4 Kit
Selecting the right VW MK4 kit for your vehicle is crucial to ensure proper performance, longevity, and value for money. The Volkswagen Golf MK4 is a popular model among enthusiasts and daily drivers alike, so choosing the correct kit can make a significant difference in both functionality and driving experience.
Determine the Purpose of the Kit
Before purchasing any VW MK4 kit, it's essential to determine the primary purpose you're looking to address. This will help guide your decision-making process and ensure that you invest in components that deliver real benefits.
- Maintenance: Kits focused on replacement parts like bushings, belts, or suspension components are ideal for regular upkeep and extending the life of your vehicle.
- Performance Enhancement: Look for kits that include upgraded sway bars, coilovers, or high-flow air filters if you're aiming to improve acceleration, handling, or braking.
- Aesthetic Improvements: Some kits focus on visual upgrades such as body kits, lighting systems, or interior enhancements to give your MK4 a personalized look.
Tip: Always prioritize functional needs before aesthetic ones unless you’re restoring the car for show purposes.
Set a Realistic Budget
VW MK4 kits vary widely in price depending on their content, quality, and brand. Setting a clear budget helps narrow down options while ensuring you get the best possible value without overspending.
- Entry-level kits may cost between $100–$300 and typically cover basic maintenance parts.
- Mid-range kits ($300–$700) often include performance-enhancing components and some aesthetic parts.
- Premium kits exceeding $700 usually feature OEM-grade parts, full suspension overhauls, or complete cosmetic transformations.
Value tip: Consider long-term savings—higher upfront costs may mean fewer replacements and better reliability over time.
OEM vs. Aftermarket Parts
One of the most important decisions when selecting a VW MK4 kit is whether to choose Original Equipment Manufacturer (OEM) parts or go with aftermarket alternatives. Each has its own advantages and trade-offs.
- OEM Parts: These are made by Volkswagen or licensed manufacturers and offer perfect fitment, reliable performance, and compatibility with your MK4’s systems.
- Aftermarket Parts: Often more affordable, but quality can vary significantly. Look for reputable brands with good customer reviews and warranties.
- Hybrid Kits: Many kits combine OEM and aftermarket parts to balance cost and quality effectively.
Recommendation: For critical safety or drivetrain components, opt for OEM where possible.
Ensure Compatibility with Your MK4 Model
The Volkswagen Golf MK4 was produced over several years and had various configurations depending on market and trim level. Ensuring compatibility is vital to avoid installation issues or improper function.
- Check your VIN or vehicle identification number to confirm exact specifications.
- Verify that the kit includes all necessary hardware and brackets for your specific year, engine type, and drivetrain (FWD or 4Motion).
- Some kits may require modifications for certain models or trims.
Important: Always double-check product descriptions or contact the seller for confirmation if unsure.
Brand Reputation and Customer Reviews
Researching the manufacturer or brand behind the VW MK4 kit can prevent headaches later. Positive reviews and a strong reputation are indicators of quality and reliability.
- Look for brands with a history of producing reliable VW parts, such as ECS Tuning, Neuspeed, or APR Performance.
- Read user reviews to understand common issues, ease of installation, and overall satisfaction.
- Consider forums like VWvortex or Reddit for community insights on specific kits and brands.
Red flag: Avoid kits with numerous complaints about missing parts or poor build quality.
Warranty and Customer Support
A good warranty can save you money and hassle in case something goes wrong with your kit. It also reflects the manufacturer's confidence in their product.
- Look for kits offering at least a 1-year limited warranty.
- Reputable brands often provide dedicated support lines or online resources for installation assistance.
- Some companies offer return policies or replacement programs for defective items.
Pro tip: Save receipts and registration details—these are often needed for warranty claims.
Component Availability and Lead Times
Even the best VW MK4 kit won’t be helpful if parts are difficult to source or take too long to arrive. Check availability before making a purchase, especially if you're working on a timeline.
- Preferred vendors should have parts in stock or offer fast shipping options.
- If a part breaks during use, check how quickly replacements can be obtained.
- Some rare or specialty kits may need to be ordered from overseas, which can delay installation.
Planning tip: Order your kit well in advance of scheduled maintenance or upgrade projects.
Installation Difficulty and Required Tools
Understanding the complexity of installation helps you decide whether you can do the work yourself or need to hire a professional mechanic.
- Basic maintenance kits (e.g., brake pad sets, bushings) are often DIY-friendly with standard tools.
- Performance or suspension kits may require specialized tools, lifts, or alignment equipment.
- Review included instructions or look for video tutorials from other owners who installed the same kit.
DIY note: If unsure about your skill level, consult a local VW specialist or online community for advice.
Expert Tip: When upgrading multiple areas of your VW MK4, consider phased installations rather than tackling everything at once. This allows you to monitor how each modification affects performance and handling, and gives you time to adjust your approach accordingly.
| Kits Type | Common Components | Difficulty Level | Estimated Cost Range |
|---|---|---|---|
| Maintenance Kit | Bushings, brake pads, fluids, filters | Easy | $100 - $300 |
| Suspension Upgrade Kit | Coilovers, sway bars, bushings, shocks | Moderate to Difficult | $400 - $900 |
| Performance Kit | Exhaust system, intake, ECU tuning module | Moderate | $500 - $1,200 |
| Body/Aesthetic Kit | Bumper lips, side skirts, spoilers, lights | Easy to Moderate | $300 - $1,500 |
DIY Replacement Guide for VW MK4 Instrument Cluster
Replacing the instrument cluster in your Volkswagen MK4 is a rewarding DIY project that can significantly enhance your vehicle's functionality and aesthetics. Whether you're upgrading to a digital cluster, adding customization features, or replacing a faulty unit, this comprehensive guide will walk you through each step of the process while ensuring safety and efficiency.
Safety Warning: Always disconnect the battery before working with electrical components to avoid short circuits or damage to sensitive electronics. Work carefully around plastic trim to prevent cracking or breaking.
Essential Tools and Preparation
Proper preparation is key to a successful installation. Before beginning the replacement, gather all necessary tools and materials. This includes specialized tools like Torx screwdrivers, which are commonly used in VW models, as well as general automotive hand tools.
| Tool/Item | Purpose | Notes |
|---|---|---|
| Torx Screwdriver (T20 or T25) | To remove cluster mounting screws | Some clusters may require different Torx sizes |
| Plastic Trim Removal Tools | For safely removing dashboard panels | Avoid using metal tools to prevent scratches |
| Multimeter or Test Light | To verify power disconnection | Optional but recommended |
| Electrical Contact Cleaner | Clean connectors if needed | Helps ensure reliable connections |
Detailed Installation Steps
- Preparation and Safety Measures
- Ensure the vehicle is turned off and the keys are removed from the ignition
- Disconnect the negative terminal of the battery to prevent any electrical shorts
- Allow the vehicle to sit for at least 10 minutes to discharge residual power
- Gather all tools and lay them out in an organized manner for easy access
- Take photos during disassembly to aid reassembly later
- Trim Removal Process
- Begin by gently prying away the center vent trim using plastic tools
- Remove the instrument cluster bezel by carefully popping out the retaining clips
- Work slowly around the edges to avoid breaking any tabs or fasteners
- Set aside all trim pieces and hardware in a safe location
- Old Cluster Removal
- Locate the Torx screws securing the instrument cluster (usually 2-4 depending on model)
- Use the correct size Torx driver to remove these screws
- Gently pull the cluster forward while supporting its weight
- Be cautious of additional harnesses or brackets that may be connected
- Electrical Disconnection
- Identify and label all wiring harnesses connected to the back of the old cluster
- Press release tabs and carefully disconnect each connector
- Note any orientation markings on connectors for proper reinstallation
- Inspect connectors for corrosion or damage before proceeding
- New Cluster Installation
- Align the new instrument cluster with the dashboard opening
- Connect all labeled harnesses securely, ensuring they click into place
- Double-check all connections before securing the cluster
- Insert and tighten the Torx screws to manufacturer specifications
- Final Assembly and Testing
- Reconnect the negative battery cable securely
- Turn the ignition key to position II and observe initial cluster startup sequence
- Start the engine and verify all gauges respond appropriately
- Check warning lights, turn signals, and illumination functions
- Reinstall all trim pieces in reverse order of removal
Professional Tip: If installing a programmable or customizable cluster, perform any software configuration before final assembly. Some digital clusters may require coding via OBD-II port after installation. Always consult the specific instructions provided with your new cluster kit.
Troubleshooting Common Issues
If you encounter problems after installation, refer to this quick checklist:
- No power to cluster – Verify battery connection and check fuses
- Inoperative gauges – Ensure all connectors are fully seated
- Error messages – May indicate incompatible cluster version
- Illumination issues – Check dimmer switch settings and bulb connections
- Communication errors – Consider professional diagnosis for CAN bus systems
Volkswagen MK4 Kit FAQ Guide
To ensure proper compatibility with your Volkswagen MK4, always start by checking the product specifications provided by the manufacturer or seller. Look for specific model-year ranges (e.g., 1999–2005 Jetta, Golf, Beetle) and trim levels that the kit is designed to fit. If the listing includes detailed fitment notes or vehicle-specific diagrams, review those carefully.
If there's any ambiguity in the description, it’s best to contact the supplier directly or consult with a qualified mechanic who has experience with VW models. In some cases, kits may be marketed as universal but might require minor modifications like trimming, drilling, or custom mounting brackets to install properly on your specific chassis.
VW MK4 body kits and performance components are typically made from one of three primary materials:
- ABS Plastic: Known for its durability and resistance to impact and temperature changes. It's relatively lightweight and easy to paint, making it ideal for bumpers and side skirts. Cost-effective option without sacrificing too much strength.
- Fiberglass: Offers greater flexibility in shaping and design, allowing for more aggressive or customized looks. However, it can be heavier than other materials and requires careful handling during installation. Fiberglass parts often need additional sanding and priming before painting.
- Carbon Fiber: The premium choice, known for being extremely lightweight and very strong. Carbon fiber adds a high-performance aesthetic and is resistant to warping over time. It's commonly found in hood vents, mirror covers, and spoiler accents. Due to manufacturing complexity, this material comes at a significantly higher price point.
Each material has its pros and cons, so choose based on your budget, desired look, and whether you plan to modify or race your vehicle.
The answer depends on the complexity of the kit and your mechanical skill level. Many entry-level cosmetic kits—like front bumper lips, side skirts, or rear valances—are designed for DIY installation and come with detailed instructions and necessary hardware.
If you're comfortable using basic tools and have prior experience working on cars, especially Volkswagens, you should be able to handle these types of installations. However, more advanced kits involving wiring (e.g., lighting upgrades), aerodynamic components requiring alignment, or full wide-body conversions are best handled by a professional shop. Improper installation can lead to misalignment, poor fitment, or even safety issues, particularly with structural or functional components.
Tip: Always test-fit parts before permanently attaching them. This helps identify any potential clearance or mounting issues early in the process.
Most VW MK4 kit installations can be completed with standard hand tools. Here’s a typical list you’ll want to have ready:
- Screwdrivers (flathead and Phillips)
- Socket wrench set (metric sizes common on VWs)
- Pliers and adjustable wrenches
- Rubber mallet or dead-blow hammer
- Trim removal tools (especially useful for interior panels)
- Drill and bits (for optional mounting holes)
- Paint supplies (if unpainted parts are included)
- Measuring tape or straight edge
Some kits may also include specialty fasteners or require epoxy/adhesives for bonding certain components. Always check the instruction manual included with your kit for a complete list of recommended tools and materials before beginning installation.
Installation time varies depending on the scope and complexity of the kit. For example:
- Simple kits (e.g., front bumper lip, side skirt extensions): 1–3 hours
- Moderate kits (e.g., complete front bumper replacement, rear diffuser): 3–6 hours
- Full body kits (bumpers + sideskirts + fenders + spoilers): 1–2 days
- Functional kits (e.g., intake systems, exhaust setups): 2–8 hours depending on integration needs
Your personal experience level and access to a well-equipped workspace will also affect the timeline. First-time installers may want to allocate extra time to avoid rushing through critical steps. Remember, proper fitment and finish are worth the effort!