Introduction to Vinyl Siding J Channel Installation
Vinyl siding is one of the most popular exterior cladding options for homes due to its durability, low maintenance, and aesthetic appeal. One essential component of a successful vinyl siding installation is the J Channel. Understanding how to properly install vinyl siding J Channel is crucial for achieving a professional finish while ensuring your siding remains secure and intact through various weather conditions.
Types of Vinyl Siding J Channel
There are several types of vinyl siding J Channel available in the market, each tailored for different applications and aesthetic preferences. Depending on your project's requirements, choosing the right type of J Channel is important for optimal installation and functionality.
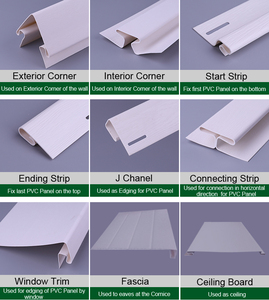
- Standard J Channel: This is the most common type, designed to provide a clean edge where siding meets windows, doors, and other vertical surfaces.
- Corner J Channel: Ideal for exterior corners, this type allows seamless transitions by covering the ends of vinyl siding and ensuring a polished look.
- Trim J Channel: Used for finishing around the roofline or other unique architectural features, trim J Channel offers a decorative touch while serving a functional purpose.
- Undersill J Channel: This specific type is designed for horizontal vinyl siding installations, enabling the siding to securely interlock while adding an extra dimension to upper sections.
Features and Function of Vinyl Siding J Channel Installation
The features of vinyl siding J Channel are integral to its function, providing both structural support and aesthetic enhancement. A properly installed J Channel significantly improves the durability and appearance of your vinyl siding system.
- Water Resistance: J Channels are designed to direct water away from areas where the siding could be penetrated, protecting the exterior of the home from potential leaks.
- Enhanced Durability: By providing a firm anchor point for vinyl siding panels, J Channels prevent warping, sagging, and damage caused by temperature fluctuations.
- Seamless Appearance: With J Channel, homeowners can achieve a clean and finished look around windows and doors, contributing to the overall curb appeal of the property.
- Flexibility: Vinyl siding J Channels can accommodate minor shifts in the structure without causing damage, allowing for longer-lasting installations.
How to Properly Install Vinyl Siding J Channel
Installing vinyl siding J Channel requires careful planning and execution to ensure optimal performance and longevity. Here’s a simple guide to get you started with your vinyl siding J Channel installation.
- Preparation: Begin by measuring the areas where the J Channel will be installed. Ensure the surfaces are clean, dry, and flat.
- Cut J Channel Parts: Using a fine-toothed saw, cut the J Channel pieces to appropriate lengths, allowing for expansion and contraction—typically about 1/4 inch for each end.
- Positioning: Place the J Channel against the walls or around windows and doors, securing with siding nails in pre-drilled holes to avoid cracking.
- Sealant Application: Apply caulking or sealant to the edges before positioning the siding for an added layer of water resistance.
- Final Checking: After installation, review the J Channel placement to ensure everything fits snugly and check for any gaps that may need addressing.
By following this guide and understanding the importance of vinyl siding J Channel installation, you can enhance the functionality and appearance of your home’s exterior. Proper installation not only protects against moisture and weathering but also elevates the aesthetic quality of your property.