


Types of Toyota Camry Bodykit
The Toyota Camry bodykit is a collection of exterior components designed to enhance both appearance and aerodynamics. From factory options to aftermarket solutions, these kits transform your vehicle's styling while potentially improving performance. Let's explore the popular options:
Toyota Camry TRD Body Kit
Developed by Toyota Racing Development (TRD), this factory-engineered kit features aggressive styling with functional aerodynamic benefits:
- Front splitter for improved downforce
- Side skirts to channel airflow
- Rear diffuser and spoiler for enhanced stability
- Bold lines and distinctive TRD badging
- Performance-tuned suspension components
Perfect for: Performance enthusiasts wanting factory-backed quality and warranty coverage
Toyota Camry V6 XSE Body Kit
This premium factory option pairs perfectly with the powerful V6 engine:
- Sportier front bumper with enlarged air intakes
- Sculpted side skirts with chrome accents
- Redesigned rear bumper with dual exhaust outlets
- Distinctive black mesh grille
- Chrome exhaust tips and XSE badging
Perfect for: Luxury-minded drivers seeking a balance of elegance and sportiness
Toyota Camry Hybrid XLE Body Kit
Specifically designed for the eco-conscious Hybrid XLE model:
- Refined front bumper with chrome accent strip
- Subtle side skirts with integrated lighting
- Aerodynamic rear lip spoiler
- Premium LED daytime running lights
- 18-inch alloy wheels with unique finishing
Perfect for: Hybrid owners wanting to enhance eco-friendly styling without sacrificing luxury
Toyota Camry SE Sport Package
A popular factory upgrade for the SE trim that adds sporty visual elements:
- Aggressive front fascia with larger air dam
- Sport-tuned suspension for improved handling
- Rear trunk spoiler for a racing-inspired look
- Unique 18-inch alloy wheels with dark finish
- Sport-fabric interior elements and leather-wrapped steering wheel
Perfect for: Drivers wanting factory sport styling with warranty protection
Toyota Camry Nightshade Edition
A sleek, blacked-out appearance package with distinctive styling:
- Black front and rear bumper accents
- Black mirror caps and door handles
- Black window trim and badges
- Black 18-inch wheels
- Sport mesh grille with dark chrome surround
Perfect for: Style-conscious owners wanting a modern, aggressive aesthetic
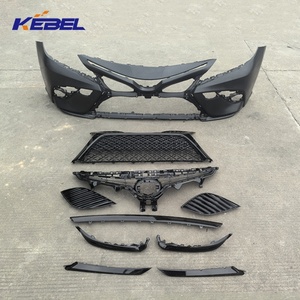
Toyota Camry Custom Aftermarket Kits
Third-party options offering unlimited customization possibilities:
- Wide-body conversion kits for dramatic visual impact
- Ground effects packages for lowered appearance
- Carbon fiber components for weight reduction
- Custom hood designs with functional venting
- Personalized graphics and vinyl wraps
Perfect for: Car enthusiasts seeking unique, personalized styling beyond factory options
| Bodykit Type | Key Features | Best For | Typical Price Range |
|---|---|---|---|
| TRD Body Kit | Factory performance parts, aggressive styling | Performance enthusiasts | $2,500-$4,000 |
| V6 XSE Body Kit | Luxury styling, chrome accents | Luxury-minded drivers | $1,800-$3,200 |
| Hybrid XLE Body Kit | Eco-friendly styling, refined aesthetics | Hybrid owners | $1,500-$2,800 |
| SE Sport Package | Sport styling, improved handling | Active drivers | $1,200-$2,500 |
| Nightshade Edition | Blacked-out appearance | Style-conscious owners | $1,300-$2,700 |
| Custom Aftermarket | Unlimited customization options | Car enthusiasts | $800-$5,000+ |
Expert Tip: Factory bodykits like TRD and XSE packages typically maintain better resale value and come with warranty protection. Aftermarket kits offer more customization options but may affect insurance coverage and warranty status.
Specifications and Maintenance of Toyota Camry Bodykit
Proper maintenance is essential for preserving both the appearance and functionality of your Toyota Camry bodykit. Following these guidelines will extend the life of your components and maintain your vehicle's enhanced appearance.
Regular Cleaning
Use mild soap, water, and a soft microfiber cloth to clean bodykit components. Avoid abrasive materials that could scratch surfaces and high-pressure washers that might loosen parts or damage finishes.
Recommended frequency: Weekly or after driving in adverse conditions
Inspection
Routinely check all bodykit components for signs of damage, loose parts, or mounting issues. Early detection prevents small issues from becoming larger problems requiring expensive repairs.
Recommended frequency: Monthly and after any impact
Waxing and Polishing
Apply quality automotive wax to painted surfaces and specialized plastic protectants for non-painted components. This creates a protective barrier against environmental damage while enhancing appearance.
Recommended frequency: Every 3 months
Tightening Fasteners
Regularly inspect and tighten the screws, clips, and bolts securing bodykit components. Vehicle vibration can gradually loosen these fasteners over time.
Recommended frequency: Every 3 months
Avoiding Rough Roads
Minimize driving on unpaved roads, over large speed bumps, or through areas with road debris. Low-clearance bodykit components are particularly vulnerable to damage from road hazards.
Impact Protection
Exercise caution when parking near curbs or obstacles. Consider using parking sensors or cameras to prevent accidental contact with bodykit components.
UV Protection
Apply UV-resistant protectants to plastic components to prevent fading and deterioration from sun exposure. When possible, park in shaded areas or use a car cover for extended periods of inactivity.
Recommended frequency: Every 2 months
Manufacturer Guidelines
Always follow the specific maintenance recommendations provided by the bodykit manufacturer. These guidelines typically include approved cleaning products and maintenance schedules.
| Maintenance Task | Frequency | Tools/Products Needed | Difficulty Level |
|---|---|---|---|
| Basic cleaning | Weekly | Mild soap, microfiber cloth, water | Easy |
| Waxing painted components | Every 3 months | Automotive wax, applicator, microfiber cloth | Medium |
| Plastic treatment | Every 2 months | UV protectant, applicator pad | Easy |
| Fastener inspection | Every 3 months | Socket set, screwdriver set | Medium |
| Damage inspection | Monthly | Flashlight | Easy |
| Touch-up paint application | As needed | Matching touch-up paint, fine brush | Medium |
Pro Tip: Create a maintenance calendar for your bodykit components to ensure proper care intervals are maintained. Regular maintenance not only preserves appearance but also protects your investment by extending component lifespan.
How to Choose Toyota Camry Bodykit
Selecting the perfect bodykit for your Toyota Camry requires careful consideration of multiple factors. This comprehensive guide will help you make an informed decision that balances aesthetics, functionality, and value.
Compatibility
Ensure the bodykit is specifically designed for your Camry's model year and trim level. Even slight variations between model years can affect fitment.
- Verify exact model year compatibility
- Check if modifications are required for installation
- Consider OEM vs. aftermarket compatibility differences
Material Quality
The material significantly impacts durability, appearance, and installation complexity.
- Polyurethane: Flexible, durable, premium option
- ABS Plastic: Rigid, affordable, easy to paint
- Fiberglass: Lightweight, customizable, requires skilled installation
- Carbon Fiber: Ultra-lightweight, premium appearance, highest cost
Style & Design
Choose a design that complements your personal taste and the Camry's existing lines.
- Aggressive racing-inspired styling (TRD)
- Elegant luxury appearance (XSE/XLE)
- Subtle enhancement of factory lines
- Complete visual transformation
Functionality
Consider whether you want purely aesthetic improvements or performance benefits.
- Aerodynamic improvements for stability
- Ground clearance implications
- Weight considerations (lighter or heavier)
- Impact on cooling system efficiency
Warranty Coverage
Manufacturer warranties can provide valuable protection against defects.
- Factory kits typically maintain vehicle warranty
- Aftermarket warranties vary significantly
- Check warranty transfer policies
- Verify coverage for material vs. installation issues
Brand Reputation
Research manufacturers before purchasing to ensure quality and reliability.
- Read customer reviews and testimonials
- Check online forums for real-world experiences
- Verify manufacturer history and support
- Look for companies specializing in Toyota products
Price Considerations
Balance your budget with quality expectations and desired features.
- Factory kits typically cost $1,500-$4,000
- Aftermarket kits range from $800-$5,000+
- Remember to budget for professional installation
- Consider potential paint matching costs
Installation Complexity
Evaluate your DIY skills against the installation requirements.
- Some kits require professional installation
- Factor installation costs into your budget
- Check if specialized tools are required
- Verify if permanent modifications are needed
Shopping Tip: Request detailed photos of the bodykit installed on the same model and color as your Camry before purchasing. This gives you a realistic preview of how the kit will look on your specific vehicle.
DIY Installation Guide for Toyota Camry Bodykit
Installing a Toyota Camry bodykit can be a rewarding DIY project that transforms your vehicle's appearance. While some components may require professional installation, many parts can be successfully installed at home with the right tools and patience.
Preparation and Planning
- Select compatible components - Verify that each part matches your specific Camry model year and trim level.
- Gather necessary tools - Common tools include screwdrivers, socket wrench set, drill with bits, automotive-grade double-sided tape, panel removal tools, heat gun, and measuring tape.
- Create a clean, well-lit workspace - Ideally in a garage with enough room to move around the vehicle.
- Read instructions thoroughly - Familiarize yourself with the entire process before starting.
- Test-fit all components - Dry-fit each part before final installation to identify any fitment issues.
Step-by-Step Installation Process
- Remove existing components - Carefully remove factory parts that will be replaced. Store these parts safely in case you need them in the future.
- Clean the mounting surfaces - Thoroughly clean all areas where new components will be installed, removing dirt, wax, and any adhesive residue.
- Prepare new components - If components aren't pre-painted, consider having them professionally painted to match your vehicle.
- Test alignment - Double-check alignment with the vehicle's body lines before securing components.
- Secure components - Depending on the design, use the appropriate mounting method (screws, clips, adhesive).
- Verify proper fit - Check for gaps or misalignments and make adjustments as needed.
- Allow adhesives to cure - If using adhesives, follow manufacturer recommendations for curing time.
- Test functionality - Ensure moving parts like the hood and trunk operate properly with new components installed.
- Final cleaning - Clean the newly installed components and remove any protective film.
- Road test - Take a test drive to verify no parts vibrate or create wind noise at highway speeds.
Installation Tip: Take photos throughout the removal process to document the original configuration. These reference photos can be invaluable when installing new components, especially for complex areas with multiple attachment points.
Common Installation Challenges and Solutions
| Challenge | Potential Cause | Solution |
|---|---|---|
| Panel gaps | Improper alignment or incompatible parts | Loosen mounting points and readjust; add spacers if needed |
| Adhesive failure | Inadequate surface preparation | Clean surface thoroughly with isopropyl alcohol; use primer if recommended |
| Paint damage | Improper handling during installation | Use microfiber towels as buffers; work with a partner when handling large pieces |
| Mounting hole misalignment | Manufacturing variances | Carefully enlarge holes if necessary; use adjustable mounting hardware |
| Component vibration | Insufficient mounting points | Add additional fasteners or reinforcement where needed |
Frequently Asked Questions
Yes, the Toyota Camry has several factory-offered body kit options as well as numerous aftermarket alternatives. Factory options include the TRD package, V6 XSE styling, Nightshade Edition, and SE Sport Package. Each factory option features unique exterior components designed specifically for the Camry. Additionally, many third-party manufacturers produce custom body kits in various styles ranging from subtle enhancements to dramatic visual transformations.
A body kit serves multiple purposes:
- Aesthetic enhancement - Transforms the vehicle's appearance with sportier or more premium styling
- Aerodynamic improvement - Properly designed components can reduce drag and improve stability at higher speeds
- Personalization - Allows owners to customize their vehicle's appearance to reflect personal taste
- Differentiation - Makes the vehicle stand out from standard factory models
- Performance benefits - Some components like functional splitters and diffusers can improve downforce and handling
Body kits generally fall into three main categories:
- OEM (Original Equipment Manufacturer) Body Kits - Factory-designed and approved packages like the Toyota TRD or XSE styling packages. These offer perfect fitment, warranty coverage, and typically maintain resale value.
- Standard Aftermarket Body Kits - Mass-produced by third-party manufacturers to fit specific vehicle models. These offer more aggressive styling options than factory kits at various price points and quality levels.
- Custom Body Kits - One-off or limited production designs created for unique styling. These can range from minor modifications to complete visual transformations and are typically the most expensive option.
Within these categories, body kits can feature different styling approaches like JDM (Japanese Domestic Market), European, Wide-Body, or Motorsport-inspired designs.
The impact on warranty depends on several factors:
- Factory options (like TRD kits) won't affect warranty coverage when properly installed
- Aftermarket body kits may affect warranty coverage if they cause damage or require modification to the vehicle's structure
- Under the Magnuson-Moss Warranty Act, manufacturers must prove that aftermarket parts caused a specific problem to deny warranty coverage
- Installation method matters - professional installation reduces the risk of warranty complications
- Always consult with your dealer before making significant modifications if warranty coverage is important to you
Installation costs vary based on several factors:
- Professional installation: $500-$2,000 depending on kit complexity
- Paint matching: $300-$1,000 for unpainted components
- DIY installation: $0 (plus tools if needed)
- Additional modifications: May be required for proper fitment
For a complete professional installation including painting of aftermarket components, expect to budget $800-$3,000 in addition to the cost of the body kit itself.