


Types of Spoiler for Golf 5
A spoiler for Golf 5 plays a crucial role in enhancing both the aesthetics and performance of the vehicle. These aerodynamic components are designed to manipulate airflow around the car, improving stability, handling, and visual appeal. There are several types of spoilers tailored to different functions and installation locations on the Volkswagen Golf 5.
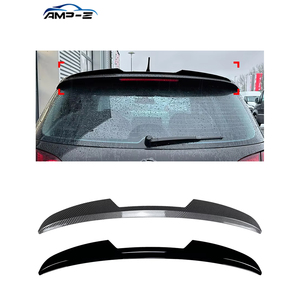
Roof Spoiler
Rooftop-mounted spoilers for the Golf 5 are typically installed at the rear edge of the hatch or liftgate. While they contribute significantly to the car's sporty appearance, their primary function is aerodynamic optimization.
Advantages
- Improves high-speed stability
- Reduces air turbulence over the roof
- Enhances visual profile of the vehicle
- Popular among enthusiasts for aesthetic upgrades
Limitations
- Limited downforce generation compared to rear wing
- Potential for wind noise at highway speeds
- May require drilling for installation
Best for: Daily drivers seeking improved aerodynamics and style without aggressive modifications
Boot Spoiler
Mounted at the top of the boot lid or integrated into the rear windshield area, boot spoilers offer a balanced combination of form and function for the Golf 5.
Advantages
- Effective at reducing rear-end lift
- Minimal impact on trunk space
- Subtle enhancement to rear styling
- Ease of installation with many OEM-style options
Limitations
- Less effective at extreme speeds
- May collect dirt and debris
- Limited customization potential
Best for: Drivers wanting moderate performance benefits with clean aesthetics
Wing Spoiler
The most performance-oriented option, wing spoilers protrude from the rear of the vehicle and create significant downforce through aerodynamic principles.
Advantages
- Maximum downforce generation
- Improved cornering stability
- Distinctive motorsport-inspired look
- Customizable for track-specific setups
Limitations
- Increased drag reduces top speed efficiency
- Can obstruct rear visibility
- Larger size may not suit all driving styles
Best for: Track enthusiasts and drivers prioritizing high-speed performance
Canard Spoiler
Also known as dive planes, these small front-mounted spoilers attach to the front bumper and work to improve front-end grip and stability during dynamic driving.
Advantages
- Improves front downforce and turn-in response
- Reduces front-end lift during braking
- Complements rear spoiler systems effectively
- Compact design maintains streetability
Limitations
- Most effective at higher speeds
- Potential for stone chips and damage
- Requires precise mounting angles
Best for: Performance-oriented drivers looking for balanced aerodynamic upgrades
Lip Spoiler
These compact spoilers attach to either the front bumper (front lip) or rear trunk (rear lip) and provide subtle yet effective aerodynamic improvements while maintaining a clean profile.
Advantages
- Cost-effective upgrade option
- Easy DIY installation available
- Improves airflow management at entry points
- Available in numerous color and material options
Limitations
- Minimal performance gains compared to full systems
- Vulnerable to parking-related damage
- Quality varies widely between manufacturers
Best for: Budget-conscious owners seeking mild visual and functional enhancements
| Type | Primary Function | Performance Benefit | Aesthetic Impact | Ideal Use Case |
|---|---|---|---|---|
| Roof Spoiler | Reduce rooftop turbulence | Moderate | High | Street driving, casual styling |
| Boot Spoiler | Minimize rear lift | Moderate | Moderate | Daily commuting with occasional spirited drives |
| Wing Spoiler | Generate maximum downforce | High | Very High | Track days, performance driving |
| Canard Spoiler | Improve front-end grip | Good | Moderate | Cornering-focused driving |
| Lip Spoiler | Manage airflow at edges | Low to Moderate | Moderate | Visual customization on budget |
Expert Tip: For optimal aerodynamic performance, consider combining complementary spoiler types like a front canard with a rear wing. This creates a balanced system that improves overall vehicle dynamics without compromising visual harmony.
Specifications and Maintenance of Spoiler for Volkswagen Golf 5
Key Specifications to Consider
When selecting or upgrading a spoiler for your Volkswagen Golf 5, understanding the specific design and material characteristics is essential to ensure optimal performance, durability, and aesthetic appeal. Below are the core specifications that influence both function and appearance:
Size & Dimensions
The size of the Golf 5 rear spoiler varies depending on the type of vehicle trim and intended use. Standard sizes typically range from 40 to 60 inches in length, with widths between 5-10 inches and heights ranging from 2-6 inches.
Larger spoilers can enhance aerodynamic downforce at higher speeds, while smaller designs often focus more on visual appeal rather than performance gains.
Material Composition
Golf 5 spoilers are manufactured using a variety of materials, each offering distinct advantages:
- Plastic (ABS or Polypropylene): Common due to its affordability, lightweight nature, and ease of installation.
- Fiberglass: Offers improved durability and resistance to weathering while maintaining a relatively light weight.
- Carbon Fiber: The premium option known for being extremely lightweight yet highly durable, though significantly more expensive.
Color Options
Spoilers come in standard colors like black, white, and gray, but many owners choose to paint them to match their vehicle's body color for a cohesive look.
Painted spoilers provide a factory-finished appearance, while matte or gloss finishes can further enhance visual impact depending on personal preference and styling goals.
Design Variants
Two primary types of spoilers are available for the Golf 5:
- Rear Roof Spoiler: Mounted on the roof edge, these improve high-speed stability by managing airflow over the rear window.
- Boot Lid Spoiler: Attached directly to the trunk lid, these primarily serve cosmetic purposes while slightly enhancing aerodynamics.
| Specification | Performance Impact | Selection Guidance |
|---|---|---|
| Aerodynamic Profile | High | Select based on driving habits—higher profiles benefit highway driving, while low-profile spoilers suit city use. |
| Mounting Type | Medium | Roof spoilers often require drilling, while boot lid versions may be adhesive or bolt-on for easier installation. |
| UV Resistance | Medium | Look for UV-treated materials if you live in sunny regions to prevent fading and cracking. |
| Weight | Low | Carbon fiber and fiberglass reduce overall weight compared to plastic, which may matter for performance builds. |
Maintenance Best Practices
Proper care ensures your Golf 5 spoiler remains functional and visually appealing for years. Here’s how to maintain it effectively:
Important: Never use abrasive cleaning tools or solvents like acetone on painted or composite spoilers. These can strip protective coatings and cause irreversible damage.
How to Choose Spoiler For Golf 5
Selecting the perfect spoiler for your VW Golf 5 involves more than just aesthetics — it's about enhancing performance, ensuring compatibility, and personalizing your vehicle's appearance. A well-chosen spoiler can improve aerodynamics, add a sporty flair, and even increase resale value when properly selected.
Compatibility & Fitment
The most crucial factor is ensuring the spoiler is specifically designed for the Volkswagen Golf 5 model (Mk5), which was produced from 2003 to 2009. Due to variations in trim levels and body styles, not all spoilers will fit perfectly out of the box.
- Verify if the spoiler is compatible with your specific hatchback or sedan variant
- Check mounting points and dimensions against factory specifications
- Look for OEM-style fitments that match original equipment tolerances
Expert Tip: Some aftermarket spoilers may require minor drilling or trimming for installation — always verify fitment details before purchasing.
Style & Design Preferences
Golf 5 owners typically choose between several distinct spoiler styles, each offering different visual impact and functionality:
- Rear Wing Spoilers: Large, raised wings that offer significant downforce
- Lip Spoilers: Subtle additions along the trunk edge for minimalistic styling
- Roof Spoilers: Small additions near the rear windshield
- Factory Style Replicas: Designed to mimic OEM look while offering customization
Design Insight: Consider how the spoiler complements other exterior modifications like wheels, body kits, and lighting upgrades.
Material Selection
The material choice significantly affects durability, weight, and overall performance:
- ABS Plastic: Cost-effective, paintable, and durable under normal conditions
- Fiberglass: Lightweight but requires painting and careful handling
- Polyurethane: Flexible material that resists cracking in cold climates
- Carbon Fiber: Premium option offering lightweight construction and distinctive appearance
Performance Note: Carbon fiber and polyurethane options often provide better aerodynamic efficiency compared to basic ABS plastic models.
Finish Options
Proper finish selection ensures your spoiler integrates seamlessly with your car's overall aesthetic:
- Painted Finish: Matches your car’s body color for a factory look
- Matte Black: Popular choice for aggressive styling
- Carbon Fiber Weave: Exposed dry or wet carbon fiber patterns
- Chrome/Polished: Adds luxury appeal (less common on performance-oriented builds)
Installation Advice: Unpainted spoilers allow custom matching but require professional painting expertise.
Performance Consideration: If you're looking for actual aerodynamic benefits rather than just style, opt for larger wing-style spoilers with proper airfoil shapes. These can reduce lift at highway speeds, improving stability and grip during high-speed cornering.
| Spoiler Type | Aesthetic Impact | Aerodynamic Benefit | Typical Material | Price Range |
|---|---|---|---|---|
| Lip Spoiler | Moderate | Low | ABS Plastic | $50-$150 |
| Trunk Lid Spoiler | High | Moderate | Fiberglass/Polyurethane | $150-$350 |
| Full Rear Wing | Very High | Significant | Carbon Fiber/Polyurethane | $300-$1000+ |
| Roof Spoiler | Low | Negligible | ABS Plastic | $30-$100 |
Legal & Practical Considerations
Before finalizing your purchase, consider these important practical factors:
- Check local regulations regarding spoiler height and protrusion limits
- Ensure proper clearance for hatch/trunk operation
- Consider visibility impact – large spoilers may obstruct rear view
- Confirm warranty coverage and return policies
Legal Tip: In many jurisdictions, spoilers extending more than 4-6 inches beyond the vehicle profile are prohibited.
Installation & Support
Ease of installation varies significantly by design and complexity:
- Factory-style replacements often use existing mounting points
- Aftermarket performance spoilers may require drilling
- Check whether hardware and instructions included
- Consider professional installation costs for complex setups
Installation Pro Tip: Look for spoilers that include detailed step-by-step instructions and all necessary mounting hardware.
Value Recommendation: When shopping online (especially on platforms like Alibaba), prioritize sellers with verified reviews, clear product specifications, and responsive customer service. Don't sacrifice quality for price — a slightly more expensive spoiler that fits well and lasts longer provides better long-term value.
DIY Spoiler Replacement Guide for Volkswagen Golf 5
Replacing the spoiler on your Volkswagen Golf 5 is a rewarding modification that enhances both aesthetics and aerodynamics when done correctly. This comprehensive guide will walk you through each step of the process, ensuring a safe and professional installation while adding value to your vehicle.
Safety Warning: Always wear protective gloves and eyewear when handling tools and drilling into metal surfaces. Ensure the vehicle is parked on a level surface with the engine turned off before beginning work.
Preparation and Materials
Before starting the replacement process, ensure you have all necessary materials and tools ready. Proper preparation prevents delays and ensures a smoother workflow.
- New Spoiler: Choose a high-quality spoiler compatible with your Golf 5 model year (typically 2004–2009).
- Mounting Hardware: Includes screws, bolts, or brackets depending on the spoiler design.
- Double-Sided Tape: High-strength automotive-grade tape for additional support.
- Adhesive Remover: For removing old adhesive residue from the hatchback.
- Clean Cloth & Isopropyl Alcohol: For final cleaning before installation.
- Primer: Rust-inhibiting primer suitable for automotive use.
- Drill & Bits: Variable-speed drill with appropriate bits for metal and plastic.
- Measuring Tools: Ruler, measuring tape, and level to ensure accurate alignment.
- Masking Tape: To protect surrounding paint during drilling.
Pro Tip: Consider test-fitting the spoiler multiple times before marking any drilling points to ensure perfect alignment and symmetry with the vehicle's body lines.
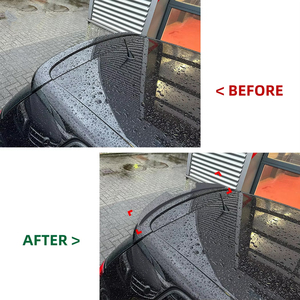
Step-by-Step Installation Process
- Prepare the Vehicle Surface
Begin by thoroughly cleaning the area where the new spoiler will be installed using an adhesive remover and clean cloth. Remove any dirt, wax, or old adhesive residue to create a clean bonding surface. Finish with a wipe-down using isopropyl alcohol to remove oils and contaminants.
- Test Fit and Alignment
Hold the new spoiler against the hatchback without applying pressure. Check for proper fitment and make sure it aligns with existing holes or contours. Adjust positioning as needed and consider using masking tape to temporarily secure it in place while evaluating placement.
- Mark Drilling Points
If your spoiler requires new mounting holes, carefully mark their locations using a permanent marker. Use a level to ensure horizontal alignment and measure distances from reference points like tail light edges to maintain symmetry.
- Drill Holes Safely
Apply masking tape over the marked spots to prevent slipping and reduce paint chipping. Drill slowly using a low-speed setting and appropriate bit size. Clean away metal shavings immediately after drilling and check from inside the trunk to ensure no internal components were damaged.
- Apply Primer
Using a small brush, apply a thin layer of rust-inhibiting primer around each drilled hole. Allow it to dry completely according to the manufacturer’s instructions. This step helps protect the metal from corrosion and improves paint adhesion if touch-up painting is required later.
- Install Mounting Hardware
Attach the provided mounting hardware to the spoiler first, then secure it to the hatchback. Use thread-locking compound on bolts if available to prevent vibration-related loosening. Do not fully tighten until all mounting points are loosely attached to allow for minor alignment adjustments.
- Apply Double-Sided Tape
Cut strips of double-sided tape to match the underside profile of the spoiler. Apply them evenly across the contact surface, avoiding direct placement over drilled holes. Press firmly to ensure good adhesion.
- Secure the Spoiler
Align the spoiler with your previously marked positions and press down firmly along the entire length. Apply consistent pressure for at least 30 seconds to activate the adhesive bond. Re-check tightness of bolts and reapply any sealant if necessary.
- Final Alignment Check
Stand back and visually inspect the spoiler from multiple angles. Make sure it sits level and parallel with other body features. If misaligned, gently loosen fasteners and adjust before final tightening.
- Perform a Test Drive
Take the vehicle for a short drive at varying speeds to ensure the spoiler remains securely attached and doesn’t produce wind noise or vibrations. Listen carefully for any rattling sounds that might indicate loose connections.
| Stage | Estimated Time | Common Issues | Recommended Tools |
|---|---|---|---|
| Surface Preparation | 30 minutes | Residual adhesive affecting bonding | Adhesive remover, microfiber cloth, alcohol wipes |
| Fitting & Marking | 20 minutes | Misalignment due to improper measurement | Ruler, level, masking tape |
| Drilling | 15–30 minutes | Paint chipping, incorrect hole size | Drill, various bits, vacuum for debris |
| Installation | 45 minutes | Loose hardware, poor bonding | Screwdriver, torque wrench, gloves |
| Final Testing | 30 minutes | Vibration noise, uneven appearance | Ear protection, visual inspection checklist |
Additional Recommendation: If your Golf 5 has a painted spoiler, consider having a professional match the factory paint code to maintain a cohesive look. Alternatively, many opt for black spoilers for a sportier aesthetic that hides minor scratches better.
Car Spoiler FAQ: Installation, Performance, and Customization
Yes, absolutely. A spoiler can be added to virtually any vehicle, even if it wasn’t originally equipped with one from the factory. Aftermarket spoilers come in a wide variety of styles, materials (such as ABS plastic, carbon fiber, or fiberglass), and mounting options tailored for different makes and models. Whether you're looking for subtle aesthetic enhancements or aggressive aerodynamic improvements, there’s likely a spoiler available for your specific car.
Installation typically involves drilling into the trunk lid or rear window area, so it's important to carefully follow the manufacturer's instructions or consult with a professional installer to avoid damaging your vehicle.
A properly designed and installed spoiler can indeed enhance a vehicle’s performance by improving aerodynamics. At higher speeds, a well-engineered spoiler generates downforce on the rear axle, which increases traction and stability—especially during cornering and high-speed driving. This is particularly beneficial for sports cars, track vehicles, or anyone who frequently drives at highway speeds.
However, it's worth noting that not all spoilers are created equal. Some aftermarket spoilers are purely cosmetic and offer minimal or no aerodynamic benefit. For real performance gains, look for wind-tunnel tested designs or those used in motorsport applications.
In addition to performance benefits, spoilers also add visual appeal, giving your car a sportier, more aggressive appearance.
No, a well-designed and properly installed spoiler should not produce any noticeable noise. However, some poorly designed or improperly mounted spoilers may cause wind turbulence at certain speeds, leading to whistling, humming, or fluttering sounds.
The material and shape of the spoiler play a major role in noise generation. Spoilers with sharp edges or flat surfaces perpendicular to airflow are more likely to create unwanted noise. Curved or multi-element spoilers often reduce turbulence and remain quiet at highway speeds.
If your spoiler starts making noise after installation, consider checking:
- Mounting tightness and alignment
- Gaps between the spoiler and the body
- Potential vibration points
Many aftermarket spoilers do come with warranties, though this varies by manufacturer and product quality. Entry-level spoilers might only include a limited 1-year warranty covering defects in materials and workmanship, while premium products—especially those made from carbon fiber or OEM-quality composites—may offer extended or even lifetime warranties.
It's essential to check the warranty terms before purchasing. Warranties typically cover:
- Manufacturing defects
- Material flaws (e.g., cracking, peeling)
- Structural integrity issues
Damage caused by improper installation, accidents, or environmental factors (like UV degradation or paint failure) usually isn't covered unless specifically stated. Always keep your purchase receipt and warranty documentation for future reference.
Yes, most aftermarket spoilers can be painted to match your car’s original color. Many manufacturers sell unpainted spoilers (typically in primer form) to allow for custom painting. It's highly recommended to have the painting done by a professional automotive body shop to ensure a flawless finish and accurate color matching.
The process usually includes:
- Sanding and priming the spoiler surface
- Color-matching using your vehicle’s VIN or paint code
- Applying base coat and clear coat finishes
- Curing and polishing for a factory-like appearance
If you're planning to paint your own spoiler, make sure to use automotive-grade paints and follow proper preparation steps to avoid peeling or discoloration over time. Also, consider having a UV-resistant clear coat applied to protect against sun damage.