


Types of Solar Dash Cameras
Solar dash cameras are innovative devices that combine the technology of traditional dash cameras with solar power. They are designed to be installed on vehicle dashboards, providing video recordings of the road to enhance safety and security for drivers. By harnessing solar energy, these cameras reduce dependence on traditional power sources, making them an excellent choice for eco-conscious individuals.
Expert Tip: Solar dash cameras not only provide security footage but can also help reduce your carbon footprint by using renewable energy. Many models can operate for extended periods without drawing power from your vehicle's electrical system.
Single Channel Solar Dash Cameras
These front-facing cameras offer high-resolution recording (typically 1080p or higher) with solar panels that extend battery life and reduce energy consumption.
Key Features:
- High-resolution front recording
- Loop recording capability
- G-sensor integration for incident detection
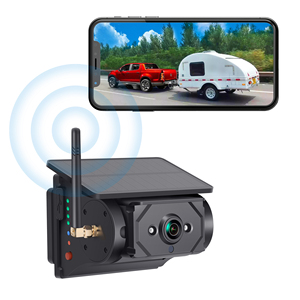
- Many models offer Wi-Fi connectivity
- Ideal for basic security and evidence collection
Dual Channel Solar Dash Cameras
These systems record both front and rear views simultaneously, providing comprehensive coverage of your vehicle's surroundings.
Key Features:
- Front and rear recording capabilities
- High-resolution video capture
- Some models include GPS tracking
- Parking mode for surveillance when vehicle is stationary
- Perfect for complete accident documentation
3-Channel Solar Dash Cameras
These advanced systems offer the most comprehensive coverage by recording the front, rear, and interior of your vehicle.
Key Features:
- Three-way recording (front, rear, interior)
- Ideal for ride-sharing services and taxis
- Enhanced security monitoring
- Solar panels for extended operation
- Often include advanced features like GPS and cloud storage
| Type | Camera Views | Best For | Typical Price Range |
|---|---|---|---|
| Single Channel | Front only | Basic security, casual drivers | $50-150 |
| Dual Channel | Front and rear | Complete coverage, everyday commuters | $100-250 |
| 3-Channel | Front, rear, and interior | Ride-sharing, professional drivers | $150-350+ |
Specifications of Solar Dash Cameras
Determines the quality and clarity of the recorded footage. Higher resolution equals better quality for identifying details like license plates.
- 1080p: Standard HD quality
- 2K: Enhanced clarity for better detail
- 4K: Premium resolution for maximum detail
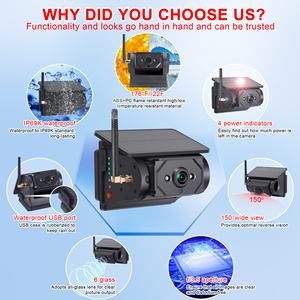
The width of area that the camera can capture, typically ranging from 120° to 180°.
- 120°-140°: Focused view with less distortion
- 150°-170°: Wide coverage of road and adjacent lanes
- 180°: Maximum coverage but may have edge distortion
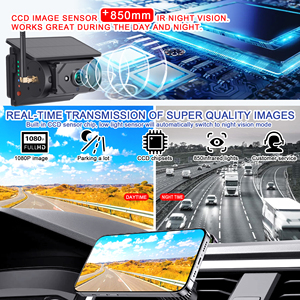
Enables clear recording in low-light conditions or darkness.
- Infrared: Uses IR LEDs for nighttime visibility
- WDR (Wide Dynamic Range): Balances bright and dark areas
- HDR: Enhanced contrast for clearer night footage
Tracks vehicle location and speed, creating a detailed log of movements that can serve as evidence.
- Location stamping on footage
- Speed monitoring
- Route tracking and history
Detects sudden changes in motion and automatically saves and locks footage during incidents.
- Automatic collision detection
- Emergency recording mode
- Adjustable sensitivity levels
Records continuously by overwriting the oldest footage once memory is full.
- Seamless recording without gaps
- Customizable segment lengths (1-10 minutes)
- Protected files are never overwritten
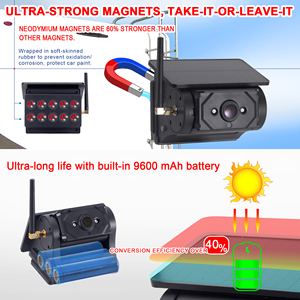
Determines operation time without external power, ranging from 200 to 500 mAh.
- 200-300 mAh: Basic backup power
- 300-400 mAh: Medium operation time
- 400-500+ mAh: Extended standalone operation
Enables remote access and control via smartphone or tablet.
- Wi-Fi: For wireless file transfer and live view
- Bluetooth: For settings adjustment and notifications
- Mobile apps for viewing and managing footage
Affects energy absorption and battery charging efficiency (5-20 square cm).
- 5-10 sq cm: Basic power supplementation
- 10-15 sq cm: Medium charging capacity
- 15-20+ sq cm: Maximum solar energy harvesting
Maintenance of Solar Dash Cameras
Proper maintenance ensures your solar dash camera continues to function optimally and extends its lifespan. Follow these essential maintenance tips:
| Maintenance Task | Frequency | Importance | Notes |
|---|---|---|---|
| Lens Cleaning | Weekly | Critical | Use microfiber cloth; avoid harsh chemicals |
| Firmware Updates | Quarterly | High | Check manufacturer's website for latest versions |
| Memory Card Check | Monthly | High | Format occasionally to maintain performance |
| Installation Check | Monthly | Medium | Ensure secure mounting and correct positioning |
| Battery Inspection | Quarterly | High | Check for swelling or performance decline |
| Solar Panel Cleaning | Bi-weekly | Critical | Keep free of dust and debris for optimal charging |
Pro Tip: To maximize solar charging efficiency, park your vehicle in sunlight when possible and periodically clean the solar panel with a soft, damp cloth to remove dust and debris that can block sunlight absorption.
Warning: Never use abrasive materials or harsh chemicals when cleaning your dash camera lens or solar panel. These can cause scratches or damage the special coatings, reducing performance and longevity.
How to Choose a Solar Dash Camera
Selecting the right solar dash camera requires careful consideration of several factors to ensure it meets your specific needs and provides reliable performance.
Video Quality Considerations
- Resolution: Minimum 1080p for clear details; 4K for maximum clarity
- Frame Rate: 30fps minimum; 60fps for smooth motion capture
- Night Vision: Essential for 24/7 recording capability
- HDR/WDR: Helps balance lighting in challenging conditions
Expert Recommendation: Look for cameras with at least 1440p resolution and WDR technology for optimal performance in various lighting conditions.
Technical Specifications
- Field of View: 140° minimum for adequate coverage
- G-Sensor: Adjustable sensitivity for accurate incident detection
- Storage: Support for high-capacity SD cards (128GB+)
- GPS: Built-in for location and speed tracking
Expert Recommendation: A 170° viewing angle provides excellent coverage without excessive distortion at the edges.
Power & Charging Options
- Battery Capacity: 400+ mAh for extended operation
- Solar Panel Efficiency: Larger panels provide better charging
- Alternative Charging: USB capability for cloudy days
- Power Management: Efficient systems to maximize runtime
Expert Recommendation: Dual power sources (solar + USB) provide the most reliable operation in all conditions.
Additional Features
- Wi-Fi/Bluetooth: For easy file access and settings adjustment
- App Support: User-friendly interface for monitoring
- Parking Mode: Motion detection when vehicle is stationary
- Voice Control: Hands-free operation for added safety
Expert Recommendation: Wi-Fi capability significantly improves usability by allowing wireless access to footage and settings.
Shopping Tip: Consider future-proofing your purchase by selecting a camera with slightly higher specifications than you currently need. Technology evolves quickly, and a more capable camera will remain useful longer as your needs change.
How to DIY and Replace Solar Dash Camera
Installing or replacing a solar dash camera is a straightforward process that most vehicle owners can complete without professional assistance. Follow these steps for a successful installation:
Remove the Old Camera (if applicable)
Carefully remove the existing mount, which may require unscrewing or detaching adhesive. Disconnect all power sources before removal. Handle batteries with care to prevent damage or potential hazards.
Safety Alert: Always disconnect power before removing electronic devices. Handle lithium batteries with extreme care to avoid damage that could lead to fire or explosion.
Prepare for the New Camera
Thoroughly clean the installation area on your windshield using isopropyl alcohol to remove oils and residue. This ensures proper adhesion and clear recording. Read the manufacturer's instructions completely before proceeding.
Preparation Tip: Alcohol-based cleaners dry without leaving residue, creating an ideal surface for adhesive mounting.
Mount the New Camera
Attach the camera to its mount according to the instructions. Position it high on the windshield, typically behind the rearview mirror, ensuring it doesn't obstruct your view. Press firmly to secure the adhesive mount.
Positioning Tip: The ideal position is centered high on the windshield behind the rearview mirror, where it won't obstruct your vision but will capture a wide view of the road.
Connect the Power
Route the power cable along the edge of the windshield and down the A-pillar. Use the included clips or adhesive to secure the cable neatly. Connect to your vehicle's power source (cigarette lighter/USB port) or hardwire if desired.
Cable Management: Tuck cables into the headliner and A-pillar trim for a clean, professional-looking installation that won't interfere with driving.
Test the Camera
Position the solar panel to receive maximum sunlight exposure. Start your vehicle to power up the camera and verify it turns on properly. Check settings and adjust the camera angle to capture the optimal view of the road ahead.
Testing Tip: Record a short test video and review it to ensure proper positioning and focus before finalizing the installation.
Final Adjustments
Secure any loose cables with cable ties or adhesive clips. Double-check that the camera is recording properly and review the footage to ensure good visibility. Make final adjustments to angle and settings as needed.
Final Check: Take your vehicle for a short drive and then review the recorded footage to ensure proper operation in real-world conditions.
Frequently Asked Questions
Solar dash cameras typically have a lifespan of 2-5 years, though premium models can last up to 10 years with proper maintenance. Factors affecting longevity include:
- Environmental conditions (extreme temperatures can reduce lifespan)
- Frequency and duration of use
- Build quality and component durability
- Regular maintenance and proper handling
To maximize lifespan, protect the device from extreme temperatures and ensure regular maintenance of both the camera and memory card.
Yes, solar dash cameras work at night through two mechanisms:
- Battery Storage: The solar panel charges the internal battery during daylight hours, providing power for nighttime operation
- Night Vision Technology: Most models include infrared LEDs or WDR (Wide Dynamic Range) technology to enhance visibility in low-light conditions
Premium models can operate for 8+ hours after sunset on stored solar energy, while most standard models provide 3-6 hours of nighttime recording.
Yes, most solar dash cameras include USB charging capability as a backup or supplementary power source. This dual-charging design offers several advantages:
- Ensures continuous operation during extended periods of low sunlight
- Provides faster charging when the solar panel alone is insufficient
- Serves as a reliable backup during winter months or in regions with limited sunlight
- Enables full functionality even when the camera is mounted in areas with limited sun exposure
Most models use standard micro-USB or USB-C connections compatible with typical car chargers.
Yes, solar dash cameras are highly compatible with RVs, trucks, and other large vehicles. In fact, they offer several advantages for these applications:
- Extended Power Independence: Ideal for long-haul trucking or RV camping where constant vehicle power may not be available
- Flexible Mounting Options: Can be installed on large windshields or other suitable locations
- Wide-Angle Coverage: Many models offer extra-wide viewing angles ideal for larger vehicles
- Durability: Designed to withstand temperature variations and vibrations common in commercial vehicles
For commercial trucks, look for models with extended storage capacity and GPS tracking to maintain comprehensive trip records.