


Types of Shock Absorber Compression Tools
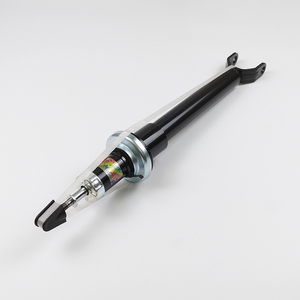
A shock absorber compression tool is a specialized tool used to safely and efficiently compress shock absorber springs during automotive suspension work. These tools are essential for mechanics and DIY enthusiasts working on vehicle suspension systems.
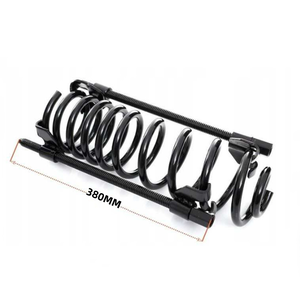
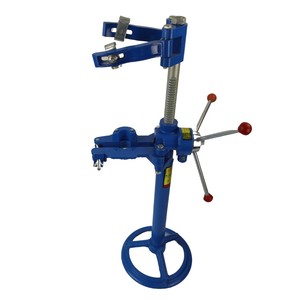
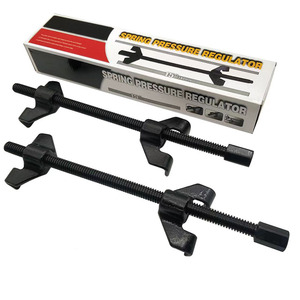
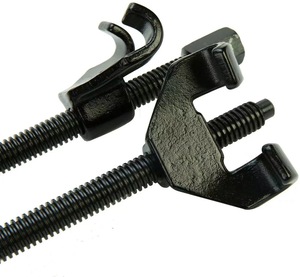
Manual Compression Tool
Manual shock absorber compression tools operate using lever mechanics with two arms and a central frame that holds the coil spring. When pressure is applied to the handles, the spring compresses.
Pros: Affordable, portable, no power requirements
Cons: Requires physical effort, not ideal for heavy springs
Best for: Light to average work, home mechanics, occasional use
Hydraulic Compression Tool
Hydraulic tools use pressurized oil in hydraulic cylinders with specialized fittings to generate the force needed to compress coil springs with minimal physical effort.
Pros: Less physical effort, more precise control, handles heavier springs
Cons: More expensive, requires maintenance, needs power supply
Best for: Professional workshops, heavy-duty applications, frequent use
Electric Compression Tool
Electric compression tools utilize electric motors to generate pressure and compress springs, offering high precision with convenient controls and automated functions.
Pros: Fast operation, precise control, user-friendly
Cons: Higher cost, requires electrical power
Best for: High-volume workshops, precision work, professionals
Universal vs. Specific Tools
Some compression tools are designed for specific vehicle models or spring sizes, while others offer universal compatibility across various vehicles.
Universal tools: More versatile, cost-effective for varied work
Specific tools: Better fit and safety for particular models
Best choice: Depends on the variety of vehicles serviced
| Tool Type | Price Range | Effort Level | Precision | Spring Capacity | Best For |
|---|---|---|---|---|---|
| Manual | $50-200 | High | Moderate | Light to Medium | DIY, Occasional Use |
| Hydraulic | $200-500 | Low | High | Medium to Heavy | Professional Use |
| Electric | $300-800 | Very Low | Very High | All Sizes | High Volume Shops |
| Universal | Varies | Varies | Good | Most Standard | Various Vehicle Types |
| Specific | Varies | Varies | Excellent | Specific Designs | Specialized Repair |
Pro Tip: For occasional DIY mechanics, a quality manual compression tool is often sufficient. Professional workshops dealing with a wide range of vehicles should invest in hydraulic or electric models with universal applications.
Specifications and Features of Shock Absorber Compression Tools
Size Considerations
Tools come in various sizes to accommodate different shock absorbers. Larger shock absorbers require bigger compression tools with greater capacity. Always check compatibility before purchase.
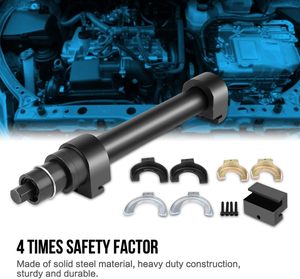
Material Construction
Common materials include steel (durable, heavy-duty), aluminum (lightweight, corrosion-resistant), and sometimes reinforced composite materials for certain components.
Tool Design Variations
Different designs include twin tube compressors for standard shock absorbers, gas spring compressors for gas-charged units, and specialized designs for strut assemblies.
Load Capacity
The maximum force the tool can safely apply without damage. Always select a tool with capacity exceeding your heaviest spring load by at least 25%.
Stroke Length
The maximum compression distance the tool can achieve. Adequate stroke length ensures complete compression of the shock absorber spring during service.
Handle Design
Handle length and ergonomics affect user comfort and mechanical advantage. Longer handles require less effort but need more space to operate.
Safety Warning: Never exceed the rated capacity of your compression tool. Doing so can lead to tool failure, spring damage, or serious personal injury. Always wear appropriate safety gear including eye protection and heavy-duty gloves.
Maintenance of Shock Absorber Compression Tools
Proper maintenance ensures safety, reliability, and longevity of your compression tools. Follow these essential maintenance practices:
| Maintenance Task | Frequency | Importance | Procedure |
|---|---|---|---|
| Clean Tool | After Each Use | High | Wipe with cloth and mild soap solution to remove dirt and grease |
| Lubricate Moving Parts | Monthly | High | Apply machine oil to hinges, pivots, and sliding components |
| Inspect for Wear/Damage | Before Each Use | Critical | Check for cracks, deformation, loose bolts or excessive wear |
| Check Hydraulic Fluid | Quarterly | High (Hydraulic Tools) | Inspect level and condition, replace if dirty |
| Verify Safety Mechanisms | Monthly | Critical | Test locks, stops and safety features for proper function |
Storage Tip: Store your compression tool in a clean, dry environment away from moisture and extreme temperatures. For hydraulic models, release pressure before long-term storage and keep in a vertical position to prevent fluid leakage.
How to Choose the Right Shock Absorber Compression Tool
Selecting the appropriate compression tool ensures safety, efficiency, and value for your investment. Consider these key factors before making your purchase:
Quality Assessment
Prioritize tools made from high-quality materials with solid construction. Look for features like:
- Heat-treated steel components
- Smooth operating mechanisms
- Quality welds and fasteners
- Safety locking mechanisms
- Corrosion-resistant finishes
Size and Portability
Consider where and how you'll use the tool:
- Fixed location workshop: Larger tools may be acceptable
- Mobile mechanics: Compact, lightweight designs preferred
- Home garage: Consider storage space limitations
- Look for tools with carrying cases or storage features
Price Considerations
Balance cost with value and intended use:
- Budget options ($50-100): Suitable for occasional DIY use
- Mid-range ($100-300): Good for serious enthusiasts
- Professional grade ($300+): For commercial or heavy use
- Consider cost of replacement parts and accessories
Warranty and Support
Look for tools backed by solid manufacturer support:
- Minimum 1-year warranty (longer for professional tools)
- Availability of replacement parts
- Technical support options
- User manual with clear instructions
- Check customer reviews for service experiences
Selection Tip: Match your tool to the specific types of vehicles you'll be working on. If you service primarily light passenger vehicles, a mid-range universal tool may be sufficient. For shops handling trucks, SUVs, or performance vehicles with heavy-duty springs, invest in a higher-capacity professional model.
DIY Shock Absorber Replacement Guide
Replacing shock absorbers can be accomplished by DIY enthusiasts with the right tools and knowledge. Follow these steps carefully for a successful replacement:
Preparation
Park on level ground with parking brake engaged. Loosen wheel lug nuts before jacking up the vehicle. Raise and secure with jack stands. Remove wheels to access the shock absorber assembly.
Compress the Spring
Using your shock absorber compression tool, carefully compress the coil spring according to the tool manufacturer's instructions. Ensure the spring is evenly compressed and the tool is securely positioned.
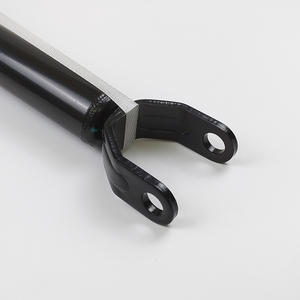
Remove Lower Shock Bolt
Locate the lower mounting bolt connecting the shock to the control arm or axle. Use the appropriate wrench or socket to remove this bolt, freeing the bottom portion of the shock absorber.
Remove Upper Mounting Hardware
Access the upper shock mounting nuts (often located in the engine bay or trunk). Remove these fasteners to completely detach the shock absorber assembly from the vehicle.
Install New Shock Absorber
Position the new (or compressed) shock absorber at the upper mounting point and install the nuts finger-tight. Connect the lower mount and insert the bolt. Ensure proper alignment before final tightening.
Carefully Release Spring Compression
Once the shock is securely mounted, gradually and evenly release the spring compression tool, allowing the spring to return to its natural state while maintaining proper positioning.
Final Assembly and Testing
Tighten all fasteners to manufacturer-specified torque values. Reinstall wheels and lower the vehicle. Test drive to ensure proper function and re-check all fasteners after the test drive.
Critical Safety Warning: Compressed springs store enormous energy and can cause serious injury or death if released improperly. Always follow tool manufacturer instructions exactly, wear appropriate safety gear, and never take shortcuts when working with suspension components.
DIY Tip: Consider replacing shocks in pairs (both front or both rear) even if only one shows signs of wear. This ensures balanced handling and performance. Also, check related components like mount bushings and spring seats while the assembly is disassembled.
Frequently Asked Questions
The most reliable sources for tool-specific information include:
- The tool's user manual (often available online if you've lost the original)
- The manufacturer's website or technical support department
- Professional automotive forums specializing in suspension work
- Vehicle-specific service manuals that recommend appropriate tools
- Authorized dealers who can provide specifications and usage guidance
No, proper tool selection is critical for both safety and effectiveness. While some universal compression tools can accommodate multiple vehicle types, important considerations include:
- The tool must have adequate capacity for the specific spring's size and tension
- Different vehicles have varying spring designs requiring specific tool configurations
- Some performance vehicles, heavy-duty trucks, or specialized suspensions require dedicated tools
- User experience level should match the complexity of the task
Always verify compatibility between your tool and the specific vehicle before beginning work.
Yes, proper safety equipment is absolutely essential. Compressed springs store tremendous energy that can cause serious injury if released suddenly. Minimum recommended safety gear includes:
- Safety glasses or face shield to protect against spring fragments or debris
- Heavy-duty work gloves to improve grip and protect hands
- Steel-toed boots to protect feet from falling components
- Long sleeves to protect arms from scratches and pinch points
Never compromise on safety equipment when working with spring compression tools.
Yes, shock absorbers that have been compressed can potentially be reused, but this depends on several factors:
- Condition assessment: Check for oil leaks, dents, or bent components
- Age: Shocks naturally deteriorate over time (typically 50,000-100,000 miles)
- Performance testing: Bounce test can indicate if damping is still effective
- Visual inspection: Look for excessive rust or wear on mounting points
For safety and optimal vehicle performance, replacement is often recommended when doing major suspension work, even if shocks appear serviceable.
For maximum safety and reliability, inspect your compression tool:
- Before each use: Quick visual inspection for obvious damage
- Monthly for frequent users: Detailed check of all components
- Annually for occasional users: Complete disassembly and inspection
- After any incident or drop: Immediate thorough inspection
- According to manufacturer's schedule: Some tools have specific maintenance intervals
Never use a compression tool that shows any signs of damage, excessive wear, or uncertain mechanical integrity.