


Types of Van Recline Seats
Recline seats for vans are specifically designed to enhance comfort and convenience in various van configurations. Whether you're outfitting a passenger van, conversion van, or campervan, understanding the different seat types will help you make the best choice for your needs.
Bucket Seats
Individual seats with contoured designs that provide excellent support for long journeys. The reclining mechanism allows passengers to adjust their seating position to their preference.
Best for: Driver and front passenger comfort, sporty feel, individual adjustment
Captain Chairs
Premium individual seats designed for larger vans like conversion or passenger vans. They offer an elevated sense of luxury with features like integrated armrests, swivel capabilities, and sometimes massage functions.
Best for: Luxury travel, passenger comfort, long-distance journeys
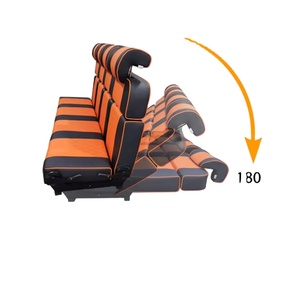
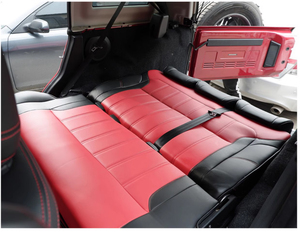
Bench Seats
Designed to accommodate multiple passengers side-by-side. Modern bench seats often feature reclining capabilities for each position, making them ideal for converting vans into campers or mobile homes.
Best for: Maximizing passenger capacity, convertible sleeping surfaces, family travel
Swivel Seats
These versatile seats can turn to face the interior of the van, creating a living-room-like space when parked. Combined with reclining functions, they maximize comfort and space utilization in cargo vans or campervans.
Best for: Campervans, multi-use vehicles, creating social spaces
Reclining Side Seats
Mounted along the sides of the van, these seats are perfect for recreational or conversion vans. They optimize interior space while providing comfortable seating that can often be converted into sleeping arrangements.
Best for: Van conversions, maximizing floor space, versatile layouts
| Seat Type | Comfort Level | Space Efficiency | Best Application |
|---|---|---|---|
| Bucket Seats | High | Medium | Daily drivers, front seats |
| Captain Chairs | Very High | Low | Luxury vans, passenger transport |
| Bench Seats | Medium | High | Family vans, maximizing capacity |
| Swivel Seats | High | Very High | Campervans, multi-functional spaces |
| Side Seats | Medium | Very High | Conversions, recreational vans |
Expert Tip: When selecting seat types, consider your van's primary purpose. For weekend camping, swivel seats create versatile living spaces. For family transportation, a mix of captain chairs and bench seats might be ideal.
Specifications of Van Recline Seats
Selecting the right reclining seats for your van requires understanding key specifications that impact comfort, safety, and functionality. Here are the critical factors to consider before making your purchase:
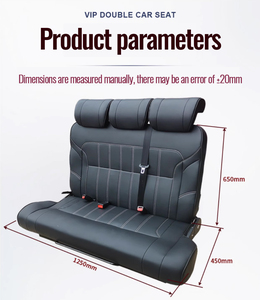
Seat Size & Van Space
Accurately measure your van's interior dimensions before selecting seats. Consider both the footprint of the seat and its reclining arc to ensure proper fit without restricting walkways or other functionality.
Measurement tip: Include at least 6-8 inches of clearance behind seats for maximum recline position
Seat Capacity
Balance your passenger needs with available space. Overcrowding with too many seats reduces comfort and can impact safety. Consider modular seating solutions that can be reconfigured as needed.
Planning advice: Allow at least 24-26 inches of width per passenger for comfort
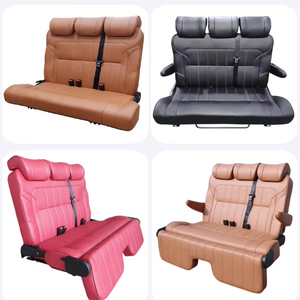
Seat Material
Choose materials based on your usage patterns and climate considerations:
- Leather: Easy to clean, durable, but can be hot in summer and cold in winter
- Fabric: Breathable and comfortable year-round, but harder to clean
- Vinyl: Affordable, water-resistant, but less breathable than fabric
Adjustment Mechanisms
The method of adjusting your seat impacts both convenience and cost:
- Manual: More affordable, reliable, no power required
- Power: Convenient, precise adjustments, but requires electrical connections
- Multi-position: Offers preset stopping points
- Infinite position: Allows stops at any angle within range
| Specification | Options | Considerations |
|---|---|---|
| Padding & Support | High-density foam, memory foam, spring support | Thicker padding offers more comfort but takes more space; lumbar support reduces fatigue |
| Safety Features | Integrated seat belts, headrests, side impact protection | Never compromise on safety features; ensure seats meet vehicle safety standards |
| Style & Design | Contemporary, classic, sporty, minimalist | Select designs that complement your van's interior aesthetic |
| Weight Capacity | Standard (250-300 lbs), Heavy-duty (350+ lbs) | Choose seats rated for your passengers' needs; undersized seats may fail prematurely |
| Mounting System | Floor rails, swivel bases, fixed mounts | Ensure compatibility with your van's floor structure and desired functionality |
Safety Warning: When replacing or installing aftermarket seats, always verify that the seats and mounting systems meet safety standards for vehicular use. Non-automotive grade seats may not provide adequate protection in case of an accident.
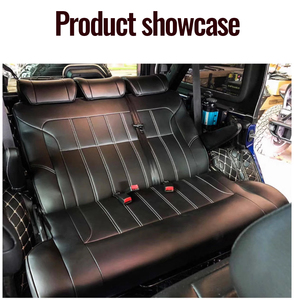
Maintenance of Van Recline Seats
Proper maintenance extends the life of your van's reclining seats and preserves their comfort and functionality. Follow these essential maintenance practices to keep your seats in optimal condition:
Regular Vacuuming
Use a vacuum with upholstery attachments to remove dust, crumbs, and debris from seats weekly. Pay special attention to seams, crevices, and the areas where the seat back meets the cushion, as these collect the most debris.
Deep Cleansing
Clean fabric seats monthly with appropriate upholstery cleaner. For leather and vinyl, use dedicated cleaners that won't dry out the material. Always test cleaning products on an inconspicuous area first.
Prompt Spot Cleaning
Address spills immediately to prevent staining. Blot (don't rub) liquid spills with absorbent cloth, then clean with appropriate cleaner for your seat material. For stubborn stains, use specialized stain removers designed for automotive upholstery.
Material Conditioning
Apply appropriate conditioners quarterly: leather conditioner for leather seats, fabric protectant for fabric seats, and vinyl protectant for vinyl seats. This prevents cracking, fading, and premature wear.
Mechanical Inspection
Check reclining mechanisms, adjustment levers, and seat mounting points every three months. Tighten loose screws, lubricate moving parts with silicone spray, and address any unusual noises or resistance in the mechanisms.
Sun Protection
Install window tinting or use windshield sun shades when parked to prevent UV damage. For maximum protection, consider seat covers when the van is not in use for extended periods.
| Maintenance Task | Frequency | Materials Needed |
|---|---|---|
| Vacuuming | Weekly | Vacuum with upholstery attachments |
| Deep Cleaning | Monthly | Material-appropriate cleaner, microfiber cloths |
| Spot Treatment | As needed | Stain remover, clean cloths |
| Conditioning | Quarterly | Material-specific conditioner or protectant |
| Mechanism Check | Quarterly | Silicone spray, screwdriver set |
| Full Inspection | Annually | Basic tool kit, flashlight |
Pro Tip: Create a maintenance calendar for your van seats. Regular, scheduled maintenance prevents bigger problems and extends the life of your investment. Set reminders for quarterly conditioning and mechanical checks.
How to Choose Van Recline Seats
Selecting the perfect reclining seats for your van requires balancing comfort, functionality, space considerations, and budget. Follow this comprehensive guide to make an informed decision:
Space Evaluation
The foundation of your seat selection begins with careful measurement:
- Measure total available floor space where seats will be installed
- Account for reclining clearance (typically 10-12 inches behind the seat)
- Consider walkway space between seats (minimum 15 inches recommended)
- Map out fixed obstacles like wheel wells, door openings, and structural components
Purpose Assessment
Different use cases demand different seat configurations:
- Daily commuter: Focus on driver comfort with premium bucket seats
- Family transport: Prioritize multiple comfortable positions and easy-clean materials
- Campervan: Consider seats that convert to beds or swivel to create living spaces
- Commercial shuttle: Balance comfort with durability and passenger capacity
Expert Advice: Create a scale drawing of your van's interior before shopping for seats. This allows you to experiment with different layouts and ensures your selected seats will fit properly with adequate clearance.
| Selection Factor | Key Considerations | Impact on Choice |
|---|---|---|
| Installation Requirements | Mounting hardware compatibility, electrical connections for powered seats, reinforcement needs | Affects installation cost and complexity; may limit viable options |
| Budget Constraints | Initial purchase cost, installation expenses, long-term maintenance | Determines quality tier and feature set; balance with expected usage duration |
| Comfort Features | Adjustable headrests, lumbar support, armrests, heating/cooling | Critical for long journeys; prioritize based on time spent in vehicle |
| Weight Considerations | Impact on vehicle payload, fuel efficiency, handling | Lighter seats benefit smaller vans; durability remains essential |
| Future Adaptability | Removability, adjustability, modular components | Provides flexibility as needs change; important for multi-purpose vans |
Important: Always verify that aftermarket seats meet safety standards for automotive use. Many furniture-style recliners marketed for vans don't provide adequate crash protection. Look for seats with proper certification for vehicular use.
DIY Installation Guide for Van Recline Seats
Installing reclining seats in your van can be a rewarding DIY project that enhances comfort and functionality. With the right tools and careful preparation, most van owners can successfully complete this upgrade.
Essential Tools and Materials
Required Tools
- Socket wrench set (metric and standard)
- Torx bit set
- Power drill with metal bits
- Screwdrivers (Phillips and flathead)
- Measuring tape and carpenter's level
- Center punch for marking holes
- Utility knife or wire cutters
Optional but Helpful
- Floor jack to help position heavy seats
- Thread-locking compound for bolts
- Anti-corrosion spray for exposed metal
- Wire connectors and electrical tape (for powered seats)
- Rubber or felt pads to prevent squeaks
- Seat belt extenders if needed
Step-by-Step Installation Process
Remove Existing Seats
Using the appropriate socket wrench, remove the bolts securing the existing seats. Usually, these are accessible from above, but some may require accessing from underneath the vehicle. Label all hardware for potential reuse. Disconnect any electrical connections carefully, noting their positions.
Prepare the Installation Surface
Thoroughly clean the exposed floor area. Inspect for rust or damage and repair as needed. This is also the perfect time to add sound insulation or reinforce mounting points if required. Check for existing bolt holes that might align with your new seats.
Install Mounting Hardware
Position the seat bases or rails according to your planned layout. Mark mounting hole locations with a center punch. Double-check measurements before drilling any new holes. Install any required adapters or reinforcement plates to ensure secure mounting.
Connect the Recline Mechanism
Assemble the recline mechanism according to manufacturer instructions. Ensure all adjustment levers and handles operate smoothly before proceeding. Apply a small amount of lubricant to moving parts as specified in the installation manual.
Mount and Secure the Seats
With assistance, carefully position the seat onto the mounting points. Start all bolts by hand before tightening to prevent cross-threading. Tighten mounting bolts to the manufacturer's specified torque settings in a cross-pattern. Apply thread-locking compound if recommended.
Connect Electrical Components (if applicable)
For powered seats, connect wiring according to the manufacturer's diagram. Use proper automotive-grade connectors and protect all connections. Test functionality before final assembly. Consider adding a dedicated fuse for safety.
Install Safety Components
Attach seat belts and ensure they're properly anchored to the vehicle structure, not just the seat frame (unless specifically designed otherwise). Adjust headrests to the correct height for passengers. Verify all safety mechanisms function properly.
Perform Safety and Functionality Checks
Test all seat adjustments through their full range. Verify that locking mechanisms engage properly. Check that the seat is firmly secured by attempting to move it with moderate force. Ensure no pinch points or sharp edges are exposed.
Safety Warning: Improperly installed seats can become deadly projectiles in an accident. If you're unsure about any aspect of the installation, particularly regarding seat belt anchoring or structural reinforcement, consult a professional automotive upfitter.
Pro Tip: Take photos throughout the removal and installation process. This documentation is invaluable if you need to make adjustments later or if you want to return the van to its original configuration when selling.
Frequently Asked Questions
Reclining van seats primarily need additional space behind them to accommodate the backrest movement. Typically, you should allow 8-12 inches of clearance behind the seat for full recline functionality. The exact requirement depends on the specific seat model and its reclining mechanism.
For wall-adjacent installations, measure both the upright and fully reclined positions to ensure proper clearance. Some space-efficient models feature mechanisms that slide the seat bottom forward as the back reclines, requiring less rear clearance.
The key differences between home recliners and automotive van seats include:
- Safety standards: Van seats must meet stringent crash safety requirements and include proper seat belt integration
- Mounting systems: Van seats feature secure mounting hardware designed to withstand collision forces
- Frame construction: Automotive seats use lightweight but strong materials engineered for vehicle dynamics
- Fire resistance: Van seats are made with materials that meet automotive flame retardancy standards
While home recliners prioritize stationary comfort, van seats balance comfort with safety and vehicle-specific design considerations.
Yes, with certain qualifications. Most van owners with basic mechanical skills can successfully install reclining seats by following manufacturer instructions. The installation difficulty varies based on:
- Whether you're replacing existing seats or adding new mounting points
- The complexity of your specific seat model (manual vs. powered)
- Any required electrical connections for powered features
- The need for structural reinforcement in custom locations
For critical safety components like seat belt anchoring or custom mounting positions, professional installation is strongly recommended. Always follow torque specifications and safety guidelines provided by the seat manufacturer.
Quality van reclining seats typically last 7-10 years with proper maintenance. Factors affecting longevity include:
- Usage frequency: Daily use will wear seats faster than occasional weekend use
- Material quality: Premium leather and high-density foam last longer than budget materials
- Climate exposure: Extreme heat, cold, or humidity can accelerate deterioration
- Maintenance routine: Regular cleaning and conditioning significantly extend seat life
Mechanical components like recline mechanisms often begin showing wear first, particularly in manually operated systems. Budget for potential mechanism repair or replacement after 5-7 years of regular use.
Yes, regular automotive seats (including those from cars) can be used in van conversions with some important considerations:
- Ensure the seat mounting system is compatible with your van's floor structure
- Verify that seat belt attachment points meet safety standards for your vehicle type
- Check that the seat dimensions are appropriate for your van's interior height
- Consider that car seats might have different ergonomics than purpose-built van seats
Using seats from the same manufacturer as your van simplifies compatibility issues. Junkyard or salvage yard seats can be economical, but thoroughly inspect mechanical components and cleaning thoroughly before installation.