


Types of Valeo TM65 Components
The Valeo TM65 is a high-performance clutch system designed for modern vehicles that demand reliability, precision, and durability in demanding driving conditions. It comprises several key components that work together to ensure smooth gear transitions, efficient power transfer, and enhanced drivability.
This guide explores each individual component of the Valeo TM65 system, their functions, benefits, and applications. Understanding these parts can help vehicle owners make informed decisions when selecting replacements or upgrades for performance or maintenance purposes.
Valeo TM65 Clutch Kit
A complete Valeo TM65 clutch kit includes the pressure plate, clutch disc, and release bearing — all essential elements for a functional and responsive clutch system.
Advantages
- All-in-one solution for clutch replacement
- Precision-engineered for OEM compatibility
- Ensures balanced wear across components
- Improves overall clutch longevity
Limitations
- Higher cost than replacing single parts
- May include components still in good condition
Best for: Full clutch replacements, performance upgrades, preventive maintenance
Valeo TM65 Flywheel
The Valeo TM65 flywheel serves as a critical energy storage device that ensures consistent engine rotation and facilitates smooth engagement with the clutch disc.
Advantages
- Smooth engine idle and acceleration
- Reduces vibrations during clutch engagement
- Durable construction for long service life
- Designed for precise fitment with various engines
Limitations
- Requires resurfacing or replacement during major clutch work
- Can add rotational mass affecting throttle response
Best for: Stock and lightly modified vehicles, daily drivers, OEM replacements
Valeo TM65 Dual Mass Flywheel (DMF)
The Valeo TM65 Dual Mass Flywheel is engineered specifically for vehicles with high-torque engines and manual transmissions, offering superior vibration damping and improved driving comfort.
Advantages
- Significantly reduces engine vibrations
- Enhances ride quality and cabin quietness
- Protects transmission from shock loads
- Ideal for diesel and turbocharged engines
Limitations
- More expensive than standard flywheels
- Complex internal mechanism requires expert handling
- Not suitable for high-horsepower modifications
Best for: Diesel vehicles, luxury sedans, trucks with high-torque engines
Valeo TM65 Release Bearing
The release bearing is responsible for disengaging the clutch when the driver presses the pedal. The Valeo TM65 release bearing ensures smooth operation and protects the clutch fork and pressure plate from excessive wear.
Advantages
- High-quality materials for reduced friction
- Quiet operation under frequent use
- Resistant to heat and mechanical stress
- Long service intervals
Limitations
- Failure can lead to costly transmission repairs
- Should be replaced alongside other clutch components
Best for: Manual transmission systems, frequent stop-start driving, performance applications
Valeo TM65 Pressure Plate
The pressure plate applies force to the clutch disc, ensuring it remains engaged against the flywheel. The Valeo TM65 pressure plate is built with high-strength steel and advanced diaphragm spring design for consistent performance.
Advantages
- Provides reliable clamping force
- Resists warping under heavy load
- Easy alignment with flywheel and disc
- Compatible with a wide range of torque outputs
Limitations
- Wear over time affects clutch engagement feel
- Must be replaced if warped or cracked
Best for: Standard and mild-performance applications, OEM replacements, everyday driving
Valeo TM65 Clutch Disc
The clutch disc is the core component that transfers power from the engine to the transmission. The Valeo TM65 clutch disc features durable friction linings and torsion dampers to absorb shocks during engagement.
Advantages
- Multiple friction material options available
- Effective torsional vibration absorption
- Available in different diameters and thicknesses
- Offers smooth take-off and gear changes
Limitations
- Subject to wear with aggressive driving
- Performance variants may reduce comfort
Best for: Daily commuting, towing, spirited driving depending on variant selected
| Component | Primary Function | Material Quality | Key Benefit | Recommended Use |
|---|---|---|---|---|
| Clutch Kit | Complete clutch assembly | OEM-grade alloys and composites | All-in-one replacement | Full clutch overhaul |
| Flywheel | Energy storage and rotation smoothing | Cast iron or steel | Smooth engagement | Daily drivers, OEM use |
| DMF | Vibration damping | Multi-layered metal with springs | Improved comfort | Diesel and high-torque |
| Release Bearing | Clutch disengagement | Steel with composite bushing | Smooth operation | Manual transmissions |
| Pressure Plate | Applies clamping force | High-strength steel | Consistent grip | General driving |
| Clutch Disc | Power transfer medium | Friction composites | Shock absorption | Versatile applications |
Expert Tip: When performing any clutch-related maintenance involving the Valeo TM65 system, always inspect the flywheel surface. A worn or grooved flywheel can significantly reduce the lifespan and effectiveness of new clutch components.
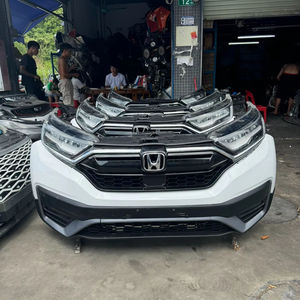
Specifications and Maintenance of OEM Honda Bumpers
Key Features of OEM Honda Bumpers
OEM Honda bumpers are critical components that serve both aesthetic and functional roles in vehicle design and performance. Designed to seamlessly integrate with the overall structure and style of each Honda model, these bumpers enhance appearance while providing essential protection and aerodynamic benefits.
Appearance & Design Integration
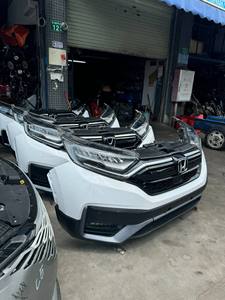
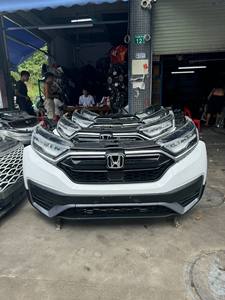
The exterior look of a vehicle is often as important as its mechanical performance, and OEM Honda bumpers are engineered to complement the unique styling of each model. Whether it's the sleek profile of a Honda Civic or the rugged stance of a Honda CR-V, the bumper maintains visual harmony with the car’s body lines and design language.
These bumpers are precisely contoured to match the factory specifications, ensuring a flush fit and a cohesive appearance that enhances the vehicle’s curb appeal. The seamless integration also contributes to a more refined driving experience by reducing wind resistance and improving fuel efficiency.
Material Composition
OEM Honda bumpers are typically manufactured using high-quality thermoplastic materials known for their durability and impact resistance. Thermoplastics offer an optimal balance between strength and flexibility, allowing the bumper to absorb minor impacts without cracking or shattering.
In addition to their resilience, these materials are lightweight, which helps reduce overall vehicle weight. This not only improves acceleration and handling but also contributes to better fuel economy and reduced emissions. The lightweight nature of the material also makes installation and replacement easier compared to heavier alternatives like steel or aluminum bumpers.
Functional Benefits
Beyond aesthetics, Honda OEM bumpers play a crucial role in protecting the vehicle from damage during low-speed collisions. They act as the first line of defense against scratches, dents, and minor impacts, safeguarding vital components such as headlights, sensors, and the vehicle frame.
Additionally, these bumpers are designed with aerodynamics in mind. Their shape helps manage airflow around the front and rear of the vehicle, reducing drag and enhancing stability at higher speeds. This contributes to improved fuel efficiency and a quieter ride.
They also provide mounting points for essential accessories like license plates, fog lights, parking sensors, and cameras, ensuring these components remain securely attached and properly aligned for optimal functionality.
Model Compatibility
One of the key advantages of OEM Honda bumpers is their precise compatibility across various models. Whether you own a compact Honda Fit, a family-friendly CR-V, or a sporty Accord, there is a bumper specifically designed for your vehicle.
This ensures perfect fitment, eliminating the need for modifications or aftermarket adjustments. OEM bumpers are tested extensively to meet Honda's rigorous standards for safety, performance, and durability across all compatible models.
Maintenance Guidelines for Longevity
Proper maintenance of your OEM Honda bumper is essential to preserve its appearance and functionality over time. Regular care can prevent premature wear and keep your vehicle looking its best.
Important: When replacing or repairing one section of your bumper system, consider inspecting and potentially replacing adjacent components as well. Mismatched wear levels can affect aesthetics and structural integrity, especially when combining new and aged parts.
How to Choose OEM Honda Bumpers
Selecting the right OEM Honda bumpers is essential for retailers aiming to provide high-quality, compatible parts that meet customer expectations and vehicle specifications. Choosing wisely ensures not only a perfect fit but also optimal performance, safety, and aesthetic appeal.
Vehicle Type and Application
Honda produces a diverse lineup of vehicles tailored for specific uses—from compact sedans like the Honda Accord designed for city driving, to rugged SUVs like the Honda CR-V built for off-road conditions. The bumper you choose must align with the vehicle's intended use and design parameters.
- Sedans (e.g., Accord, Civic): Require sleek, aerodynamic bumpers optimized for fuel efficiency and urban environments
- SUVs (e.g., CR-V, Pilot): Benefit from reinforced bumpers with enhanced durability and ground clearance
- Trucks (e.g., Ridgeline): Need heavy-duty bumpers capable of handling towing, cargo weight, and rough terrain
Key consideration: Always cross-reference part numbers with the vehicle’s make, model, year, and trim level
Bumper Design and Aesthetic Compatibility
OEM Honda bumpers are engineered to match the vehicle’s original styling cues. Whether your customer prefers a sporty look or a more utilitarian appearance, selecting the correct design is crucial for maintaining brand integrity and visual harmony.
- Sport trims often feature aggressive front fascias with integrated air dams
- Luxury models may include chrome accents and seamless integration with sensors and cameras
- Off-road variants usually come with skid plates, winch mounts, and protective elements
Design tip: Match the bumper style with the vehicle’s trim and exterior features for a factory-finished look
Material Composition and Performance
Honda OEM bumpers are manufactured using a range of materials, each offering distinct advantages in terms of weight, strength, and impact resistance. Understanding these differences helps retailers recommend the best option based on usage and environmental factors.
- Steel: High durability and crash protection, but heavier—ideal for commercial or rugged-use applications
- Aluminum: Lightweight yet strong, resistant to corrosion—perfect for performance-oriented models
- Plastic (Polypropylene): Lightest option, excellent for energy absorption in minor collisions
Performance impact: Plastic bumpers excel in absorbing low-speed impacts without deforming permanently
Integrated Features and Accessories
Modern OEM bumpers often come equipped with advanced features such as fog lights, parking sensors, camera mounts, and grille guards. These additions enhance functionality but can significantly affect pricing and compatibility.
- Front bumpers may include adaptive cruise control radar housings
- Rear bumpers can integrate backup cameras and license plate lighting
- Some bumpers offer mounting points for recovery gear or light bars
Compatibility note: Ensure all sensors, wiring harnesses, and mounting brackets align with the vehicle’s existing systems
Selection Advice: When customers are upgrading or replacing bumpers, always consider their primary usage scenario. For example, an OEM Honda CR-V front bumper with skid plate and fog light integration is ideal for weekend adventurers, while a sleek, lightweight plastic bumper suits a daily-driven Civic better. Recommending the right balance of aesthetics, function, and cost ensures customer satisfaction.
| Vehicle Type | Recommended Material | Primary Use Case | Additional Features |
|---|---|---|---|
| Sedan (Civic, Accord) | Plastic / Composite | City driving, daily commuting | Fog lights, camera mounts |
| SUV (CR-V, Pilot) | Reinforced Plastic / Steel | Family use, light off-roading | Skid plates, sensor cutouts |
| Truck (Ridgeline) | Steel / Aluminum | Towing, hauling, rugged terrain | Winch mounts, recovery points |
| Performance (Type-R, Si) | Lightweight Composites | Track use, spirited driving | Aerodynamic enhancements, cooling ducts |
DIY Guide to Replacing OEM Honda Accord Bumpers
Replacing an OEM Honda Accord bumper can be a rewarding DIY project for those with basic mechanical skills and the right tools. While minor cosmetic damage like scratches or small cracks can often be repaired, complete replacement becomes necessary when structural integrity is compromised or aesthetics are severely affected. This guide provides a comprehensive walkthrough of the process while emphasizing safety, preparation, and best practices.
Safety Warning: Always work in a well-lit, stable environment. Disconnecting the battery and using protective gloves and eyewear is essential during the removal and installation process to prevent injury from sharp edges or electrical components.
Why Replace Your Honda Accord Bumper?
An OEM (Original Equipment Manufacturer) Honda Accord bumper ensures perfect fitment, factory-level durability, and maintains your vehicle’s resale value. Whether you're replacing due to collision damage, fading, or upgrading for appearance, following the proper steps will ensure a seamless installation and long-lasting results.
Step-by-Step Replacement Process
- Assessment and Planning
- Inspect the extent of the damage to determine if a full replacement is needed.
- Confirm that the new OEM bumper matches your vehicle’s make, model, year, and trim level.
- Check for any additional components that may need transfer, such as sensors, lights, or brackets.
- Review the vehicle service manual or online repair guides specific to your Honda Accord model.
- Gathering the Necessary Tools
- Socket wrench set (with metric sockets commonly used in Honda vehicles)
- Ratchet and extension bar
- Trim removal tool or flathead screwdriver (for plastic clips)
- Phillips and flathead screwdrivers
- Zip ties or labels (to organize removed parts and fasteners)
- Work gloves and eye protection
- Parking chocks or wheel blocks
- Preparing the Vehicle
- Park the car on a level surface and engage the parking brake.
- Turn off the engine and allow it to cool down before starting work.
- Disconnect the negative terminal of the battery to avoid accidental short circuits.
- Remove any aftermarket accessories that may obstruct access to the bumper.
- Removing the Old Bumper
- Locate and remove all visible bolts, screws, and plastic clips securing the bumper to the frame.
- Carefully pry out any hidden push pins or trim clips using a trim removal tool.
- If equipped, disconnect any wiring harnesses for fog lights, sensors, or turn signals.
- Support the bumper while removing the last few fasteners to avoid dropping it.
- Set aside all hardware in a labeled container for reinstallation.
- Preparing the New Bumper
- Compare the new OEM bumper with the old one to ensure compatibility.
- Transfer any functional components such as parking sensors, brackets, or lighting assemblies.
- Test-fit the new bumper by temporarily positioning it before final installation.
- Clean the mounting areas and inspect for rust or corrosion that might affect alignment or durability.
- Installing the New Bumper
- Lift the new bumper into place, aligning it carefully with the mounting points.
- Secure it using the original bolts and clips, tightening them gradually to ensure even pressure.
- Reconnect any wiring harnesses and verify that all electrical components function properly.
- Double-check that the bumper sits flush with the body panels and there are no gaps or misalignments.
- Final Checks and Testing
- Reconnect the battery and test all lights, sensors, and electronic features connected to the bumper.
- Take a step back and visually inspect the alignment from multiple angles.
- Go for a short test drive to ensure the bumper remains secure at various speeds.
- Tighten any loose fasteners after driving a short distance, as vibrations can sometimes loosen connections.
| Phase | Key Tasks | Common Mistakes | Recommended Tools |
|---|---|---|---|
| Preparation | Verify bumper compatibility, gather tools, disconnect battery | Mismatched bumper model, missing tools, forgetting to label wires | Socket set, ratchet, trim tool, zip ties |
| Removal | Remove fasteners, disconnect wiring, support bumper weight | Damaged clips, lost screws, broken connectors | Flathead screwdriver, gloves, flashlight |
| Installation | Align bumper, secure fasteners, reconnect electronics | Uneven alignment, overtightened bolts, missed connections | Extension bar, torque wrench, multimeter |
| Testing | Check lights, sensors, and overall fit | Driving without verifying electrical functions, ignoring vibration loosening | Test drive area, screwdriver for retightening |
Pro Tip: If your Honda Accord has a front bumper with integrated radar or camera systems (like models with Honda Sensing), recalibration may be required after installation. Consult your dealership or a certified technician if this applies to your vehicle.
Additional Tips for a Professional Finish
- Use a silicone-based lubricant on rubber seals and clips to ease installation and prevent cracking.
- Paint-matched bumpers should be installed before painting to avoid overspray on adjacent panels.
- Apply anti-seize compound to bolts during reinstallation to prevent future stripping or seizing.
- Always use OEM-quality fasteners; cheap replacements can strip easily or corrode over time.
Honda Bumper FAQs: Understanding the Differences and Benefits
A: Honda bumpers are specifically engineered for Honda vehicles, ensuring a precise fit and finish that aligns perfectly with the vehicle's original design. Unlike generic bumpers, which may offer a one-size-fits-all approach, Honda bumpers undergo rigorous testing to meet factory specifications for aerodynamics, crash performance, and aesthetics. This tailored engineering ensures not only visual harmony but also optimal functionality in terms of safety and structural integrity.
A: When comparing materials, there are distinct advantages and trade-offs between plastic and steel Honda bumpers:
- Steel Honda bumpers: Known for their exceptional durability and impact resistance, steel bumpers are particularly well-suited for off-road driving or harsh environments where protection is a priority. However, they are heavier than plastic alternatives, which can affect fuel efficiency and handling. Additionally, without proper rust-proofing treatments like powder coating or galvanization, steel bumpers are susceptible to corrosion over time.
- Plastic Honda bumpers: These bumpers are significantly lighter, contributing to better fuel economy and easier installation. They are naturally resistant to rust and corrosion, making them ideal for daily drivers in urban environments. Plastic bumpers also tend to absorb minor impacts more quietly than metal ones. Their material properties allow for more complex shapes, enabling designs that integrate seamlessly with modern vehicle styling. Additionally, plastic bumpers are generally more cost-effective than steel options.
When choosing between plastic and steel, consider your driving conditions, intended use (e.g., off-roading vs. city commuting), and budget constraints.
A: The distinction between OEM (Original Equipment Manufacturer) Honda bumpers and aftermarket bumpers lies in quality, compatibility, and long-term value:
| Feature | OEM Honda Bumpers | Aftermarket Bumpers |
|---|---|---|
| Manufacturing | Made by Honda or licensed suppliers following strict factory standards. | Produced by third-party manufacturers, often with varying levels of quality control. |
| Fitting | Precision-engineered for perfect alignment with body panels and integrated components. | May require modifications for proper fit; potential misalignment issues. |
| Durability | Built to last with materials and coatings tested for longevity. | Quality varies widely; some may degrade faster under environmental exposure. |
| Resale Value | Help maintain or enhance vehicle resale value due to authenticity. | May not add value and could be seen as a cost-cutting alternative. |
| Cost | Typically more expensive due to brand assurance and quality. | Generally less expensive, though price differences may reflect lower build quality. |
While OEM bumpers guarantee factory-level performance and appearance, high-quality aftermarket bumpers can offer a cost-effective solution if sourced from reputable brands. Always research reviews and compare materials before opting for an aftermarket product.