


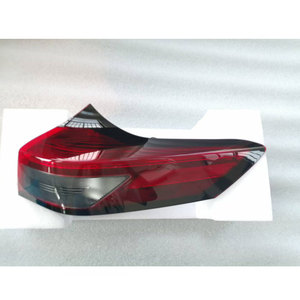


Types of NISSAN Rogue Tail Lights
NISSAN Rogue tail lights are engineered with precision to enhance vehicle visibility and safety. These tail light assemblies incorporate various components that serve different purposes, creating a comprehensive lighting system for your Rogue.
Tail Lights
The primary lighting elements at the rear of your Rogue that illuminate when headlights are active, providing critical visibility in dark or adverse weather conditions.
Safety feature: Enhances vehicle detection from multiple viewing angles
Brake Lights
Positioned prominently at the rear, these lights activate automatically when the brake pedal is pressed, signaling to following drivers that the vehicle is slowing or stopping.
Safety feature: Prevents rear-end collisions by providing immediate stopping indication
Turn Signal Lights
Located at the corners of the tail light assembly, these amber-colored lights blink to indicate the driver's intention to change direction.
Safety feature: Communicates turning intentions to surrounding traffic
- Reflectors: Integrated into the tail light assembly, these passive safety features enhance visibility under low-light conditions by reflecting light from surrounding vehicles or street lights.
- Reverse Lights: These bright white lights automatically activate when the vehicle is placed in reverse gear, illuminating the area behind the Rogue to assist with safe backing maneuvers in low-light conditions.
Expert Tip: Modern NISSAN Rogue models feature LED lighting technology that offers superior brightness, faster response time, and longer lifespan compared to traditional incandescent bulbs, significantly enhancing safety and visibility.
| Light Type | Function | Color | Activation |
|---|---|---|---|
| Tail Lights | Rear visibility | Red | With headlights/parking lights |
| Brake Lights | Indicate stopping | Brighter Red | When brakes applied |
| Turn Signals | Indicate turns | Amber | When turn signal activated |
| Reflectors | Passive visibility | Red | Passive (reflects light) |
| Reverse Lights | Illuminate rear area | White | When in reverse gear |
Specifications of NISSAN Rogue Tail Lights
The specifications of NISSAN Rogue tail lights vary by model year and trim level, but understanding these technical details can help with maintenance and replacement decisions.
Bulb Technology
Newer models utilize LED technology for greater brightness and longevity, while older models may use standard halogen bulbs.
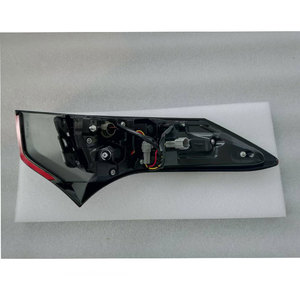
Housing Material
Durable plastic with UV coating to prevent fading and withstand extreme temperatures.
Operating Voltage
Standard automotive voltage aligned with the vehicle's electrical system.
| Specification | Details | Notes |
|---|---|---|
| Bulb Type | LED or Standard Halogen | LED bulbs last longer and provide brighter illumination |
| Housing Material | Durable Polycarbonate Plastic | Includes UV coating for protection against fading |
| Lens Color | Red (main), Clear (reverse) | Complies with DOT regulations for visibility |
| Wattage | 3-10W (LED), 21-30W (Standard) | LED bulbs consume significantly less energy |
| Voltage | 12V DC | Standard automotive electrical system |
| Lifespan | 50,000+ hours (LED), 5,000+ hours (Standard) | LEDs offer approximately 10x longer service life |
Important Note: Always check your specific Rogue model year specifications before purchasing replacement parts. Tail light assemblies are not universally interchangeable between model years or trim levels.
Maintenance of NISSAN Rogue Tail Lights
Proper maintenance of your NISSAN Rogue tail lights is crucial for safety, visibility, and compliance with traffic regulations. Follow these essential maintenance practices to ensure optimal performance:
Regular Inspection
Monthly checks for damage, condensation, or non-functioning bulbs can prevent safety hazards and traffic violations.
Pro tip: Check all functions: tail, brake, turn, and reverse lights
Cleaning Routine
Regular cleaning prevents dirt accumulation that can diminish light output and compromise visibility.
Best practice: Use automotive soap, avoid harsh chemicals
Maintenance Insight: If you notice moisture inside the tail light assembly, address it promptly. While small amounts may evaporate naturally through ventilation, persistent condensation can damage electrical components and should be professionally evaluated.
| Maintenance Task | Frequency | Procedure | Benefits |
|---|---|---|---|
| Visual Inspection | Monthly | Check for cracks, discoloration, and proper function | Early problem detection, improved safety |
| Cleaning | Bi-monthly | Wash with warm water and mild automotive soap; dry with soft cloth | Maintains optimal light output, preserves appearance |
| Electrical Connection Check | Quarterly | Inspect and secure connections; check for corrosion | Prevents flickering lights and electrical failures |
| Lens Restoration | As needed | Apply UV-protective sealant to prevent yellowing | Extends lifespan, maintains clarity |
| Professional Inspection | Annually | Comprehensive check of alignment, wiring, and seals | Identifies hidden issues, ensures compliance |
Warning: Damaged tail lights compromise vehicle safety and can lead to traffic citations. Replace cracked or malfunctioning lights promptly with OEM or high-quality aftermarket parts designed specifically for your Rogue model.
How to Choose NISSAN Rogue Tail Lights
Selecting the right tail lights for your NISSAN Rogue requires careful consideration of multiple factors to ensure compatibility, performance, and legal compliance. Use this comprehensive guide to make an informed decision:
OEM Replacements
Original Equipment Manufacturer parts offer guaranteed compatibility and quality but typically at premium prices.
Best for: Exact match to original specifications
Aftermarket Options
Third-party manufactured alternatives often provide cost savings and style variations but require careful verification of compatibility.
Best for: Budget-conscious buyers and customization
Key Selection Criteria
- Vehicle Compatibility: Verify exact fit for your specific Rogue model year and trim level. Parts catalogs often list compatibility by VIN or model information.
- Light Technology: Consider LED options for improved brightness, faster response time, and longer lifespan compared to traditional halogen bulbs.
- Style and Design: Options range from factory-style replacements to custom designs with unique light patterns, sequential turn signals, or smoked lenses (where legal).
- Legal Compliance: Ensure all replacement tail lights meet DOT (Department of Transportation) standards and local regulations for brightness, color, and visibility.
- Installation Complexity: Consider whether the replacement requires basic plug-and-play installation or additional wiring modifications.
- Quality and Durability: Research brand reputation and material quality, focusing on weather resistance, UV protection, and housing construction.
- Warranty Coverage: Compare warranty terms, with premium options typically offering 1-3 year protection against manufacturing defects.
Shopping Tip: When replacing just one damaged tail light, consider replacing both sides simultaneously to maintain consistent appearance and illumination. Light output can vary between new and aged units, potentially creating an unbalanced look.
| Feature | OEM Tail Lights | Aftermarket Tail Lights |
|---|---|---|
| Fit Guarantee | Perfect match to original | May require minor adjustments |
| Cost | Higher ($200-400+) | Lower ($80-300) |
| Style Options | Limited to original design | Various custom designs available |
| Installation | Direct replacement | May require additional modifications |
| Warranty | Typically 1-2 years | Varies widely (90 days to lifetime) |
How to DIY and Replace NISSAN Rogue Tail Lights
Replacing your NISSAN Rogue tail lights is a manageable DIY project that can save you costly service fees. Follow this step-by-step guide for a successful installation:
Required Tools and Materials
Tools Needed
- Phillips screwdriver
- Socket wrench set
- Pliers
- Work gloves
- Clean cloth
Materials Required
- Replacement tail light assembly or bulbs
- Dielectric grease (optional)
- Cleaning solution
- Microfiber cloth
Step-by-Step Replacement Process
-
Identify the Issue
Determine whether you need to replace a bulb or the entire tail light assembly. If only a bulb is burnt out, a simple bulb replacement is sufficient. If the housing is damaged or water-infiltrated, replace the entire assembly.
-
Prepare Your Vehicle
Turn off the engine, set the parking brake, and disconnect the battery's negative terminal to prevent electrical shorts during the replacement process.
-
Access the Tail Light Assembly
Open the rear hatch/trunk and locate the access points for the tail light assembly. Remove any interior panels or trim pieces that may be covering the tail light mounting area.
-
Remove Mounting Hardware
Locate and remove the screws or bolts securing the tail light to the vehicle body. These are typically located around the perimeter of the tail light assembly and are accessible from inside the trunk.
-
Detach the Tail Light
Carefully pull the tail light assembly away from the vehicle body, applying gentle and even pressure to avoid damaging the surrounding paint or mounting points.
-
Disconnect Electrical Connections
Locate the wiring harness connector at the back of the tail light assembly. Press the tab on the connector and pull it apart to disconnect the electrical supply. Take care not to damage the wiring.
-
Install the New Component
If replacing a bulb, twist the bulb holder counterclockwise to remove it, swap the old bulb for a new one, and reinstall the holder. If replacing the entire assembly, position the new unit and proceed to the next step.
-
Reconnect Electrical Connections
Firmly reconnect the wiring harness to the new tail light assembly, ensuring the connector clicks securely into place. Apply a small amount of dielectric grease to the connections if available.
-
Secure the Tail Light
Carefully align the tail light with the mounting points and gently press it into position. Reinstall all mounting screws or bolts, tightening them evenly but not excessively to avoid cracking the housing.
-
Test the Installation
Reconnect the battery, turn on the ignition, and test all tail light functions: running lights, brake lights, turn signals, and reverse lights. Verify everything works correctly before finalizing the installation.
Caution: Handle tail light assemblies with care to avoid scratching the lenses or damaging the electrical connectors. If you encounter excessive resistance during removal or installation, stop and reassess rather than forcing components.
DIY Pro Tip: Take photos of the original installation before disassembly to serve as a reference during reassembly. This simple step can prevent confusion about wire routing or component positioning.
Frequently Asked Questions
Smoked tail lights are legal in most jurisdictions as long as they meet minimum visibility requirements established by transportation authorities. The key legal requirement is that tail lights must be visible from a specific distance (typically 500-1000 feet) under normal conditions. Lightly smoked lenses may comply with these regulations, but heavily tinted versions often do not. Before installation, check your local and state laws regarding tail light modifications, as regulations vary by location. Professional installation with proper light output testing is recommended to ensure compliance.
When upgrading from standard incandescent bulbs to LED tail lights in a NISSAN Rogue, resistors are sometimes necessary but not always required. The need for resistors depends on your specific model year and whether you're experiencing these common issues:
- Hyper-flashing: Abnormally rapid blinking of turn signals
- Error codes: Dashboard warnings about bulb failure when bulbs are actually functioning
- Non-functioning: Lights that don't illuminate properly
These issues occur because LED bulbs draw significantly less current than original incandescent bulbs, causing the vehicle's computer to misinterpret this as a bulb failure. Load resistors compensate for this reduced power draw, tricking the system into normal operation. Complete LED tail light assemblies designed specifically for your Rogue model typically include built-in resistors or circuitry, eliminating the need for separate components.
Several indicators suggest your NISSAN Rogue tail lights may need attention or replacement:
| Warning Sign | Description | Possible Cause |
|---|---|---|
| Diminished Brightness | Noticeably dimmer illumination compared to normal | Aging bulbs, corroded connections, lens degradation |
| Visible Damage | Cracks, holes, or broken lenses | Physical impact, age-related degradation |
| Moisture Infiltration | Condensation or water visible inside the housing | Damaged seals, cracked housing |
| Intermittent Operation | Lights flicker or work inconsistently | Loose connections, wiring issues |
| Dashboard Warning | Bulb failure indicator illuminated | Burnt-out bulb, electrical fault |
| Discoloration | Yellowing or clouding of the lens | UV damage, aging plastic |
Perform regular visual inspections by having someone observe your lights while you test all functions (tail, brake, turn, reverse). For a more thorough check, inspect the housings for damage and test electrical connections with a multimeter. Promptly addressing these issues is crucial for safety and to avoid potential traffic citations.
Yes, you can upgrade your standard NISSAN Rogue tail lights to LED using either direct-replacement LED bulbs or complete LED tail light assemblies. LED upgrades offer several advantages including brighter illumination, faster response time (LEDs light up approximately 0.2 seconds faster than incandescent bulbs), longer lifespan (50,000+ hours vs. 5,000 hours), and reduced power consumption. For the most straightforward installation, complete LED tail light assemblies designed specifically for your Rogue model year are recommended. These typically include all necessary components for plug-and-play installation. If choosing individual LED bulbs, ensure they're designed for your specific application and be prepared to install load resistors if you experience hyper-flashing or error codes.