


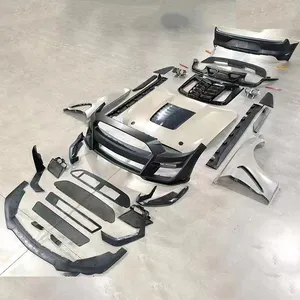


Types of Mustang Rocket Body Kit
A Mustang rocket body kit is a transformative upgrade that can dramatically enhance both the aesthetics and performance of your vehicle. These specialized body modification packages come in several distinct varieties, each with unique characteristics and benefits.
Wide Body Kit
Designed to give the Mustang a more muscular and aggressive appearance, wide body kits expand the vehicle's profile significantly. They accommodate wider wheels and tires, improving handling and traction on various surfaces.
The rocket bunny mustang wide body kit exemplifies this design philosophy, featuring flared fenders, custom side skirts, and prominent front/rear bumpers that enhance both aesthetics and performance.
Rocket Bunny Kit
Manufactured by Japanese company Pandem, the rocket bunny 2004 mustang wide body kit has become legendary among enthusiasts for its distinctive aggressive styling and wide fenders.
These kits feature unique lines and are engineered to work with modern automotive chassis while improving vehicle aerodynamics. Typically constructed from durable fiberglass, they're available in various colors and finishes to match your vision.
Liberty Walk Kit
The Liberty Walk body kit delivers an ultra-wide, aggressive profile that transforms any Mustang into a showstopper. Components include custom front/rear diffusers, distinctive rear wing, and signature widebody fenders.
For owners of earlier models, the rocket bunny 99-04 mustang wide body kit offers similar enhancements specifically designed for that generation.
Expert Tip: When selecting a body kit type, consider not just appearance but also your driving habits. Track-focused drivers may benefit from aerodynamic improvements of the Rocket Bunny design, while show car enthusiasts might prefer the dramatic styling of Liberty Walk kits.
Body Kit Comparison Chart
| Kit Type | Best For | Key Features | Material | Difficulty to Install |
|---|---|---|---|---|
| Wide Body Kit | Performance enhancement | Flared fenders, enhanced stance | Fiberglass/Carbon fiber | Moderate |
| Rocket Bunny | Distinctive JDM styling | Aggressive lines, wide fenders | Fiberglass | High |
| CDC Outlaw | Subtle enhancement | Front chin spoiler, side rockers | Polyurethane | Low to Moderate |
| Liberty Walk | Maximum visual impact | Dramatic proportions, rear wing | Fiberglass/FRP | Very High |
Specifications and Maintenance of Mustang Rocket Body Kit
Understanding the specification requirements and proper maintenance procedures for each component of your Mustang Rocket body kit is essential for preserving both appearance and performance benefits over time.
Aerodynamic Components
Front splitters, side skirts, and rear diffusers require specific maintenance routines to maintain both appearance and functional benefits. Regular cleaning prevents debris buildup that can compromise aerodynamic efficiency.
Key maintenance: Inspect for ground contact damage, verify secure mounting hardware, and maintain proper clearance adjustments.
Material Care & Protection
Different body kit materials (fiberglass, carbon fiber, polyurethane) require specific care routines. The finish quality dramatically impacts both appearance and longevity.
Protection tips: Consider paint protection film for vulnerable areas, use only appropriate cleaning products, and inspect regularly for stress cracks.
Professional Advice: Create a scheduled maintenance calendar for your body kit. Monthly inspections of mounting hardware, quarterly cleaning of difficult-to-reach areas, and semi-annual clear coat refreshing (for fiberglass kits) will significantly extend your kit's lifespan and preserve its appearance.
Component-Specific Maintenance Guide
| Component | Maintenance Tasks | Frequency | Special Considerations |
|---|---|---|---|
| Front Splitter | Clean debris, inspect for damage, check clearance | Weekly/After aggressive driving | Most prone to damage from driveways/speed bumps |
| Side Skirts | Clean surfaces, check mounting hardware | Monthly | Verify no loose fasteners from road vibration |
| Rear Diffuser | Remove debris, check alignment, clean exhaust residue | Monthly | Heat from exhaust can affect some materials |
| Wing Spoiler | Clean, check mounting points, verify angle adjustment | Monthly | Critical for proper aerodynamic function |
| Wheel/Tire Fitment | Check clearance with full suspension travel | After any suspension changes | Verify no rubbing during extreme cornering |
Warning: Never use automated car washes with a body kit installed. The brushes and high-pressure systems can catch on body kit components, potentially causing expensive damage. Hand washing is the only safe method.
How to Choose the Right Mustang Rocket Body Kit
Selecting the perfect body kit for your Mustang involves weighing multiple factors beyond just aesthetics. This comprehensive selection guide will help you make an informed decision that matches your specific goals, budget, and technical requirements.
Material Pros
- Carbon Fiber: Extremely lightweight, high strength, premium appearance
- Fiberglass: Cost-effective, good finish quality, relatively easy repairs
- Polyurethane: Flexible, impact-resistant, maintains shape in varying temperatures
Material Cons
- Carbon Fiber: Expensive, difficult to repair, can crack upon impact
- Fiberglass: Heavier than carbon fiber, brittle, may crack over time
- Polyurethane: Heavier than alternatives, less precise fitment, limited designs
Key Selection Criteria
| Selection Factor | Considerations | Importance Level |
|---|---|---|
| Goal & Purpose | Define whether you need aesthetic enhancement, performance improvement, or both | Critical |
| Material Quality | Balance weight, durability, appearance, and cost considerations | High |
| Fitment & Compatibility | Ensure compatibility with your specific Mustang model and year | Critical |
| Budget Planning | Account for kit cost, shipping, paint, installation, and potential modifications | High |
| Brand Reputation | Research rocket bunny widebody mustang suppliers and reviews | Medium |
| Future Support | Consider warranty coverage and availability of replacement parts | Medium |
Expert Recommendation: If this is your first body kit installation, consider starting with a partial kit (front bumper or rear diffuser) rather than a complete widebody transformation. This allows you to gain experience with the installation process, material characteristics, and maintenance requirements before committing to a full conversion.
DIY Installation Guide for Mustang Rocket Body Kit
Installing a body kit yourself can be a rewarding project that saves significant labor costs while giving you complete control over the finished result. This step-by-step guide breaks down the process for each major component.
Important Safety Notice: Before beginning any installation work, ensure your vehicle is properly supported on jack stands, not just a jack. Always disconnect the battery when working near electrical components, and wear appropriate safety equipment including gloves and eye protection.
1. Front Splitter Installation
Tools Required: Screwdriver set, ratchet wrench kit, trim removal tool, car jack and stands
- Safely raise the front of the car and secure it on jack stands
- Remove front wheels for better access if necessary
- Locate and remove factory hardware securing the original splitter or bumper
- Carefully detach the original component using trim removal tools to prevent damage
- Test-fit the new splitter before final installation
- Secure the new splitter using supplied hardware, ensuring even fitment
- Double-check all mounting points for proper tightening
2. Side Skirt Replacement
Tools Required: Ratchet wrench, socket set, trim removal tool, jack and stands
- Jack up both sides of the vehicle and secure on stands
- Remove any splash guards or underbody panels that might interfere
- Locate and remove factory hardware securing original side skirts
- Carefully detach original skirts using trim tools to avoid damaging the body
- Test-fit new side skirts and mark mounting locations if needed
- Secure new side skirts with supplied hardware, ensuring proper alignment with doors
- Verify clearance when doors open and close
3. Rear Diffuser Installation
Tools Required: Screwdriver set, ratchet wrench kit, socket set, trim removal tool
- Raise the vehicle's rear end and secure on jack stands
- Remove rear wheels if necessary for better access
- Disconnect exhaust tips if they interfere with the diffuser
- Remove factory hardware securing the original diffuser/bumper panel
- Carefully detach original component with trim tools
- Test-fit new diffuser and align with exhaust system
- Secure new diffuser with supplied hardware, ensuring even fitment and proper alignment
Professional Installation Tip: Take photographs of each step during disassembly. These references will be invaluable when reinstalling components, especially when dealing with complex wiring or multiple fasteners. Also, organize removed hardware in labeled containers to avoid confusion during reassembly.
Frequently Asked Questions
A Rocket Bunny body kit is a premium wide-body conversion package designed by Kei Miura of Tra-Kyoto. These kits are distinguished by their aggressive styling featuring dramatically flared over-fenders that accommodate significantly wider wheels and tires. A complete Rocket Bunny kit typically includes front and rear overfenders, front bumper/lip, side skirts, and a distinctive rear wing or ducktail spoiler.
What makes these kits special is their distinctive visual signature that blends Japanese tuner aesthetics with functional motorsport design elements. Unlike many body kits that are purely cosmetic, Rocket Bunny kits are engineered to improve aerodynamics while allowing for substantial wheel/tire upgrades that can enhance performance.
Rocket Bunny designs its body kits for specific car models and generations. For Ford Mustangs, kits are typically available for popular generations including:
- 1999-2004 New Edge Mustang (SN95) - The rocket bunny 2004 mustang wide body kit is particularly popular
- 2005-2014 S197 Mustang platform
- 2015-2022 S550 Mustang platform
Availability may vary, and some kits are produced in limited quantities. Always verify compatibility with your exact model year and trim level before purchasing, as certain modifications may be required for proper fitment even with the correct kit.
While both enhance a vehicle's width, there are several key differences between standard wide body kits and Rocket Bunny kits:
| Feature | Standard Wide Body Kit | Rocket Bunny Kit |
|---|---|---|
| Design Approach | Often seeks to blend with factory lines | Distinctive exposed bolt-on fender design |
| Installation Method | May require cutting or integrating with factory panels | Typically requires cutting fenders with visible bolts as a design element |
| Design Heritage | Various influences | Japanese tuner aesthetic with race-inspired elements |
| Customization | Varies by manufacturer | Distinctive "Rocket Bunny" branding and signature style |
| Price Point | Variable range | Premium pricing reflecting brand prestige |
The Rocket Bunny S13 body kit was one of the original designs that established Kei Miura's reputation in the automotive styling world. It was created for the Nissan S13 platform (240SX/Silvia) and features the now-iconic wide over-fenders with exposed bolt-on styling, an aggressive front lip, side skirts, and a ducktail spoiler.
While the S13 kit is for a different vehicle platform, it established the design language and approach that influenced later Rocket Bunny kits for other vehicles, including Mustangs. The success and popularity of the S13 kit led to Tra-Kyoto expanding their designs to additional platforms, applying similar aesthetic principles while adapting to each vehicle's unique characteristics.