

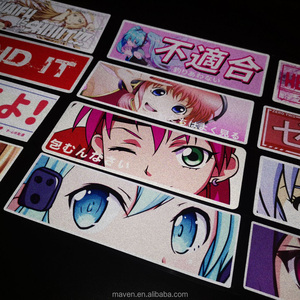

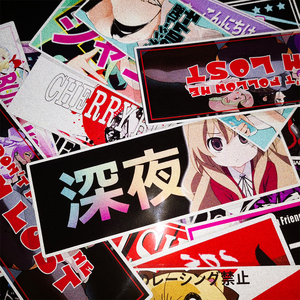
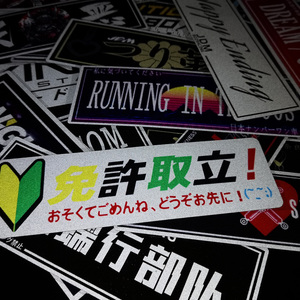
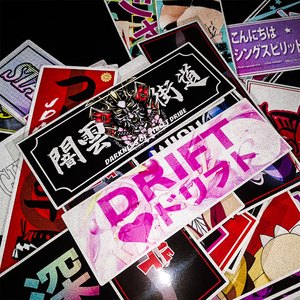
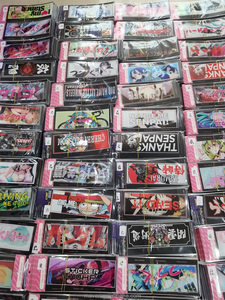


Types of Motorcycle Decal Stickers
Motorcycle decal stickers are more than just decorative elements—they serve functional and aesthetic purposes that enhance the overall appeal and visibility of a bike. Whether you're looking to personalize your ride or improve safety with better visibility, understanding the different types of motorcycle decals available can help you make informed choices for your specific needs.
Vinyl Decals
Vinyl is one of the most widely used materials for motorcycle decals due to its versatility and durability. These decals are crafted from high-quality vinyl that resists UV rays, rain, and other environmental factors, making them ideal for long-term outdoor use.
Advantages
- Highly durable and weather-resistant
- Easy to apply and remove without damaging paint
- Available in a wide range of colors and designs
- Cost-effective option for customization
Limitations
- May fade over time if exposed to harsh conditions
- Limited texture options compared to 3D emblems
Best for: Riders who want long-lasting personalization with minimal maintenance
Reflective Decals
Designed specifically to increase visibility during low-light or nighttime riding, reflective decals incorporate retro-reflective materials that bounce light back toward its source, enhancing rider safety on the road.
Advantages
- Improves visibility and enhances safety
- Ideal for urban environments and night riders
- Comes in various shapes including stripes, logos, and outlines
Limitations
- Less visually striking in daylight conditions
- Higher cost compared to standard vinyl
Best for: Safety-conscious riders and those who frequently ride at night
Racing Stripes & Kits
Racing-inspired decals give motorcycles a sporty, aggressive look reminiscent of professional racing bikes. Available as full kits or customizable sections, these decals allow riders to create a dynamic visual effect tailored to their style.
Advantages
- Adds a performance-oriented aesthetic
- Customizable layouts for personalized appearance
- Durable material suitable for track and street use
Limitations
- May not suit classic or minimalist designs
- More complex installation process
Best for: Enthusiasts seeking a race-ready look and bold styling
3D Emblems & Logos
These decals provide depth and realism, mimicking actual physical emblems or brand logos. Often used to highlight manufacturer branding or showcase personal style, 3D emblems add a premium touch to any motorcycle's design.
Advantages
- Offers a realistic, dimensional appearance
- Perfect for displaying brand loyalty or custom themes
- Resistant to peeling and cracking
Limitations
- More expensive than flat decals
- Requires careful alignment during application
Best for: Custom builds and bikes where aesthetics play a central role
Custom Graphics
For riders who desire complete uniqueness, custom graphics offer full creative freedom. From intricate patterns to personalized artwork featuring names, numbers, or themes, these decals transform a motorcycle into a rolling canvas.
Advantages
- Total customization possibilities
- Can be applied as full wraps or individual pieces
- Great for commemorating events or milestones
Limitations
- Most expensive option depending on complexity
- May require professional installation
Best for: Riders wanting a truly unique and expressive motorcycle appearance
Holographic & Metallic Decals
With eye-catching finishes that shimmer and reflect light in dynamic ways, holographic and metallic decals are perfect for riders looking to stand out. Holographic variants feature multi-colored iridescent effects, while metallic versions mimic chrome or brushed metal surfaces.
Advantages
- Highly attention-grabbing visual appeal
- Looks premium and luxurious
- Can be used for accents or full coverage
Limitations
- Not suitable for all motorcycle styles
- Potential glare under direct sunlight
Best for: Show bikes, custom builds, and riders who love making a statement
Anti-Scratch & Protective Film Decals
While primarily functional, these decals also offer aesthetic benefits by preserving the original paint underneath. Made from high-grade thermoplastic polyurethane (TPU), they protect vulnerable areas like fuel tanks, fairings, and mirrors from scratches, stone chips, and UV damage.
Advantages
- Provides excellent protection against scratches and impacts
- Maintains original paint integrity
- Clear or tinted options available for subtle protection
Limitations
- Installation requires skill and precision
- Higher upfront cost compared to regular decals
Best for: Daily commuters, touring bikes, and owners wanting to preserve resale value
| Type | Main Purpose | Durability | Aesthetic Appeal | Safety Contribution |
|---|---|---|---|---|
| Vinyl Decals | Personalization & Style | High | Good | Fair |
| Reflective Decals | Visibility Enhancement | Medium-High | Fair | Excellent |
| Racing Stripes & Kits | Sporty Aesthetic | High | Excellent | Low |
| 3D Emblems & Logos | Brand Identity & Detailing | High | Excellent | Low |
| Custom Graphics | Unique Expression | Medium-High | Outstanding | Low |
| Holographic & Metallic | Visual Impact | Medium | Outstanding | Low |
| Protective Film Decals | Paint Protection | Very High | Good | Low |
Expert Tip: For best results when applying decals, ensure the motorcycle surface is clean, dry, and free of wax or grease. Applying decals in warm weather or using a heat gun can help achieve smoother adhesion and reduce bubbles or wrinkles.
Specifications and Maintenance of Motorcycle Decal Stickers
Selecting the right motorcycle decal stickers involves more than just aesthetics—it requires understanding the technical specifications that ensure longevity, performance, and visual appeal under real-world conditions. Properly chosen and maintained decals not only enhance your bike’s appearance but also withstand environmental stressors such as UV exposure, moisture, and abrasion.
Key Specifications to Consider
When choosing motorcycle sticker decals, it's crucial to evaluate several key factors that determine their durability, application suitability, and long-term performance:
Material Composition
The material of a motorcycle decal plays a significant role in its lifespan and resistance to external elements. Common materials include:
- Vinyl: The most popular choice due to its flexibility, weather resistance, and ability to conform to curved surfaces. High-quality vinyl can last up to 5-7 years with proper care.
- Reflective Vinyl: Designed for visibility, especially at night or in low-light conditions. Ideal for riders who prioritize safety without compromising style.
- Carbon Fiber Look: Offers a premium aesthetic similar to actual carbon fiber parts without the high cost. Often printed on durable vinyl substrates.
Type of Decal
Different types of decals serve distinct purposes and visual goals:
- Racing Stripes: Classic designs that give motorcycles a sporty, aggressive look. Available in multiple colors and widths.
- 3D Raised Decals: These feature a layered construction that creates depth and dimensionality. They're often used for logos or custom branding.
- Fade & Gloss Effects: Mimic paint fades, metallic finishes, or gloss gradients for a custom-painted effect without the expense.
Thickness
The thickness of a decal directly influences its resilience against tearing, peeling, and wear from frequent riding conditions. Most motorcycle decals range between 0.1mm to 0.3mm in thickness:
- Thin (0.1–0.15mm): Easier to apply but less durable over time, best suited for short-term use or indoor bikes.
- Medium (0.15–0.25mm): Balanced option offering good durability and ease of installation—ideal for daily riders.
- Thick (0.25–0.3mm): Highly resistant to damage, suitable for off-road bikes or those exposed to harsh environments.
Adhesive Quality
The type and strength of adhesive backing are critical for ensuring the decal adheres securely and lasts through different weather conditions:
- Permanent Adhesive: Provides strong bonding, ideal for long-term applications where removal isn't anticipated.
- Removable Adhesive: Allows easy removal without leaving residue, great for renters or those who frequently customize their bike’s look.
- High-Tack Formulas: Designed to stick even on textured or uneven surfaces like plastic fairings or painted metal.
| Specification | Importance | Selection Tips |
|---|---|---|
| UV Resistance | High | Choose decals with UV protection to prevent fading from sun exposure; look for terms like "UV stable" or "outdoor grade." |
| Waterproof Rating | High | Ensure decals are fully waterproof to withstand rain, washing, and humidity. Laminated options offer enhanced water resistance. |
| Application Surface | Medium | Verify compatibility with the intended surface—metal, plastic, or painted bodywork—to ensure optimal adhesion and longevity. |
| Temperature Tolerance | Medium | Opt for decals rated for extreme temperatures if you ride in hot or cold climates to avoid cracking or bubbling. |
Essential Maintenance Practices
Proper maintenance significantly extends the life and appearance of your motorcycle decals. Here are some effective practices to keep them looking fresh:
- Gentle Cleaning: Wash your bike regularly using mild soap and water. Avoid pressure washers near decals as they can lift edges or cause bubbles.
- Avoid Harsh Chemicals: Stay away from solvents, degreasers, or ammonia-based cleaners which can break down the adhesive or fade the print.
- Weather Protection: Whenever possible, park your bike indoors or use a breathable cover to protect decals from prolonged exposure to rain, snow, or direct sunlight.
- Edge Inspection: Periodically check for lifting corners or bubbles. If found early, reapply a small amount of decal-specific adhesive or clear nail polish to seal the edge.
- Protectant Spray: Apply a decal protectant or UV-blocking wax every few months to preserve color vibrancy and shield against oxidation.
- No Scrubbing: Never scrub decals aggressively. Use soft microfiber cloths or sponges to gently remove dirt and grime.
Important: When applying new decals, ensure the surface is completely clean, dry, and free of oils or residues. Applying decals to improperly prepared surfaces can lead to premature peeling and poor adhesion.
How to Choose Motorcycle Decal Stickers
Selecting the perfect motorcycle decal sticker is more than just picking a design you like — it’s about finding a balance between aesthetics, durability, functionality, and personal expression. With so many options available in the market, making an informed choice ensures your motorcycle stands out while maintaining long-term visual appeal.
Design
The design of your motorcycle decal should reflect your personality and complement the overall look of your bike. Whether you're into aggressive racing themes, minimalist geometric patterns, or custom artwork, there's a wide variety of designs that cater to every taste and style preference.
- Racing motifs enhance sporty looks
- Nature-inspired graphics offer a laid-back vibe
- Custom typography adds a personal touch
Pro Tip: Match your decal design with your helmet or riding gear for a cohesive aesthetic.
Size & Fit
Accurate sizing is crucial to ensure your decal fits perfectly on your motorcycle's surface without overlapping, gaps, or distortion. Take measurements of the intended area before purchasing, especially when ordering custom sizes.
- Fuel tanks typically require larger, curved decals
- Fenders work well with smaller, streamlined designs
- Side covers need contoured shapes to match contours
Measurement Guide: Use a flexible tape measure and note any curves or obstructions where the decal will be placed.
Material Quality
The material used in your motorcycle decal determines its lifespan and resistance to environmental factors. High-quality vinyl is the most popular option due to its flexibility, UV resistance, and ability to withstand extreme weather conditions.
- Vinyl: Most common and durable choice
- Polyester: Budget-friendly but less resilient
- Metallic finishes: Offer premium look with added cost
Finish Options: Matte finishes hide imperfections better; glossy finishes offer vibrant shine and depth.
Installation Process
Choosing a decal that's easy to install can save time and frustration. Look for decals with air-release adhesive backing, which helps eliminate bubbles during application. Some kits also include squeegees, alignment tools, and detailed instructions.
- Air-vented adhesives allow easier positioning
- Pre-cut kits simplify installation
- Multi-piece sets may offer better fit around complex surfaces
DIY Tip: Apply decals on warm days (above 60°F/15°C) for better adhesion and flexibility.
Durability & Longevity
Durability is essential, especially if you ride frequently or in harsh climates. High-quality decals are designed to last several years without fading, peeling, or cracking. Always check manufacturer warranties and customer reviews for real-world performance insights.
- UV-resistant materials prevent sun fading
- Weatherproof layers protect against rain and snow
- Thicker vinyl lasts longer under wind resistance
Expected Lifespan: Premium vinyl decals can last up to 7 years with proper care.
Protective Functionality
Beyond aesthetics, some decals serve as protective barriers against scratches, stone chips, and UV damage. These are particularly useful for high-wear areas like the front fairing or fuel tank.
- Clear bra-style decals protect paint from road debris
- Textured wraps add grip and protection
- Anti-glare finishes reduce reflection on bright surfaces
Dual-purpose benefit: Protective decals can double as paint protection film alternatives at a lower cost.
Customization Insight: If you want a truly unique look, consider investing in a fully customized decal set tailored to your motorcycle model, color scheme, and personal preferences. Custom designs often come with digital previews so you can visualize the final result before purchase.
| Use Case | Recommended Material | Adhesive Type | Lifespan | Best For |
|---|---|---|---|---|
| Street cruising | Cast vinyl | Permanent | 5–7 years | Long-term styling and durability |
| Commuting in city | Calendered vinyl | Removable | 3–5 years | Cost-effective, temporary changes |
| Racing or track use | High-performance urethane | High-tack permanent | 3–5 years | Extreme speed and wear resistance |
| Custom builds | Printed cast vinyl | Custom blend | 5+ years | Unique colors, gradients, and textures |
Budget Planning: While budget is important, prioritize quality over price. Investing in a slightly more expensive decal made from premium materials can save money in the long run by reducing the frequency of replacements and offering better performance.
How to DIY and Replace Motorcycle Decal Stickers
Replacing motorcycle decal stickers is a cost-effective way to refresh your bike's appearance or personalize it to match your style. Whether you're restoring an older bike, updating graphics for racing, or simply giving your machine a fresh look, this comprehensive guide will walk you through the process step by step.
Tips for Success: Take your time during installation. Proper preparation and attention to detail will ensure your new decals look professional and last longer. Avoid working in direct sunlight or extreme temperatures, as heat can affect adhesion and workability.
Essential Materials Needed
Before starting the installation process, gather all necessary tools and materials to ensure a smooth experience:
- Isopropyl alcohol or adhesive remover: For cleaning surfaces and removing old adhesive residue
- Clean cloths or paper towels: To wipe down surfaces before application
- Lint-free towel: Ensures no fibers are left behind on the surface
- Credit card or squeegee: Helps eliminate air bubbles and press the decal firmly onto the surface
- Heat gun or hair dryer: Softens adhesive for easier positioning and removal
- Exacto knife: Useful for trimming excess material around curves and edges
- New stickers or decals: Choose high-quality vinyl for durability and weather resistance
- Sticker removal solution: Makes removing old decals much easier without damaging paint
| Tool/Item | Purpose | Recommended Type | Estimated Cost |
|---|---|---|---|
| Isopropyl Alcohol (90%+) | Cleaning and degreasing surfaces | High-concentration formula | $5–$10 |
| Squeegee or Credit Card | Bubble-free application | Rubber-edged squeegee preferred | $3–$15 |
| Heat Gun | Adhesive activation and removal | Adjustable temperature model | $20–$50 |
| Exacto Knife | Trimming and detailing | With replaceable blades | $10–$20 |
| Decals/Stickers | Visual customization | Cast vinyl for longevity | $20–$100+ |
Step-by-Step Installation Guide
- Surface Preparation
Begin by thoroughly cleaning the area where the decals will be placed. Use soap and water first to remove dirt and grime, then follow up with isopropyl alcohol to eliminate any oils, wax, or residue that could interfere with adhesion. Allow the surface to dry completely before proceeding.
- Remove Old Decals
If there are existing decals, use a sticker removal solution or isopropyl alcohol to soften the adhesive. Apply heat with a hair dryer or heat gun if needed, and gently peel away the old graphics. Wipe off any remaining adhesive residue and allow the surface to dry again.
- Test Fit Placement
Before peeling off the backing, place the decal in its intended position to check alignment and fit. This helps avoid mistakes once the adhesive is exposed. Make sure to account for symmetry and design flow, especially on both sides of the bike.
- Peel and Position
Slowly peel off the backing from the decal, being careful not to touch the adhesive side with dirty fingers. Hold the decal by its edges and align it carefully with your test-fit marks. If the decal is large, consider applying one section at a time.
- Avoid Contamination
Ensure the decal’s surface remains free from fingerprints, dust, and oils. Even small contaminants can show through transparent areas or create imperfections under the film.
- Apply the Decal
Starting at one edge, slowly lower the decal onto the surface. Once positioned, use a squeegee or credit card to press it firmly into place, working from the center outward to push out air bubbles and moisture.
- Eliminate Air Bubbles
If air bubbles appear, gently lift the edge of the decal slightly and reapply while smoothing it out. For stubborn bubbles, use a pin to poke tiny holes and press the air out.
- Use Heat for Flexibility
When applying to curved surfaces or compound shapes, use a heat gun or hair dryer to warm the decal. This makes it more pliable and easier to conform to contours without stretching or tearing.
- Trim Excess Material
For precise fitting around vents, panels, or other obstacles, use an Exacto knife to carefully trim the decal after application. Take your time to ensure clean, sharp lines.
- Allow Adhesion Time
After installation, avoid washing or exposing the motorcycle to heavy rain for at least 24–48 hours. This gives the adhesive time to fully bond with the surface, ensuring long-term durability against weather and road conditions.
Pro Tip: Consider using transfer tape for larger or complex decals. This technique allows you to apply multiple pieces together more accurately and ensures proper alignment, especially for multi-layered designs or logos.
Post-Installation Care Tips
To maintain the appearance and longevity of your new decals:
- Wash your motorcycle regularly with mild soap and water
- Avoid pressure washing directly on the decals
- Don't use abrasive cleaners or solvents near the graphics
- Inspect for lifting edges periodically and re-adhere if necessary
- Store your motorcycle indoors or use a cover when not in use
Types of Tricycle Electric Wiper Motor Kit
A tricycle electric wiper motor kit is an essential component in modern electric and hybrid tricycles, designed to automate windshield cleaning for improved visibility and safety. Unlike traditional vehicles that rely on mechanical systems driven by internal combustion engines, these kits are specifically engineered for electric or hybrid powertrains. They ensure reliable operation through battery-powered motors, making them ideal for eco-friendly transportation solutions.
Single Motor Kit
The single motor kit features a solitary electric motor responsible for driving both windshield wipers simultaneously. This system utilizes a mechanical linkage that transfers the motion from the motor to each wiper arm, enabling synchronized movement across the windshield. The design is compact and efficient, making it suitable for smaller tricycles with simpler windshield configurations.
Advantages
- Cost-effective solution
- Simple design with fewer components
- Easier maintenance and replacement
- Lightweight and space-saving
Limitations
- Limited customization options
- Less effective on larger windshields
- Potential for uneven wear over time
Best for: Compact tricycles, urban commuting models, budget-conscious builds
Dual Motor Kit
The dual motor kit employs two independent electric motors, each dedicated to a specific wiper blade. This configuration allows for precise control over each wiper's speed, direction, and wiping pattern, resulting in more thorough windshield coverage. It’s particularly advantageous for tricycles with wider windshields or those operating in heavy rain conditions where optimal visibility is critical.
Advantages
- Superior windshield coverage
- Independent control of each wiper
- Better performance in adverse weather
- Enhanced reliability due to redundancy
Limitations
- Higher cost compared to single motor kits
- More complex installation process
- Increased energy consumption
Best for: Larger tricycles, commercial delivery trikes, high-end models requiring premium functionality
Linkage System
The linkage system in a wiper motor for tricycle serves as the mechanical interface between the motor and the wiper blades. It translates rotational motion from the motor into linear or oscillating movement required for the wipers to sweep across the windshield effectively. Various types of linkage systems—such as direct drive, crank mechanisms, and parallel linkages—are employed based on vehicle design and performance requirements.
Advantages
- Customizable for different wiper motions
- Robust mechanical connection
- Efficient force transmission
Limitations
- Prone to wear and tear over time
- Requires periodic lubrication and adjustment
- May contribute to noise if misaligned
Best for: Mechanical-based wiper operations, retrofitting older models, custom builds
Control System
The control system of a tricycle wiper motor manages how the wipers operate based on driver preferences and environmental inputs. Basic systems allow manual adjustment of speed and intermittent settings via a switch, while advanced setups may include automatic rain sensors that detect moisture levels and activate the wipers accordingly. Some kits even integrate with the vehicle’s central electronics for smart operation.
Advantages
- Convenient and user-friendly
- Improved safety through automation
- Integration with vehicle electronics possible
- Energy-efficient when used with sensors
Limitations
- More expensive than basic controls
- Potential for electronic malfunctions
- Complex diagnostics and repairs
Best for: Modern electric tricycles, high-tech builds, rider-focused designs emphasizing convenience
| Type | Complexity | Performance | Cost | Best Application |
|---|---|---|---|---|
| Single Motor Kit | Low | Moderate | Low | Compact urban tricycles, entry-level models |
| Dual Motor Kit | High | Excellent | High | Commercial trikes, large windshields, performance-oriented builds |
| Linkage System | Medium | Good | Moderate | Retrofits, mechanical applications, custom builds |
| Control System | Very High | Excellent | High | Smart vehicles, automatic rain sensing, integrated electronics |
Expert Tip: When choosing a wiper motor kit, consider your typical riding environment. If you frequently ride in wet or unpredictable weather, investing in a dual motor kit with an automatic control system can significantly enhance safety and convenience.