


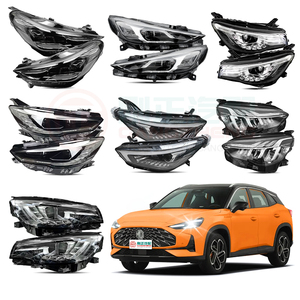


Types of MG6 Headlights
The headlights of the MG6 have evolved significantly since the vehicle's introduction in 2009. These changes reflect ongoing advancements in automotive lighting technology and shifting consumer preferences for enhanced visibility, efficiency, and aesthetics. As of 2023, the MG6 is equipped with LED (Light Emitting Diode) headlights as standard or optional equipment across most models.
LED headlights offer numerous advantages over older technologies like halogen bulbs. They are brighter, more energy-efficient, and have a longer operational lifespan—up to 30,000 hours in many cases. This translates to less frequent replacements and lower maintenance costs over time. Additionally, LED headlights provide a modern, stylish appearance that enhances the overall look of the vehicle.
Common Types of MG6 Headlights
Depending on the model year and trim level, the MG6 may come with various types of headlight configurations. Below is a breakdown of the most commonly available types:
Projector Headlights
Projector headlights utilize a lens and a precisely curved reflective bowl to focus the light emitted by the bulb into a concentrated beam pattern. This design delivers superior road illumination compared to traditional setups.
Advantages
- Sharper, more focused beam pattern
- Better visibility at night
- Defined cut-off line prevents glare for oncoming drivers
- Modern aesthetic appeal
Limitations
- More expensive than reflector units
- Complex design may be harder to repair
Best for: Night driving, urban environments, safety-conscious drivers
Reflector Headlights
Reflector headlights rely on a parabolic-shaped reflective surface to scatter light from the bulb onto the road. While they are effective, they typically produce a less uniform light pattern compared to projector systems.
Advantages
- Lower manufacturing cost
- Easier to replace or upgrade
- Adequate performance for basic needs
Limitations
- Less focused light output
- Potential for glare due to scattered light
- Shorter effective range in low-light conditions
Best for: Budget-oriented models, daylight driving, short commutes
LED Daytime Running Lights (DRLs)
Daytime running lights (DRLs) are designed to automatically illuminate when the vehicle is turned on, increasing visibility during daylight hours. Most newer MG6 models use LED DRLs due to their brightness, energy efficiency, and long service life.
Advantages
- Improves visibility in all weather conditions
- Low power consumption
- Instant-on functionality
- Modern, premium look
Limitations
- Not intended as primary headlights
- May require additional wiring for upgrades
Best for: Safety-focused driving, compliance with regulations in certain regions
LED Tail Lights
Tail lights play a critical role in signaling braking and turning intentions to other drivers. The MG6 features LED tail lights in most recent models, offering both functional and visual benefits.
Advantages
- High visibility in low-light and adverse conditions
- Faster response time than incandescent bulbs
- Durable and resistant to vibration
- Enhances rear styling and brand identity
Limitations
- Higher replacement cost if damaged
- Can sometimes be too bright for following vehicles
Best for: Highway driving, city traffic, safety and style
| Type | Visibility | Energy Efficiency | Lifespan | Ideal Use Case |
|---|---|---|---|---|
| Projector Headlights | Excellent | Good | Long | Night driving, highways |
| Reflector Headlights | Moderate | Fair | Moderate | City driving, budget models |
| LED DRLs | Good | Excellent | Very Long | Daytime visibility, safety |
| LED Tail Lights | Excellent | Excellent | Very Long | Rear visibility, highway driving |
Expert Tip: When upgrading your MG6 headlights, especially to LED or projector units, ensure compatibility with your vehicle’s existing electrical system and housing. Consider professional installation to optimize alignment and avoid issues like glare for other road users.
Comprehensive Guide to MG6 Headlights: Specifications and Maintenance
The MG6 is a dynamic vehicle that relies heavily on its headlight system for both safety and aesthetics. The headlights are not only critical for visibility during nighttime or poor weather conditions but also play a role in the overall design language of the car. Proper maintenance and understanding of specifications ensure optimal performance, longevity, and visual appeal.
Key Maintenance Practices for MG6 Headlights
Maintaining your MG6 headlights involves more than just replacing bulbs when they burn out. Regular inspection and proactive care help maintain brightness, functionality, and appearance:
Regular Inspection
Periodically inspect all components of the headlight assembly. Check for signs of dimming or complete bulb failure. Diminished light output can be an early indicator of aging bulbs or electrical issues. Also, examine the lens covers for cracks, yellowing, or cloudiness—common issues caused by UV exposure and environmental contaminants.
Ensure the headlight alignment remains correct. Misaligned beams can reduce visibility and potentially blind other drivers. Use the adjustment screws located behind the housing (referencing your owner’s manual) to realign the lights as needed.
Cleaning
Dirt, grime, and road debris can accumulate on the surface of the lenses, significantly reducing light output. Clean the lenses regularly using a mild soap solution and a soft microfiber cloth. Avoid harsh chemicals or abrasive materials that could scratch the plastic surface.
Don't neglect the interior of the headlight housing. Dust and moisture buildup inside can affect bulb life and reflector efficiency. If you notice condensation forming inside the housing, it may indicate a broken seal that needs immediate attention.
Bulb Replacement
A burned-out headlight bulb should never be ignored. Driving with only one functioning light compromises safety and may violate traffic laws. Always replace bulbs with the same type specified in your owner's manual—typically halogen, HID, or LED depending on your model year and trim level.
When installing new bulbs, avoid touching the glass portion with bare hands. Oils from your skin can create hotspots on the glass, leading to premature failure. Follow the manufacturer's instructions carefully to ensure proper seating and connection.
Lens Replacement
If the lens cover becomes cracked or severely discolored, replacement is necessary. Cracks can allow moisture into the headlight unit, which leads to fogging, corrosion, and reduced illumination. Choose OEM or high-quality aftermarket replacements that match your MG6’s original specifications.
While some lens replacements can be DIY projects, if you're unsure about sealing the unit properly or aligning it correctly, consider having a professional mechanic perform the installation to avoid future issues.
Adjusting Headlight Angles
Changes in vehicle load or suspension height can affect headlight aim. It's recommended to check and adjust the beam angle periodically, especially after major suspension work or if you've added significant weight to the trunk area.
Most MG6 models allow vertical adjustment via screws located under the lens cover. Some higher trims may include horizontal adjustments as well. Perform this task in a controlled environment—ideally against a wall or garage door—to visually confirm proper alignment.
Sealing and Moisture Protection
Proper sealing is crucial to prevent water intrusion, which can damage internal components and cause foggy lenses. Inspect the rubber grommets and silicone seals around bulb sockets and wiring harnesses for cracks or wear.
If gaps or degraded material is found, replace the affected grommets or apply fresh waterproof silicone sealant. This preventive measure helps maintain long-term reliability and prevents costly repairs down the line.
| Maintenance Task | Frequency | Tools Needed |
|---|---|---|
| Visual Inspection | Every 2 months or 3,000 miles | Flashlight, gloves |
| Lens Cleaning | Monthly or as needed | Microfiber cloth, mild cleaner |
| Bulb Replacement | As needed (avg. every 1-2 years) | Screwdriver, replacement bulb |
| Angle Adjustment | Biannually or after suspension changes | Phillips screwdriver, flat surface |
| Seal Integrity Check | Annually or after heavy rain exposure | Silicone sealant, replacement grommets |
Additional Components to Monitor
Beyond the basic maintenance tasks, there are several internal components within the MG6 headlight assembly that contribute to performance and should be checked during deeper inspections:
Note: If you encounter persistent issues such as frequent bulb failures, inconsistent lighting patterns, or recurring moisture inside the housing, consult a qualified technician. These symptoms may point to deeper electrical problems or structural flaws in the headlight assembly that require specialized diagnostics and repair.
How to Choose MG6 Headlights
Selecting the right headlights for your MG6 is crucial for safety, visibility, and driving comfort. With so many options available on the market, it's important to understand the key factors that differentiate headlight models and determine which ones best suit your needs. This guide will walk you through everything you need to know when choosing MG6 headlights.
Driving Environment Considerations
Your typical driving conditions play a significant role in determining the ideal headlights for your MG6. The lighting needs of city drivers differ from those who frequently travel on rural roads or highways.
- Urban drivers benefit from balanced beam patterns that avoid excessive glare for other motorists
- Rural/highway drivers require long-range illumination for improved reaction time
- Frequent winter drivers should prioritize fog-penetrating capabilities and anti-glare features
- Off-road enthusiasts may want additional protective housings and vibration-resistant components
Key tip: Look for adaptive lighting systems if you regularly encounter changing road conditions
Light Output and Color Temperature
Understanding lumen output and color temperature helps ensure optimal visibility without compromising legal compliance or safety.
- Lumens indicate light brightness (standard halogen = 1,000-1,500lm, LED = 2,000-4,000lm, HID = 3,000-5,000lm)
- Color temperature affects visibility and legality (measured in Kelvin - K)
- Recommended ranges:
- White light: 4,000K-5,000K (best all-around visibility)
- Bright white: 5,500K-6,500K (excellent clarity with slight blue tint)
- Blue-white: 6,500K-8,000K (legal in most areas but reduced brightness)
Important note: Extremely high color temperatures (>8,000K) often sacrifice visibility for aesthetics and may not be street legal
Installation Requirements and Compatibility
The complexity of installation varies significantly between headlight types and brands. Consider your technical skill level and available tools when making a selection.
- Halogen upgrades typically direct replacements (plug-and-play)
- LED conversions may require wiring modifications or ballast mounting
- HID kits usually need professional installation due to complexity
- Some modern units integrate daytime running lights or DRL circuits
Research tip: Check online forums like MG6 enthusiast communities for specific model compatibility reports
Durability and Long-Term Value
While initial cost is important, considering long-term value helps make the most economical choice over time.
- Halogen bulbs: Cheapest upfront ($20-$50), shortest lifespan (400-800 hours)
- LED headlights: Moderate cost ($100-$300), longest lifespan (20,000+ hours)
- HID systems: Higher cost ($150-$400), good lifespan (2,000-3,000 hours)
- Consider climate resistance ratings (IP65 or higher recommended for harsh environments)
Cost comparison: LEDs last approximately 20 times longer than standard halogens
Expert Advice: When upgrading your MG6 headlights, consider investing in a complete headlight assembly rather than just replacing bulbs. Modern assemblies often include improved reflector designs, better lens coatings, and enhanced moisture protection that can dramatically improve overall performance compared to stock units.
| Headlight Type | Pros | Cons | Average Cost Range |
|---|---|---|---|
| Halogen | Inexpensive, easy replacement, excellent color rendering | Lower brightness, shorter lifespan, more power consumption | $20 - $50 |
| LED | Extreme brightness, energy efficient, long-lasting | Higher upfront cost, potential compatibility issues | $100 - $300 |
| HID/Xenon | Natural daylight color, excellent visibility | Complex installation, potential glare issues | $150 - $400 |
| Projector Assemblies | Precise beam control, modern look, integrated tech | Most expensive option, professional installation recommended | $200 - $600+ |
Additional Considerations for MG6 Owners
MG6 owners have several unique considerations when upgrading headlights:
- Check for proper fitment with factory headlight housings
- Verify compatibility with vehicle electrical system
- Consider sequential turn signal options for aesthetic upgrades
- Look for units with integrated cooling systems for LED applications
- Review local laws regarding light output regulations
Recommendation: For 2011-2019 MG6 models, LED projector retrofit kits offer an excellent balance of performance and aesthetics while maintaining OEM integration
Final Thoughts: Don't compromise on quality when selecting headlights for your MG6. Proper lighting isn't just about seeing better – it's about being seen, reacting faster, and staying safe. Take the time to research reviews from fellow MG6 owners, consult with reputable suppliers, and choose headlights that match both your driving needs and budget requirements. A well-lit road ahead makes every journey more enjoyable and secure.
Comprehensive DIY Guide to Replacing MG6 Headlights
Replacing the headlights on your MG6 is a straightforward task that can significantly improve visibility and safety, especially at night or in poor weather conditions. With basic tools and careful attention, this maintenance job can be completed by most vehicle owners within 30 minutes per side. This guide provides detailed instructions for replacing H7 headlight bulbs commonly used in MG6 models.
Safety Reminder: Always allow the engine to cool before working under the hood, and avoid touching the glass portion of new bulbs with bare hands to prevent premature failure caused by oils from your skin.
Step-by-Step Headlight Replacement Process
- Park Safely and Prepare
- Park your vehicle on a flat surface and turn off the ignition
- Allow the engine to cool completely (wait at least 10-15 minutes after turning it off)
- Gather necessary tools: replacement H7 bulb(s), gloves or clean cloth, screwdriver if needed for cover removal
- Select the Correct Bulb Type
- Consult your owner's manual to confirm the specific bulb type required for your MG6 model year
- H7 bulbs are standard for many applications but newer LED or Xenon upgrades may require different fittings
- Purchase OEM or high-quality aftermarket replacements for optimal performance
- Open the Bonnet Properly
- Locate and pull the interior bonnet release lever
- Walk to the front of the vehicle and lift the secondary safety latch
- Fully open and secure the bonnet using the support rod
- Access the Headlight Unit
- Identify which headlight needs replacement
- Look behind the headlight assembly – some models have a removable plastic cover or access panel
- Carefully twist or unclip the cover to expose the back of the headlight unit
- Remove the Old Bulb
- Locate the electrical connector attached to the old bulb
- Press the locking tab and carefully disconnect the wiring harness
- Turn the bulb holder counterclockwise (typically ¼ turn) to release it from the housing
- Gently pull the old bulb straight out from the socket
- Install the New Bulb
- Handle the new bulb only by its base – use gloves or a clean cloth to avoid touching the glass
- Align the new bulb with the socket and insert it straight without forcing
- Reconnect the wiring harness ensuring a secure connection
- Rotate the bulb assembly clockwise to lock it into place
- Replace Protective Covers
- If you removed any plastic covers during access, reinstall them now
- Ensure all seals are properly seated to maintain dust and moisture protection
- Verify that nothing is obstructing proper closure of the bonnet
- Test Your Work
- Turn on the headlights to verify proper operation
- Check both low and high beam functions if applicable
- Observe the beam pattern – it should be even and properly aligned
- Make minor adjustments if the light appears misdirected
- Secure the Engine Bay
- Close the bonnet slowly to avoid pinching wires or components
- Ensure the primary latch and safety catch engage fully
- Double-check that no tools or materials were left under the hood
| Preparation Stage | Key Actions | Common Issues | Recommended Tools |
|---|---|---|---|
| Bulb Selection | Confirm correct H7 specification, check packaging for MG6 compatibility | Installing incorrect wattage or incompatible base type | Owner's manual, online parts catalog |
| Access Preparation | Proper bonnet opening technique, identifying cover types | Forcing stuck components, damaging clips | Flashlight, trim removal tool |
| Bulb Handling | Using gloves/cloth, avoiding twisting during installation | Fingerprints causing hotspots, broken filaments | Nitrile gloves, microfiber cloth |
| Final Testing | Checking function, verifying alignment, testing in dark location | Misaligned beams, intermittent connections | Dark area for testing, assistant for observation |
Pro Tip: For better visibility and longevity consider upgrading to a premium halogen bulb like Philips X-tremeUltinon or Osram Night Breaker, while staying within legal limits for road use. Remember to replace both headlights simultaneously for balanced illumination, even if only one has failed.
Maintenance Tips and Recommendations
- Inspect headlights every 6 months for signs of dimming or clouding
- Keep lens covers clean using appropriate automotive-grade cleaners
- Consider professional alignment if beams appear uneven
- Store replacement bulbs in original packaging until needed
- Carry spare bulbs in your emergency kit for unexpected failures
Headlight replacement is an essential maintenance task that improves nighttime driving safety and ensures your vehicle remains roadworthy. By following these comprehensive steps, you'll complete the job efficiently while maintaining the integrity of your MG6's lighting system.
Frequently Asked Questions About MG6 Headlights
While some vehicles may appear similar in design, MG6 headlights are specifically engineered to match the dimensions, mounting points, and electrical systems of the MG6 model. Attempting to install them on other vehicles can result in:
- Misalignment with bumper and grille components
- Incompatible wiring harnesses
- Potential issues with headlight leveling systems
- Improper light beam patterns that could violate road safety regulations
To ensure proper installation and legal compliance, always verify your vehicle's make, model, and year when purchasing replacement headlights. Universal-fit options exist but may require additional modifications.
Absolutely. The MG6 headlight housings are compatible with LED bulb upgrades, which offer numerous advantages:
- Brightness: LEDs produce a whiter, brighter light (up to 5000K color temperature)
- Energy Efficiency: Consumes up to 80% less power than halogen bulbs
- Lifespan: Lasts 20,000+ hours compared to 400-1000 hours for halogens
- Response Time: Instant full brightness, improving reaction time in critical situations
When upgrading, consider:
- Choosing bulbs with DOT/SAE certification
- Checking for compatibility with existing reflector or projector housing
- Installing CANbus adapters if error codes appear after installation
Headlight replacement frequency depends on several factors:
| Condition | Recommended Action | Typical Lifespan |
|---|---|---|
| Visible lens clouding | Immediate replacement | N/A |
| Diminished light output | Consider replacement | 3-5 years |
| Physical damage | Replace damaged unit | As needed |
| Regular maintenance | Inspect every 12 months | Ongoing |
Even without visible problems, experts recommend replacing headlights every 5 years as part of preventative maintenance, as gradual degradation in performance can occur over time.
The energy efficiency of MG6 headlights depends on the specific lighting technology used:
- Halogen Bulbs: ~70-90 lumens per watt
- HID/Xenon: ~90-105 lumens per watt
- LED: ~100-150 lumens per watt
Compared to traditional lighting solutions, modern headlight technologies offer significant improvements:
| Type | Power Consumption | Lifespan | Efficiency Rating |
|---|---|---|---|
| Halogen | 55W-65W | 400-1000 hrs | Moderate |
| HID | 35W-55W | 2000+ hrs | High |
| LED | 20W-40W | 20,000+ hrs | Very High |
This efficiency translates to reduced battery drain and lower long-term operating costs, particularly when using LED or HID upgrade options.
Yes, MG6 headlights feature adjustment mechanisms that allow you to optimize their beam pattern and range. Proper headlight alignment is crucial for both visibility and safety. Here's how to adjust them effectively:
- Park on level ground facing a flat wall
- Position vehicle 25 feet from the wall
- Turn on headlights to low beam setting
- Locate adjustment screws (usually on top and side of headlight assembly)
- Adjust vertically until the upper cutoff line aligns with the center of the wall marking
- Adjust horizontally until beams overlap about 10% at the center
Important considerations:
- Always consult your owner's manual for specific instructions
- Check alignment annually or after suspension work
- Some models feature automatic leveling systems
- Aftermarket projectors may require different adjustment techniques
Properly aligned headlights not only provide better visibility but also prevent blinding oncoming drivers, ensuring safer nighttime driving.