


Types of Honda Wave CDI
Honda Wave CDI (Capacitor Discharge Ignition) is an advanced electronic ignition system that replaces conventional mechanical ignition systems in motorcycles. With CDI technology, spark timing is precisely controlled electronically, resulting in improved engine performance, fuel efficiency, and reliability.
What makes CDI special: Unlike traditional ignition systems, CDI uses capacitor technology to store and discharge high-voltage electricity at precisely timed intervals, creating more powerful sparks that improve combustion efficiency.
Single CDI
The most basic and common CDI type used in Honda Wave motorcycles. It employs a single CDI unit to generate spark for the engine.
- Controls timing for all cylinders from one unit
- Ideal for single-cylinder engines like the Honda Wave
- Simple construction with fewer components
- Cost-effective and easy to replace
Multi-CDI
A more sophisticated system using multiple CDI units to generate sparks, with each unit controlling timing for a specific cylinder.
- Provides more precise spark timing control
- Enables better performance optimization
- Primarily used in multi-cylinder engines
- More complex installation and higher cost
Capacitor Discharge Multiple Spark CDI
An advanced CDI system that generates multiple sparks per ignition event rather than a single spark.
- Creates multiple sparks for more complete combustion
- Improves power delivery and throttle response
- Ensures full ignition of air-fuel mixture
- Offers smoother engine operation across RPM range
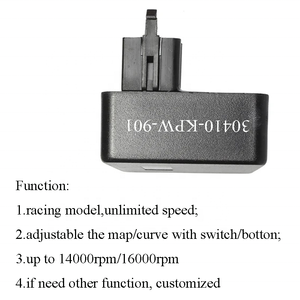
Programmable CDI
A customizable CDI system allowing users to adjust and program ignition timing through a controller interface.
- Enables custom timing curves for different conditions
- Can be optimized for different fuel types
- Ideal for performance upgrades and racing applications
- Allows adaptation to engine modifications
Capacitor Discharge Ignition Digital CDI
The most advanced Honda Wave CDI type, combining high-energy capacitor technology with digital control systems.
- Uses microprocessor control for precise timing
- Delivers consistent high-energy sparks
- Provides optimal performance in all conditions
- Features improved fuel efficiency and emissions
| CDI Type | Best For | Performance Level | Cost Range | Installation Complexity |
|---|---|---|---|---|
| Single CDI | Standard stock replacement | Basic | Low | Simple |
| Multi-CDI | Multi-cylinder engines | Improved | Medium | Moderate |
| Multiple Spark CDI | Performance enhancement | Advanced | Medium-High | Moderate |
| Programmable CDI | Racing/Custom tuning | High | High | Complex |
| Digital CDI | Ultimate performance | Premium | Very High | Complex |
Specifications of Honda Wave with CDI System
The Honda Wave series featuring CDI technology combines reliability, efficiency, and performance in an affordable package. Here are the key specifications of the typical Honda Wave models equipped with CDI systems:
Engine
- Type: 109.1 cc, single-cylinder
- Configuration: Four-stroke, air-cooled SOHC
- Ignition: CDI system
- Compression Ratio: 9.5:1
- Power Output: 6.9kW @ 8,500 rpm
- Torque: 9.3Nm @ 5,000 rpm
- Fuel Efficiency: Excellent for daily commuting
Transmission
- Type: Four-speed constant mesh
- Clutch: Multi-plate wet clutch
- Final Drive: Chain drive
- Gear Pattern: 1-N-2-3-4
- Shifting: Smooth operation
- Power Delivery: Optimized for fuel efficiency
Suspension & Handling
- Front: Telescopic suspension
- Rear: Swingarm suspension
- Front Wheel Travel: 110 mm
- Rear Wheel Travel: 84 mm
- Handling: Balanced and stable
- Ride Comfort: Good on various road conditions
Brakes & Tires
- Front Brake: 220mm hydraulic disc
- Rear Brake: 130mm leading/trailing drum
- Braking Performance: Responsive and reliable
- Front Tire: 70/90-17 (tubeless)
- Rear Tire: 80/90-17 (tubeless)
- Traction: Good grip on varied surfaces
Electrical System
- Battery: DC-12V
- Headlight: 35W halogen
- Taillights: LED technology
- CDI System: Honda Wave CDI electronic ignition
- Reliability: Excellent electrical stability
- Starting: Electric and kick start options
Dimensions & Capacity
- Length: 1906 mm
- Width: 683 mm
- Height: 1095 mm
- Seat Height: 764 mm
- Wheelbase: 1233 mm
- Ground Clearance: 129 mm
- Curb Weight: 96 kg
- Colors: Black, White, Red (varies by market)
Essential Maintenance for Honda Wave CDI
Proper maintenance of your Honda Wave CDI system is crucial for ensuring optimal performance, reliability, and longevity. Following the recommended maintenance schedule will help prevent breakdowns and maintain fuel efficiency.
Important: Always refer to your specific Honda Wave owner's manual for the exact maintenance intervals and procedures. Maintenance requirements may vary slightly between different Wave models and production years.
| Maintenance Item | Inspection Frequency | Replacement Interval | Importance |
|---|---|---|---|
| Engine Oil | Before each ride | Every 1,000-2,000 km | Critical |
| Spark Plug | Every 3,000 km | Every 6,000-8,000 km | High |
| Air Filter | Every 2,000 km | Every 4,000-6,000 km | High |
| Valve Clearance | Every 3,000 km | Adjust as needed | Medium |
| CDI System | Every 6,000 km | When malfunctioning | High |
| Battery Connections | Monthly | Clean as needed | Medium |
Detailed Maintenance Guidelines
Engine Oil Maintenance
- Check oil level before each ride using the dipstick
- Use Honda-recommended 10W-30 or 10W-40 engine oil
- Change oil when warm for better drainage
- Replace oil filter during every other oil change
- Dispose of used oil properly at recycling centers
- Inspect for oil leaks around gaskets and seals
Spark Plug Maintenance
- Check for proper electrode gap (0.7-0.8mm)
- Inspect for carbon deposits or oil fouling
- Look for proper electrode color (light tan is ideal)
- Use manufacturer-recommended spark plug type
- Tighten to proper torque specifications
- Replace if electrodes show excessive wear
Air Filter Maintenance
- Remove and inspect for dirt accumulation
- Clean foam filters with special cleaner
- Allow filter to dry completely before reinstallation
- Apply filter oil to foam elements
- Replace if torn or damaged
- Check more frequently in dusty conditions
Valve Clearance Check
- Check when engine is cold
- Standard intake clearance: 0.08mm
- Standard exhaust clearance: 0.12mm
- Adjustment requires specialized tools
- Consider professional service if inexperienced
- Improper clearance affects engine performance
Pro Tip: To maximize the lifespan of your cdi honda wave 125 system, keep all electrical connections clean and tight. Apply dielectric grease to protect connections from moisture and corrosion, especially if you ride in rainy conditions.
How to Choose the Right Honda Wave CDI
Selecting the appropriate CDI for your Honda Wave is crucial for optimal performance, reliability, and compatibility. Consider these key factors when purchasing a replacement or upgrade CDI unit:
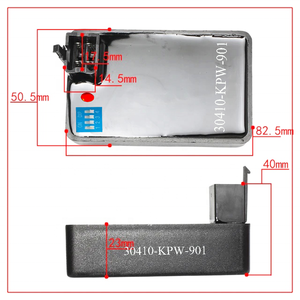
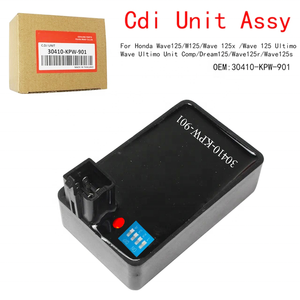
Compatibility Assessment
- Check your exact Honda Wave model and year
- Verify voltage specifications match (usually 12V)
- Confirm wire connector configuration is compatible
- Check if the CDI requires additional modifications
- Consult the parts catalog for your specific model
Remember: Using an incompatible CDI can damage your electrical system or cause the engine to run improperly.
Performance Considerations
- Standard CDI: For stock replacement and factory specifications
- Racing CDI: For increased RPM limit and performance
- Programmable CDI: For custom tuning capabilities
- Unrestricted CDI: For removing factory speed limitations
- Multiple-spark CDI: For improved combustion efficiency
Important: Performance upgrades may impact fuel efficiency or require additional modifications.
Quality and Reliability Factors
- Choose OEM parts for guaranteed compatibility
- Research aftermarket brands for reliability history
- Look for warranty coverage (minimum 6 months)
- Check customer reviews and feedback
- Inspect construction quality and component durability
- Verify heat resistance and weatherproofing
Installation Considerations
- Check if mounting points match your model
- Verify if special tools are needed for installation
- Look for clear installation instructions
- Consider professional installation for complex CDIs
- Check if wiring adapters are included if needed
- Determine if ECU remapping is required (for performance CDIs)
Price vs. Value Considerations
| CDI Type | Price Range | Value Proposition | Best For |
|---|---|---|---|
| OEM Replacement | $$-$$$ | Perfect compatibility, factory performance, reliable | Stock restoration, reliability-focused owners |
| Budget Aftermarket | $ | Low cost, variable quality, basic functionality | Temporary fix, budget-conscious owners |
| Premium Aftermarket | $$-$$$ | Good quality, potential performance gains, warranty | Value-conscious performance seekers |
| Racing/Performance | $$$-$$$$ | Maximum performance, adjustability, premium components | Racers, performance enthusiasts, modified bikes |
| Programmable | $$$$ | Customizable performance, advanced features, tuning flexibility | Professional tuners, serious enthusiasts |
Warning: Extremely cheap CDIs (under $10) may use substandard components that can fail prematurely or even damage your motorcycle's electrical system. These "too good to be true" deals often result in frequent replacements and potential safety hazards.
Expert Advice: When selecting a cdi for honda wave 100, it's often worth spending a bit more for a quality unit from a reputable manufacturer. The difference in price between a low-quality and medium-quality CDI is typically small, but the reliability difference can be substantial.
DIY Honda Wave CDI Replacement Guide
Replacing the CDI on your Honda Wave can be accomplished by following these step-by-step instructions. This procedure requires basic mechanical skills and appropriate tools.
Safety First: Always disconnect the battery before working on electrical components to prevent short circuits or electrical shocks. Work in a well-ventilated area and use appropriate safety gear.
Step-by-Step CDI Replacement Process
-
Disconnect the Battery
Remove the negative (black) terminal first, then the positive (red) terminal to prevent accidental short circuits during the replacement process.
-
Locate the CDI Unit
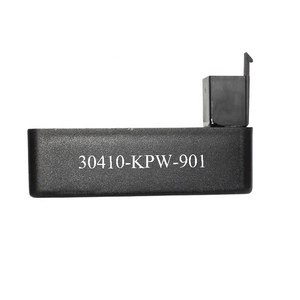
The CDI is typically located near the engine or above the battery box. In most Honda Wave models, it's a small rectangular box with multiple wire connections attached to it.
-
Document Wire Connections
Take clear photos of the wire connections before disconnecting anything. This will serve as a reference during reassembly. Note the colors and positions of all wires.
-
Remove CDI Mounting Hardware
Using the appropriate screwdriver or wrench, remove the bolts or screws that secure the CDI to its mounting bracket. Keep these fasteners in a small container to prevent loss.
-
Disconnect the Wiring Harness
Carefully unplug the wiring connectors from the CDI unit. Most connectors have a small tab that needs to be pressed to release them. Never pull directly on the wires.
-
Compare Old and New CDI Units
Before installation, compare the old and new CDI units to ensure they have identical connector types, mounting points, and overall dimensions.
-
Connect Wiring to New CDI
Carefully connect the wiring harness to the new CDI unit. Ensure each connector is firmly seated and clicks into place. Double-check against your reference photos.
-
Mount the New CDI
Secure the new CDI in the same position using the original mounting hardware. Ensure it's firmly attached but avoid overtightening the bolts.
-
Reconnect the Battery
Reconnect the battery, starting with the positive (red) terminal followed by the negative (black) terminal. Ensure connections are tight.
-
Test the Installation
Turn the ignition key to the "ON" position and check that electrical systems function normally. Start the engine to verify the new CDI is working properly.
Troubleshooting Tip: If the engine doesn't start after CDI replacement, check all connections again. Ensure the kill switch is in the "RUN" position, and verify that the spark plug is functioning by removing it and checking for spark while cranking.
Tools Required for CDI Replacement
Essential Tools
- Screwdriver set (Phillips and flathead)
- Socket wrench set (8mm-14mm typically sufficient)
- Needle-nose pliers
- Wire cutters/strippers (for emergency repairs)
- Multimeter (for testing)
- Clean rags
Optional But Helpful
- Service manual for your specific Honda Wave model
- Electrical tape
- Dielectric grease (for connections)
- Zip ties for wire management
- LED work light
- Camera or smartphone for reference photos
Frequently Asked Questions
CDI stands for Capacitor Discharge Ignition. This system stores electrical energy in a capacitor and then discharges it at precisely timed intervals to the ignition coil. The coil then amplifies this energy to create a high-voltage spark at the spark plug, igniting the air-fuel mixture in the engine's combustion chamber. This electronic ignition system replaced older mechanical points-based systems, offering better reliability, more precise timing, and improved performance.
While it's technically possible to use aftermarket or alternative CDIs compatible with Honda Wave models, it's important to understand the implications:
- OEM Compatibility: The safest option is to use a genuine Honda replacement CDI or one specifically designed for your exact model.
- Aftermarket Options: Many aftermarket CDIs are available that claim compatibility with Honda Wave models. Quality varies significantly between manufacturers.
- Racing/Performance CDIs: These can offer performance improvements but may affect fuel efficiency or require additional modifications.
- Universal CDIs: Generally not recommended unless specifically stated as compatible with your model, as electrical connections and mounting points vary.
Always verify voltage specifications, connector configurations, and mounting dimensions before purchasing an alternative CDI. Using an incompatible CDI can damage your electrical system or cause engine operation problems.
The CDI system is generally considered a maintenance-free component that doesn't require regular servicing. However, inspection and potential maintenance may be necessary under these circumstances:
- Routine Inspection: Check CDI connections for corrosion or looseness every 6,000-10,000 km or annually
- After Exposure to Water: Inspect after riding in heavy rain or through deep water
- When Troubleshooting: If experiencing starting problems, misfires, or erratic engine performance
- Age-Related Checks: Consider inspection on bikes older than 5 years, as deterioration of components may occur
The CDI itself is sealed and not serviceable internally. If malfunctioning, replacement is typically the only solution. Follow your Honda Wave owner's manual for model-specific maintenance recommendations and intervals.
A failing CDI unit can manifest through several symptoms that affect your motorcycle's performance and operation:
- Starting Problems: Difficulty starting the engine, especially when warm
- Engine Misfires: Sporadic power loss or hesitation during acceleration
- Stalling: Engine suddenly cutting out while riding or idling
- Poor Acceleration: Noticeable decrease in throttle response and power
- Backfiring: Loud popping sounds from the exhaust during deceleration
- Erratic Idle: Inconsistent or unstable engine idle speed
- No Spark: Complete failure to produce spark at the spark plug
- RPM Limitations: Engine unable to reach higher RPM ranges
If experiencing these symptoms, perform a proper diagnosis before replacing the CDI, as similar issues can be caused by spark plug problems, fuel system issues, or other electrical components.
The key differences between analog and digital CDI systems in Honda Wave motorcycles include:
| Feature | Analog CDI | Digital CDI |
|---|---|---|
| Technology | Uses resistors, capacitors, and transistors | Uses microprocessors and advanced circuitry |
| Timing Control | Fixed timing curve with limited adjustment | Precise, adaptable timing with multiple parameters |
| Performance | Good for standard applications | Superior performance across RPM range |
| Adaptability | Limited or no adaptability to conditions | Can adapt to temperature, RPM, and load changes |
| Pricing | More affordable | Generally more expensive |
| Best For | Stock replacements, budget-conscious riders | Performance enthusiasts, modified engines |
Modern Honda Wave models typically come with digital CDI systems as they offer better performance, fuel efficiency, and reliability compared to the older analog systems.