All categories
Featured selections
Trade Assurance
Buyer Central
Help Center
Get the app
Become a supplier
(784 products available)


 Ready to Ship


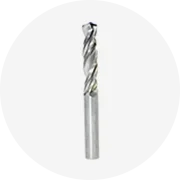
Collated Headless Pin Nails
Headless pinned nails are grouped together for easy use with nailers. They are attached to strips or wheels so that they can be fired from pneumatic or electric pin nailers. Coil pinners use large bags of nails to reduce reloading and increase production. Collated pinner nails come in different lengths and gauges to match nailer requirements and project needs. The collated format makes these pins ideal for fast and efficient construction, especially in large projects or settings where multiple tasks need to be completed quickly.
Box-Headless Pin Nails
Box-type headless pin nails, which have slightly thicker borders, are ideal for projects that require extra grip, such as installing heavy moldings or attaching hardwoods. Because they stand out more than typical headless pins, they can sometimes provide more stability, which is useful in scenarios where extra pull-out power is required. Additionally, because they are box-shaped, they can be affixed more closely together, increasing the convenience of the fixed nailer for challenging jobs that require increased density.
Stainless Steel Headless Pin Nails
Stainless steel headless pin nails are appropriate for both external and internal use in areas of high humidity, such as bathrooms, saunas, and exterior constructions. Because of the corrosion-resistant material, they will not rust or discolor on the surface, which is critical when aesthetics and material integrity are concerned. Additionally, stainless-steel pinned nails are robotic arms a choice for premium uses since they are tough and readily able to endure weather and wear-and-tear.
Brass Headless Pin Nails
Brass headless pin nails are oftenused for specialty applications. Although the brass can be softer than steel, it will not rust, making it ideal for conditions sensitive to moisture. Brass pinned nails also make sense to use when the material that needs to be installed is brass or other soft metals so that there aren't any potential scratches or damage on the surface. They are often used for fine furniture restoration or delicate craft projects.
Furniture Manufacturing
Headless pinner nails are widely used in furniture clinics where precision and finish matter a great deal. Such pinned nails are appropriate for putting together delicate components where visible fasteners cannot be used, such as attaching tabletops to legs or affixing veneers on different wooden surfaces. Because they have no heads and leave no unsightly traces, they guarantee that the furniture's aesthetic quality remains undamaged after construction.
Cabinetry and Built-In Projects
Cabinet makers and carpenters who create built-in furniture use headless pinned nails to affix moldings, veneers, and thin panels. When constructing cabinets and other built-in furniture, puttying nails make it easy to work on delicate trim work without marring the material's surface. They are employed when precision and detail are paramount, like installing thin elements that require more finesse than standard nailing would provide.
Trim and Molding Installation
For trim work, including baseboards, crown moldings, and window casings, puttying nails are ideal for installing these items. They cause little damage to their underlying structures, giving the installed trim a professional appeal. Moreover, since they allow the installer to work fast without constantly changing tools, which improves efficiency in residential and commercial properties.
Woodworking and Craft Projects
Woodworkers and craftsmen who create detailed work use headless pinned nails due to their unique characteristics. Pinned nails are perfect for attaching layers in making complex inlay designs or attaching thin woods in model making. They are also suitable for making miniature projects that require special attention to detail, where regular nails are too big for the task.
Machinery and Equipment Specifications
In industries where pieces of equipment and machinery involve complex or delicate interiors, headless pinned nails are sometimes useful to install non-visible components that must be secured but cannot carry much weight. These pinned nails come in handy when securing circuit boards or other fine electronic components where larger fasteners would not be appropriate. Their use in these applications provides a clean installation without any obstruction within the internal assembly.
Gauge and Size
Headless pin nailers work great with 23-gauge nails which are around 0.013 inches in diameter. Their small size makes them ideal for delicate jobs around the house where larger nails aren't needed. These nails come in a range of lengths to suit various tasks, typically between 1/2 and 2 inches long. Longer nails provide more securing power and penetrate deeper while shorter ones are perfect for lighter or thinner materials.
Material and Durability
The majority of headless pin nails are made from steel since it's a solid and flexible material. Steel headless pin nails are often plated with materials such as anti-rust treatment for added corrosion resistance. For projects where moisture levels are high, such as outdoors, in kitchens, or in baths, stainless steel pinned nails are often needed. As mentioned before, another material option is brass, which is rust resistant but typically softer. It is used for specialty tasks to avoid marring softer surface materials.
Pin Lengths and Diameters
Headless pinner nails come in a variety of lengths to accommodate different materials, ranging from 1/2 inch for smaller projects to 2 inches for larger. Wider projects require longer pins, and thinner materials work better with shorter ones. The diameter of the nails is 23 gauge, which reduces splitting in delicate work. In essence, users need to select the right length and size for the specific material in order to get the most attractive outcome.
Preparation
To achieve the desired end results when using a headless pinner nailer, one must prepare the nailer, the pins, and the project to get started. The nailer should be checked for sufficient air pressure and pin availability. Users should also select the appropriate length of pin for the task at hand. A proper working environment is achieved by ensuring the materials being worked on are cut to size and aligned well.
Adjust Settings
Different projects will require certain different settings to come into play, such as the amount of air pressure and the depth pin. Materials that vary in thickness, such as hardwood, softwood, and plywood, require adjustments. The goal here is to ensure that the pin enters the material at the right depth without going too far and damaging it.
Aim and Fire
After having set the desired parameters, one should place the nailer against the position where the pin is to be placed and pull the trigger. The nailer must be held straight to make sure proper placement is achieved. Applying gentle pressure will give the pin a smooth and even drive into the material.
Monitor and Adjust
It is important to monitor pin placements as a person proceeds with the project; one must check whether the pins are being properly placed. The air pressure and depth settings must be adjusted where necessary, especially when switching between various materials or when one is experiencing resistance. The best tip is to always remember to check on the material so the final presentation remains intact.
Routine Cleaning
It is very important to clean a headless pinner nail regularly so that it works efficiently. Dust, resin, and other debris can easily accumulate on the tool if used for a long time. Users should pay close attention to the nose and magazine area since these places collect most of the trash. Prior to usage, the best practice is to clean the pinner with a brush and a clean, damp cloth in order to remove all dirt and dust that accumulated on it. Proper cleaning guarantees better pin placement, reduces jams, and increases the tool's lifespan.
Lubrication
Lubricating is pivotal in minimizing friction and is vital for any tool. The moving parts of a headless pinner nail require constant lubrication for them not to wear out or get damaged. Many manufacturers recommend lubrication using a small amount of pneumatic oil to the body of the tool. Nailers should be lubricated every so often, depending on how often they are used. However, it is imperative that the owner's manual be referred to for proper lubrication to guarantee that the tool is maintained properly.
Inspection for Wear and Damage
Like other tools, headless pinners need constant inspection if they are to remain in good shape. Users should inspect the nose, magazine, and any moving parts for cracks, wear, or other damage. In addition, users must check the pinner's condition, and if any components need replacing, such as a gasket or cylinder, it does. Moreover, damaged parts fix or replace as quickly as possible to avoid more extended damage to the tool and guarantee precision in the operation.
Repair Guidelines
It is important that users refer to the manufacturer's guidelines, and users should take the information and instructions therein as the ultimate reference when fixing their tools. Most of the time, complex repairs are beyond the reach of a regular user and should be handled by professional service centers to avoid further damage. Repairing or replacing damaged parts will not only save money but will also improve work efficiency.
Use Appropriate Materials and Tools
When using a headless pinner, the pins, nails, or nails should be made of the same material as the tool. Whenever possible, use high-quality, durable pinner nails that match the specific job required. Nails should also be the appropriate length for the project to ensure complete penetration without excess material coming through the other side. Using the right size of pins for each task prevents material splitting and guarantees a robust installation.
Wear Personal Protective Equipment (PPE)
Personal protective equipment (PPE) such as safety glasses, gloves, and earmuffs should be worn to protect oneself from flying debris and loud noises. Gloves also offer hand protection from sharp tools and materials. Earmuffs or earplugs will reduce the likelihood of noise-induced hearing loss over time. PPE will promote workplace safety and reduce the likelihood of sustaining injuries.
Follow Manufacturer's Guidelines
Every headless pinner nail comes with specific instructions on its use, maintenance, and pin types. These guidelines should always be followed to achieve the desired results. Nailer's required pressure and settings should be respected, and pinner nails should be appropriate in size and type. Such compliance with these guidelines will enhance operational efficiency and improve the tool's safety and reliability.
Regular Maintenance
Key for any form of machinery, including headless pinner nails, is frequent cleaning and maintenance. Maintenance will always keep the tool in great working condition and decrease the probability of accidents occurring as a result of jams or malfunctioning. Essentials that should be done often include lubrication, cleaning after each use, inspections for wear, and replacing worn-out parts. For safety and efficiency, well-maintained tools are well equipped to handle larger projects.
Proper Storage
Maintaining the tool is guaranteed by proper storage after use. One should keep the headless pinner in a dry, safe, and location that is free from moisture and extreme temperatures. The area should also be free of stuff so that it is easy to grab the tool with one hand when in the midst of working. Keeping the tool covered or housed in a case will reduce the amount of dust and debris collected, which in return enhances the tool's life and increases safety.
A1: Headless pin nails are ideal for trim work, like attaching molding, because they leave almost no trace. They're also used in furniture making where tiny parts need to be fastened without big nails showing. Their ability to go into hard-to-reach spots while being discreet makes them perfect for detailed woodworking jobs.
A2: Steel is commonly used to make headless pin nails because it is both strong and flexible. Steel pinned nails are usually coated to help prevent them from rusting, making them a good choice for areas with lots of humidity. Brass pinned nails are softer and might dent easier, but are perfect for delicate projects where steel could cause damage.
A3: Just like other tools, headless pinners need constant inspection if they are to remain in good shape. Users should inspect the nose, magazine, and any moving parts for cracks, wear, or other damage. In addition, users must check the pinner's condition, and if any components need replacing, such as a gasket or cylinder, it does. Moreover, damaged parts fix or replace as quickly as possible to avoid more extended damage to the tool and guarantee precision in the operation.
A4: When purchasing headless pin nails, people need to pay attention to two main things: the gauge and the length. The gauge, like the 23-gauge, determines how thick the pins are, while the length range, like 1/2 to 2 inches, helps the pins go into different material depths. It's also important that the gauge number matches the nailer's requirements to ensure everything works smoothly together.