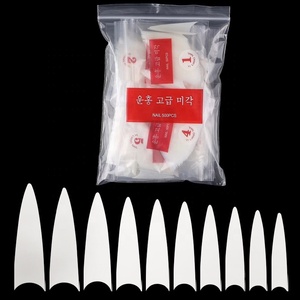
Types of Halloween false nails images
Halloween is a time for creative self-expression, especially through manicures that celebrate the spooky spirit of the season. From classic creepy-crawly motifs to glittering ghostly glamour, there's a style to match every trick or treat. Halloween false nails images provide endless inspiration for festive fingertips that let one’s inner monster shine.
-
Gothic Glamour
Think deep crimson blood-reds and midnight black polishes, all tinged with the sparkle of crushed diamonds or the subtle gleam of darkly opulent shimmers. These nails often feature intricate designs like lace patterns, skulls, and bats, sometimes accented with rhinestones or textured finishes like velvet to add depth and drama.
-
Spooky Classics
These designs bring to life Halloween's most beloved symbols, such as pumpkins, ghosts, witches, and black cats. Often painted in vibrant oranges, eerie whites, and midnight blacks, these nails can range from cute and cartoonish to creepy and realistic. Glitter accents and 3D embellishments like tiny bat stickers or raised pumpkin carvings can make these timeless themes festive and fun.
-
Glamorous Ghosts
These designs incorporate glitter, shimmer, and metallic finishes to create a hauntingly beautiful look. Ghostly white, blood-red, and midnight black colors are often used, sometimes combined with sparkling accents to add a touch of glamour. Nail art images may feature intricate designs like spiderwebs, skulls, and bats, often embellished with rhinestones, sequins, and other sparkling details to create a truly bewitching manicure that's perfect for a night out or a haunted house party.
-
Monstrous Mashups
These nails combine various Halloween themes and symbols, like witches, ghosts, pumpkins, and spider webs, often in bold, bright colors. These designs frequently include glitter, glow-in-the-dark elements, and textured finishes to create a fun and festive look that's perfect for celebrating the holiday. Nail art images may feature intricate designs like spiderwebs, skulls, and bats, often embellished with rhinestones, sequins, and other sparkling details to create a truly bewitching manicure that's perfect for a night out or a haunted house party.
-
Underworld Chic
This style blends dark elegance with underworld-inspired imagery, featuring elements like skulls, snakes, and occult symbols. Nails are often adorned with rich, dark colors such as deep burgundy, black, and emerald green, sometimes accented with metallic gold or silver for a touch of glamour. Textures like matte finishes paired with shine or intricate details like studs and beads add depth to the designs.
How to choose Halloween false nails images
- Style: Consider the overall look and feel the user wants to achieve. There are many Halloween nail styles, from cute and whimsical to dark and gothic. Choose a design that reflects the desired aesthetic and complements the Halloween costume or theme.
- Colors: Bright and bold colors often express fun and excitement, while dark or muted tones create a more mysterious or sophisticated look. Consider the colors of the clothing and makeup to ensure everything is coordinated and visually appealing.
- Textures: Glitter adds sparkle and shine, making nails festive, while matte finishes give a smooth, subtle look. Studs or other 3D elements can create a dramatic effect, perfect for a bold look or a more textured, layered appearance.
- Trends: Some nail designs may be more popular or in style at certain times, so it is helpful to be aware of current trends. This way, the user can choose a design that is fashionable and relevant, making their nails look fresh and stylish.
- Skill level: More intricate or detailed designs may require nail art skills to achieve, so consider whether they can create the design themselves or will need to seek nail art from a professional. Some designs may be easier to do at home, while others may be more challenging and require extra time and practice.
- Cost: More elaborate designs with additional features, like 3D elements or high-quality materials, may be more expensive than simpler sets. Consider the budget to ensure the nails fit within the overall Halloween spending.
- DIY or Salon: Decide whether to create the nails at home or have them done at a nail salon. If going to a salon, consider the design complexity and how long it will take the nail technician to create it.
How to use, install, and product safety
- Prepare the Nails: Start with clean, dry, and dewy nails. Remove any nail polish and wash the nails with soap and water. Dry them well. Push back the cuticles with a cuticle pusher or an orangewood stick carefully. Lightly buff the nail's surface with a nail file to eliminate shine. This will help the fake nails adhere better.
- Select the Correct Size: Hold each Halloween false nail against each natural nail to find the right fit. Pressing the nail gently to the nail bed will check if it matches the size. Do not select one that is wider or narrower; if it is, do not go with one that is wider or narrower. It should give the proper adhesive for a clean and crisp look. If necessary, files the false nail's tip to fit perfectly.
- Glue Application: Apply a small amount of glue to the natural nail. Spread the glue evenly over the nail using a toothpick or by spreading it with a fingertip. Avoid using excess glue, which can ooze out and create a mess. Quickly press the fake nail onto the natural nail. Start from the cuticle and work toward the tip. Hold it for about five seconds.
- Remove Excess Glue: Wipe off any excess glue that may ooze out from the sides of the fake nail with a damp cloth. This step ensures a clean and polished finish to the application and avoids any messy appearance that could detract from the overall look of the nails.
- Nail Clippings: Use a nail clipper to trim the falsies to the preferred length. Then, use a nail file to make the edges smooth and even. File in one direction to avoid splitting the nails.
- Buff and Polish: Lightly buff the surface of the fake nails to give them a natural look. Washing the nails will help remove any leftover glue and prepare the nails for a nail polish application. Apply a coat of nail polish for an even finish.
Product Safety
- Material Quality: These Halloween false nails are made from high-quality plastic or acrylic material that is durable and long-lasting. These materials are not easily breakable and thus are less likely to crack or snap, causing injury to the fingertip.
- Non-Toxic Adhesives: The glues used to attach these nails are non-toxic and safe for use. They are specially formulated to minimize irritation to the skin and nails. Nevertheless, one should use the glue as directed and avoid contact with the eyes.
- Easy Removal: Halloween false nails can be removed easily, and the adhesive can also be removed without much hassle. This feature prevents damage to the natural nails, as it does not require excess force to pull the nails off. One can easily peel them off with one's fingers or use a remover to loosen the adhesive.
- Skin Safety: These nails are designed to be safe for the skin. They are not sharp and do not have rough edges, which can cause cuts or bruises. The nails are also made with rounded edges and smooth surfaces to ensure they do not harm the cuticles or the surrounding skin during application or use.
- Regular Testing and Compliance: Reliable manufacturers regularly test their products to meet specific safety standards and regulations. These tests ensure that the nails are safe for the end user. The results from the tests are usually compliance certificates that the manufacturer keeps as proof of the product's safety.
Functions, features and design of Halloween false nails
Function
- Transformation: These Halloween press on nails are designed to transform the look of one's hands dramatically. They can enhance a regular appearance to a spooky or festive one with just a pop of color and texture.
- Temporary Change: They offer a temporary change that can be easily removed after the holiday or event is over, making them perfect for those who do not want a permanent change in their nail style.
- Protection: Some falsies can protect natural nails from breakage, allowing one to enjoy Halloween-themed manicures without the worry of damaging their natural nails.
Feature
- Diverse Designs: From ghoulish green shades to glittering graveyard themes, these nails come in endless designs that suit every Halloween mood and costume.
- Easy Application: Many Halloween false nails are easy to apply at home, with no special skills needed. They often come with pre-applied adhesive or require just a drop of glue.
- Durability: These nails are made to last through parties, trick-or-treating, and other Halloween events without chipping or peeling, keeping the festive spirit strong all night long.
- Customization: They can be cut and shaped to suit personal preferences, ensuring that every pair of nails fits perfectly with one's style or costume.
- High-Quality Materials: They are made from high-quality materials, ensuring they are safe for one's natural nails and long-lasting in terms of wear and tear during the Halloween season.
Design
- Shape: These nails come in various shapes, from stiletto to coffin to square, allowing one to choose a shape that best suits their Halloween persona.
- Colors: Bold, vibrant colors like blood red, ghostly white, and deep black are typical of Halloween nails, often combined with glitter or matte finishes for added effect.
- Textures: Many Halloween false nails include textured elements like sequins, rhinestones, or even matte and glossy contrasts to add depth and dimension to one's Halloween look.
- Length: They are available in different lengths, from subtle to dramatic, allowing one to choose how bold they want to go this Halloween.
- Seasonal Themes: Designs often incorporate seasonal themes, colors, and symbols that resonate with the Halloween spirit, making them perfect for the occasion.
Q&A
Q1: What are some popular themes for Halloween nails?
A1: Halloween nail designs often explore themes inspired by the holiday's spooky spirit. Popular ideas include ghostly whites with skulls, deep reds and blacks with blood drip effects, and eerie pastels with spiderwebs. Other themes incorporate classic pumpkins, witches, bats, and haunted houses, often using creative nail art techniques and seasonal colors to capture the Halloween essence.
Q2: What are some easy-to-do Halloween nail designs?
A2: Simple Halloween nail designs include painting orange and black stripes, creating ghost faces with white polish and black dots, or applying a dark base with glittery spider webs. Using nail stickers or stamps for pumpkins and bats, or accenting nails with a single spooky image, offers quick yet festive ways to celebrate Halloween through easy nail art.
Q3: How can I make my Halloween nail design last longer?
A3: To extend the wear of a Halloween nail design, start with a strengthening base coat, apply two quality color coats, and seal with a long-wear top coat. Avoiding harsh chemicals and frequent hand washing, and moisturizing cuticles will help maintain the look longer. Touch up any chips promptly and use nails as tools sparingly to ensure the festive design lasts through the Halloween season.
Q4: Are there nail designs that glow in the dark for Halloween?
A4: Yes, there are Halloween nail designs that glow in the dark. Nails can be painted with glow-in-the-dark polish featuring spooky shapes like ghosts, bats, and pumpkins. Layering a white base with glow polish or adding glow-in-the-dark top coats over decals also creates nails that shine eerily when the lights go out, perfect for Halloween night festivities.