


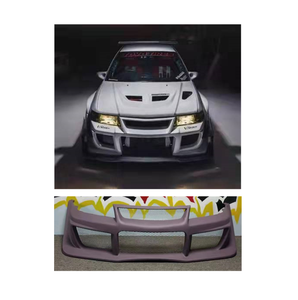


Types of Evo 6 Front Bumpers
The Evo 6 front bumper is a critical component of the Mitsubishi Lancer Evolution 6, serving both aesthetic and functional purposes. Beyond enhancing the vehicle's aggressive appearance, it plays a vital role in aerodynamics, safety, and performance.
Absorbs impact during collisions
Improves downforce and stability
Directs airflow to engine components
Enhances aggressive rally heritage look
| Bumper Component | Function | Material | Performance Impact |
|---|---|---|---|
| Bumper Cover | Exterior styling and protection | Reinforced plastic/fiberglass | Aerodynamic efficiency |
| Bumper Beam | Collision protection | Steel or aluminum | Safety and structural integrity |
| Energy Absorber | Impact force dissipation | Specialized foam | Crash safety |
| Support Brackets | Secure mounting to chassis | Metal alloy | Stability and fitment |
| Front Grille | Airflow management | Plastic/metal mesh | Engine cooling |
| Fog Light Housing | Auxiliary lighting | Plastic/composite | Visibility in poor conditions |
| Splitters/Canards | Enhanced downforce | Carbon fiber/composite | High-speed stability |
Expert Tip: Racing-oriented Evo 6 front bumpers often feature larger air intakes and more aggressive splitters compared to street versions. When upgrading, consider your primary driving environment (street, track, or mixed use) to select the appropriate design.
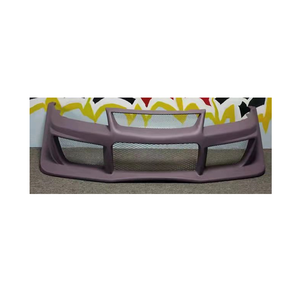
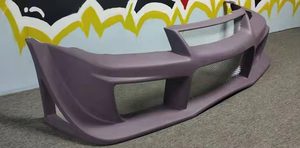
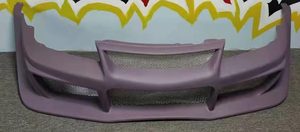
OEM Style Bumpers
Factory-designed bumpers that maintain the original Mitsubishi Evolution 6 appearance while offering reliable performance for daily driving.
Best for: Purists seeking factory aesthetics and consistent quality
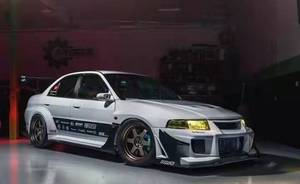
Racing/Performance Bumpers
Lightweight, aerodynamically optimized bumpers with enhanced cooling capacity and downforce generation for competitive driving.
Best for: Track day enthusiasts and competitive racers
Aftermarket Styling Bumpers
Custom-designed bumpers that modify the Evo 6's appearance for a unique look while maintaining functionality.
Best for: Customization enthusiasts seeking distinctive aesthetics
Specifications and Maintenance of Evo 6 Front Bumper
Understanding the technical specifications and proper maintenance procedures ensures your Evo 6 front bumper delivers optimal performance and longevity.
Technical Specifications
Material Composition
High-quality reinforced plastics with exceptional impact resistance, typically polycarbonate (PC) or ABS plastic. Racing versions may incorporate carbon fiber elements for weight reduction.
Key benefit: Excellent durability with protection against road debris and minor impacts
Finish Options
Available in factory colors like grey and black, with various finish options including matte, gloss, and textured. Custom painting options allow for personalization.
Key benefit: Customizable appearance to match vehicle styling
Fitment Compatibility
Specifically engineered for the Mitsubishi Lancer Evolution 6 chassis. Some aftermarket versions offer cross-compatibility with other Lancer models with minor modifications.
Key benefit: Precise fitment for optimal aerodynamic performance
Maintenance Best Practices
| Maintenance Task | Frequency | Recommended Products/Tools | Benefits |
|---|---|---|---|
| Deep Cleaning | Bi-weekly | Automotive soap, microfiber cloth, soft brushes | Removes road grime and prevents staining/damage |
| Inspection | Monthly | Flashlight, inspection mirror | Early detection of cracks, dents, or mounting issues |
| Waxing/Sealant Application | Quarterly | Automotive wax, plastic sealant | UV protection and color preservation |
| Bracket/Mount Check | Bi-annually | Socket set, wrench | Ensures secure fitment and prevents vibration damage |
| Trim/Grille Maintenance | Quarterly | Plastic restorer, detail brushes | Prevents fading and deterioration of plastic components |
Important: Avoid using harsh chemical cleaners containing acetone or petroleum distillates on your Evo 6 front bumper. These can damage the plastic composition and degrade the finish over time. Always test cleaning products on an inconspicuous area first.
How to Choose Evo 6 Front Bumpers
Selecting the right Evo 6 front bumper requires careful consideration of several critical factors. Whether for personal use or wholesale distribution, understanding these key selection criteria ensures you make the optimal choice.
Quality Assessment
Premium bumpers feature reinforced construction with proper thickness and rigidity. Examine material quality, molding precision, and finish consistency before purchase.
Pro tip: Check for consistent material thickness throughout the bumper
Design Considerations
Consider both aesthetic appeal and functional performance. Racing-oriented designs offer enhanced cooling and aerodynamics, while style-focused versions prioritize visual impact.
Pro tip: Balance looks with functionality for your specific needs
| Selection Factor | Importance | What to Look For |
|---|---|---|
| Material Quality | Critical | High-grade plastics (ABS/PC) for durability; carbon fiber for weight savings |
| Installation Complexity | High | Pre-drilled mounting holes, included hardware, comprehensive instructions |
| Aerodynamic Design | Medium-High | Properly engineered air channels, effective splitters, balanced downforce |
| Compatibility | Critical | Proper fitment for Evo 6 chassis without excessive modification requirements |
| Warranty Coverage | Medium | Minimum 1-year warranty against manufacturing defects |
| Price vs. Value | High | Competitive pricing with features aligned to intended use |
| Customization Options | Variable | Available in multiple finishes or custom paint-ready surfaces |
Purchasing Advice: For wholesale buyers, consider stocking a mix of OEM-style bumpers for restoration projects and performance-oriented options for enthusiasts. This diversification maximizes market coverage and profit potential while meeting various customer needs.
How to DIY and Replace Evo 6 Front Bumper
Replacing your Mitsubishi Evo 6 front bumper can be a rewarding DIY project that saves money while allowing for personalization. Follow this comprehensive guide for a successful installation.
Essential Tools and Materials
Step-by-Step Installation Guide
Safety Warning: Never rely solely on a jack to support your vehicle during this procedure. Always use proper jack stands rated for your vehicle's weight. Incorrect installation can compromise the bumper's structural integrity in a collision.
Pro Installation Tip: When transferring components from your old bumper, take photographs of each step to document the correct positioning and wiring routes. This visual reference can save significant time and prevent errors during reassembly.
Frequently Asked Questions
The Evo 6 front bumper is a specialized body component designed specifically for the Mitsubishi Lancer Evolution 6. It serves multiple critical functions beyond aesthetics, including:
- Primary impact protection in minor collisions
- Aerodynamic enhancement for improved high-speed stability
- Engine cooling through strategic air intake placement
- Housing for auxiliary lighting systems like fog lights
- Defining the vehicle's aggressive rally-inspired appearance
Modern Evo 6 bumpers are engineered using computational fluid dynamics to balance these functional requirements while maintaining the iconic Mitsubishi Evolution styling.
Evo 6 front bumpers utilize various materials depending on their application and manufacturer:
| Material | Characteristics | Best Application |
|---|---|---|
| ABS Plastic | Lightweight, impact-resistant, cost-effective | Street use, OEM replacement |
| Fiberglass | Lightweight, customizable, moderate strength | Show cars, budget performance |
| Carbon Fiber | Ultra-lightweight, extremely strong, premium finish | Racing, high-performance applications |
| Polyurethane | Flexible, durable, resistant to minor impacts | Daily drivers, urban environments |
| Steel (Bumper Beam) | Maximum strength, superior crash protection | Structural support behind bumper cover |
Each material offers different trade-offs between weight, durability, cost, and appearance. Performance-oriented applications typically favor lightweight materials like carbon fiber, while daily drivers benefit from the durability of reinforced plastics.
Proper maintenance of your Evo 6 front bumper extends its lifespan and preserves its appearance. Follow these essential care instructions:
- Regular Cleaning: Wash the bumper bi-weekly with automotive soap and warm water using a microfiber cloth. This prevents dirt buildup that can cause microscopic scratches.
- Protective Treatments: Apply a UV-resistant plastic protectant quarterly to prevent fading and deterioration from sun exposure.
- Inspection Routine: Check monthly for cracks, loose fasteners, or misalignment that could indicate mounting problems.
- Proper Repair: Address small cracks or damage immediately using appropriate plastic repair products before they expand.
- Winter Care: In snowy regions, promptly remove road salt accumulation to prevent corrosion of mounting hardware.
- Avoid Harsh Chemicals: Never use petroleum-based cleaners or abrasive compounds that can degrade the plastic material.
Following these maintenance practices will preserve both the appearance and structural integrity of your Evo 6 front bumper, potentially saving costly replacements down the road.
While the Evo 6 front bumper is specifically designed for the Mitsubishi Lancer Evolution 6, limited cross-compatibility exists with certain modifications:
- Standard Mitsubishi Lancers (1996-2001) can accept Evo 6 bumpers with significant modification to mounting points and fender alignment
- Other Evolution models (Evo 4-5) have higher compatibility but still require minor adjustment and possibly custom brackets
- Non-Lancer Mitsubishi vehicles would require extensive custom fabrication work, making it impractical
If attempting to fit an Evo 6 bumper on a different model, consult with a professional body shop familiar with Mitsubishi vehicles to evaluate the feasibility and required modifications for your specific application.
The price of Evo 6 front bumpers varies significantly based on type, material, and source:
| Bumper Type | Price Range (USD) | Notes |
|---|---|---|
| OEM Replacement | $400-$700 | Factory quality, direct fitment, may require painting |
| Fiberglass Replica | $200-$450 | Budget option, varies in quality, requires finishing |
| Performance Aftermarket | $300-$600 | Enhanced aerodynamics, may include additional vents |
| Carbon Fiber | $600-$1,200+ | Lightweight, premium finish, racing application |
| Used/Salvage | $150-$400 | Condition varies, may require repair, limited availability |
Additional costs to consider include professional painting ($200-$500), installation labor ($100-$300 if not DIY), and shipping fees for online purchases. The rising collector status of Evolution models has generally increased parts prices in recent years.