All categories
Featured selections
Trade Assurance
Buyer Central
Help Center
Get the app
Become a supplier
(585 products available)


 Ready to Ship


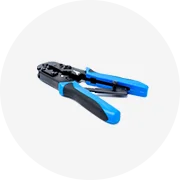
Duct crimping tools are the go-to tools when it comes to setting up air ducts or repairwork. These tools, mainly the crimpers, help bend one end of a duct so that the other end can slide into it. When this is done, the whole HVAC system duct gets a fitting and neat look without any loose parts hanging around. The world of duct crimping tools is revolutionized, though – there are manual, electric, and pneumatic crimping tools in the modern era.
Crimping tools that are used amid manual operations are, for the most part, in hand mostly because they convey precision crimp by means of manual control. These tools are simple in construction and require no extra power sources. The utility company workers use these tools for small to medium-sized crimping tasks and projects. In addition, since no batteries or air compressors are required for operation, these tools are very portable and useful for emergency repairs.
The construction and operation of electric crimping tools involve electric power. These tools are handy when large tasks have to be accomplished. They operate at a higher level than manual crimpers in terms speed, power, and consistency. Electric crimping tools are mostly used in situations where ducts are to be fixed in constancy with the need for efficiency. These are particularly useful in large commercial or industrial HVAC projects.
Pneumatic crimping tools are those that operate using compressed air. These tools pack a lot of force, and their speed makes them perfect for heavy-duty applications. Air conditioners use these tools in their work settings over and over again. Because of their remarkable strength and efficiency, these crimpers are used in large engineering operations, especially when creating an impact is a necessity.
Duct crimping tools are regularly used in HVAC ductwork setups. They assist in joining different duct sections to ensure that the flow of air is not affected at all. Duct crimpers easily help make fitting one end of the duct into another, thus promoting good sealing. Such tools are effective and, therefore, a requirement in residential and commercial HVAC installations.
The crimping tools that are used in ducts are mainly employed in the vehicle vent systems. For instance, they install and maintain the air conditioning and heating ducts in automobiles. Moreover, the tools offer great precision in crimping, which is very important, seeing that the site in question is very limited in space, and any loose connections might lead to serious problems. In short, Duct Crimpers increase the performance of the car's internal climate management system.
Duct crimping tools are very useful in the production process of appliances such as dryers and stoves. These tools help to put together vents and ducts in a way that the appliance performs at its best. For instance, they make the exhaust system of the products; These tools are important in ensuring that there are no leaks and that the airflow within these appliances is not obstructed.
Crimpers are used to install and maintain ventilation systems in places where people reside and work. They work to ensure that duct sections join properly, leading to an improvement in airflow. Furthermore, by using crimping tools, duct leaks are reduced, which not only improves energy efficiency but also creates a better working environment. Keeping good ventilation in these spaces is good for health and productivity.
Industrial environments use large systems that require strong and efficient ducts. In these high-demand spaces, crimping tools must be fast and provide seamless connections to improve airflow and lower pressure.
Crimping Capacity
Crimping capacity refers to how thick or large a duct the tool can work with. For contractors and technicians, a wide range in crimping capacity is more desired since crimpers can handle different jobs. Good crimpers for HVAC work can crimp typically 26-gauge steel sheets and up to 30-gauge aluminum sheets in thickness.
Tubing Sizes
Cordless crimping tools, in particular, are made for many different tubing diameters. Tool users would opt for a model that supports the most commonly used tubing sizes in their work scenario. For example, HVAC systems often require half-inch, three-quarter-inch, and one-inch tubing.
Power Source
The power source for crimping tools: every tool has its electrical type of energy: manual, electrical, or pneumatic. As mentioned previously, manual crimping tools are operated in a purely hand-driven manner by the fingers of the human hand, electric crimping tools utilize electrical energy, while pneumatic crimping tools use compressed air. Each type has its own purpose and advantages to offer, and it is important that they be chosen according to the type of application that they will be used in.
Durable Blades
In these tools, Crimping blades hold great importance. The blades are made of high-grade steel to offer endurance against wear and tear. Sharp and good-quality blades ensure clean crimps, meaning that connections will be well-made and tight.
Ergonomic Design
This is a very important consideration when assessing the operation of manual and electrical tools. Such tools are designed to fit in one's hand and reduce the strain force, unlike those poorly designed handles that cause discomfort. Many electric and pneumatic tools also come with anti-slip handles to promote a firm grip.
Portability
Portability is another important consideration, especially for electrical crimping tools. Most HVAC experts prefer tools that can easily be transported to the job site. Some electric tools operate using batteries, while pneumatic tools require compression of air. However, both are, in most cases, portable for use.
Material
The material a crimper is made from determines how long the tool will last when used. Crimping tools made from high-carbon steel have proven to be very strong, and they are durable, while stainless steel offers resistance to corrosion. In short, the nature of the materials used in making a tool dictates its longevity and resistance to environmental factors.
Blade Sharpness
Blade sharpness is an important consideration for crimpers when purchasing new blades. Clean, sharp blades facilitate smoother operations and cleaner crimps. Blunt blades are sometimes risky because of accidents, and, at worst, unsafe crimps are produced, impairing the functionality of the ductwork.
Mechanical Strength and Rigidity
The mechanical strength and rigidity of the crimping tool are imperative to the safety of the tool's operation. Materials used to manufacture these tools are generally meant to withstand the uneven distribution of force without bending or breaking. In other words, if a tool fails due to excessive strains, serious injuries can happen.
Corrosion Resistance
The HVAC duct crimping tool usually works in an environment that may contain moisture or corrosive substances. So it is recommended that the tools be made of materials resistant to rust. Stainless steel and corrosion-resistant coatings are applied to keep the tool safe and help in giving a long performance.
Ergonomics
The design of the duct crimping tool is very important, as the scope of injury associated with this tool is very minimal. When we consider ergonomic aspects, we see that materials and shapes that reduce the operating force and do not cause fatigue are helpful in reducing injury. Further, anti-slip covers help absorb sudden shocks and jolt the injured person's body less.
The main mechanism of a crimping tool is the blades where the crimping action occurs. The blades fold and bend the duct's end so that one duct can slide into another. Two common styles of the blade are the crimping die that squeezes and the folding die that cuts and folds. These cuts make crimping easier and ensure the crimp is tight and well-shaped.
To make a crimp, the crimping tool is positioned over the crimp area on the duct's end. The user then activates the tool – either by squeezing a trigger, pressing a button, or hand-pushing. As the blades come together, they will fold the duct's metal edges inward. This forms a rectangular outline at the crimp border. The crimp is an essential step, as it enables one duct to easily slide into another for connection.
Here are the key steps in the crimping process:
A1: Crimping tools are suitable for 26-gauge steel and 30-gauge aluminum, max.
A2: Quality materials, precise blades, well-designed machines, and rust resistance increase lifespan.
A3: Lubrication prior to use and regular inspections boost performance and prevent internal rusting in aging tools.
A4: Quality blades, durable materials, good handles, and rust prevention increase safety when operating the tool.
A5: Internal maintenance of electric and pneumatic tools is needed from pros for peak performance and safety.