


Types of Dodge Charger Lips
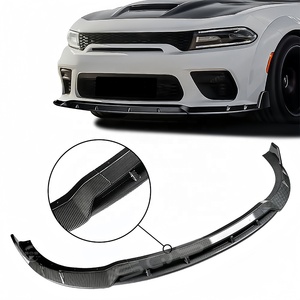
A Dodge Charger lip is a popular aftermarket car accessory that serves both aesthetic and performance purposes. These components are designed to enhance the vehicle's appearance while also improving aerodynamics and handling characteristics. Each type of lip has specific functions and benefits, making them suitable for different driving styles and performance goals.
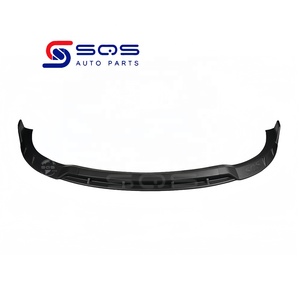
Splitters
Dodge Charger lip splitters are front bumper extensions designed to manage airflow at high speeds. By directing air around the vehicle rather than under it, they significantly reduce lift forces acting on the car. This improved aerodynamic efficiency results in better tire contact with the road surface, enhancing grip and stability during aggressive driving maneuvers.
Advantages
- Reduces front-end lift
- Improves high-speed stability
- Enhances cornering grip
- Available in multiple materials
Limitations
- Can be prone to damage from curbs
- Larger sizes may affect ground clearance
- Requires proper installation for optimal performance
Best for: Performance-oriented drivers, track use, high-speed cruising
Canards
Dodge Charger canards (vortex generators) are strategically placed aerodynamic accessories that optimize airflow around the front end of the vehicle. Mounted near the front bumper or splitter, these small but effective components help create additional downforce by manipulating air pressure distribution. They work particularly well when combined with other aerodynamic modifications like splitters and side skirts.
Advantages
- Increases front downforce
- Reduces aerodynamic drag
- Improves steering response
- Easy to install
Limitations
- Minimal effect at low speeds
- May require periodic adjustment
- Visual impact depends on size and placement
Best for: Track enthusiasts, autocross competitors, drivers seeking sharper handling
Spats
Dodge Charger spats (bumper fins or side skirts) are aerodynamic enhancements positioned along the sides of the front or rear bumpers. Their primary function is to smooth out turbulent airflow around the wheels and lower body areas, which helps maintain stable air flow patterns and increases overall downforce. These components work particularly well on modified vehicles with lowered suspensions where airflow management becomes more critical.
Advantages
- Reduces turbulence around wheel wells
- Improves lateral stability
- Enhances visual aggression
- Works well with other aero components
Limitations
- Less effective on stock height vehicles
- May require trimming for proper fitment
- Can accumulate dirt easily
Best for: Lowered Chargers, street performance builds, show cars
| Type | Primary Function | Material Options | Installation Complexity | Performance Benefit |
|---|---|---|---|---|
| Splitters | Front lift reduction | Fiberglass, ABS Plastic, Carbon Fiber | Moderate | High |
| Canards | Vortex control/downforce | Plastic, Carbon Fiber, Polyurethane | Low | Moderate |
| Spats | Turbulence reduction | ABS Plastic, Fiberglass | Moderate | Moderate-High |
Expert Tip: For maximum aerodynamic benefit, consider combining multiple lip types. A common setup includes a front splitter with integrated canards and side spats, creating a cohesive airflow management system that enhances both performance and visual appeal.
Specifications and Maintenance of Dodge Charger Lip
Key Specifications to Consider
When selecting a Dodge Charger lip for your vehicle, understanding the detailed specifications ensures proper fitment, performance, and aesthetic appeal. The following elements should be carefully evaluated:
Material Composition
Dodge Charger lips are typically manufactured using three primary materials — ABS plastic, polyurethane, and carbon fiber — each offering distinct benefits based on durability, weight, and visual appeal.
- ABS Plastic: Known for its high impact resistance and ability to withstand harsh weather conditions without corroding, this is a popular choice for everyday drivers seeking reliability and cost-effectiveness.
- Polyurethane: This flexible material offers excellent stress resistance, making it ideal for vehicles driven in rough conditions or off-road environments. It's less prone to cracking under pressure compared to rigid plastics.
- Carbon Fiber: Lightweight yet incredibly strong, carbon fiber provides a premium look and is often chosen by enthusiasts who prioritize aesthetics and performance. However, it tends to be more expensive than other materials.
Vehicle Compatibility
Lips are specifically engineered for particular model years and trim levels of the Dodge Charger. Choosing a compatible design ensures seamless integration with the factory bumper and overall styling.
- For example, a 2015 Dodge Charger lip will not necessarily fit a 2018 model due to changes in bumper design and dimensions over time.
- Trim-specific designs (e.g., SXT, R/T, Hellcat) may differ in contouring or mounting points to complement the unique body lines and aerodynamic features of each variant.
Dimensional Accuracy
The physical size of the lip must align precisely with the vehicle’s front bumper to avoid gaps, misalignment, or interference with ground clearance. Common measurements include:
- Length: Typically around 72 inches, matching the width of the bumper to ensure full coverage.
- Width: Usually between 10–14 inches, affecting how much the lip extends downward from the bumper.
- Profile Shape: Some lips have a flat profile, while others feature a curved or aggressive angle to enhance the car’s sporty appearance.
Installation Requirements
Installation methods vary depending on the design and manufacturer of the lip. Understanding these requirements helps prevent damage during installation and ensures long-term security.
- Drilling Required: Some lips require drilling into the bumper for screw or bracket attachment, which offers maximum stability but can be permanent.
- Adhesive Mounting: Others use heavy-duty double-sided tape or automotive adhesive, allowing for easier removal and reinstallation without modifying the original bumper.
- Included Hardware: High-quality kits often come with all necessary components such as screws, brackets, and even alignment templates to simplify the process.
| Feature | Importance | Recommendation |
|---|---|---|
| Material Type | High | Choose based on usage: ABS for daily driving, Polyurethane for rugged conditions, Carbon Fiber for performance/aesthetics |
| Model Year Specific Fit | High | Always confirm compatibility with your exact year and trim level |
| Mounting Method | Medium | Opt for no-drill options if you plan to remove the lip frequently |
| Surface Finish | Medium | Select pre-painted or paintable finishes based on desired customization |
Maintenance Best Practices
To maintain the appearance and structural integrity of your Dodge Charger lip, regular maintenance is essential. Follow these guidelines to keep your investment looking great and functioning properly:
Note: Always follow the manufacturer’s care instructions specific to your lip’s material type. For instance, carbon fiber may benefit from specialized protectants, while polyurethane might require less frequent cleaning due to its resilience against dirt buildup.
How to Choose the Perfect Dodge Charger Lip Spoiler
Selecting the ideal lip spoiler for your Dodge Charger involves more than just aesthetics—it's about enhancing performance, complementing your vehicle’s design language, and ensuring long-term durability. Whether you're aiming for aggressive styling or improved aerodynamics, understanding key selection factors will help you make an informed decision that maximizes both form and function.
Match Your Charger Trim
The Dodge Charger comes in various trims ranging from the refined SXT to the high-performance SRT Hellcat. Each trim has a distinct personality, and your lip spoiler should enhance rather than clash with its factory design cues.
- SXT/SE: Subtle, OEM-style lips that maintain elegance while adding minor visual flair
- RT/R/T Scat Pack: More aggressive designs with moderate overhang for enhanced presence
- SRT/SRT Hellcat: Full-body kits or wide-body style lips that emphasize power and performance
Pro Tip: Consider how other modifications (like front bumpers or grilles) interact with your chosen lip spoiler.
Material Selection and Performance
The material choice affects not only the look but also the longevity and functionality of your lip spoiler. Different materials offer varying levels of rigidity, weight savings, and resistance to environmental damage.
- Carbon Fiber: Ultra-lightweight, stiff, and resistant to fading or corrosion. Ideal for track-focused builds or those seeking premium aesthetics.
- Polyurethane: Highly flexible and impact-resistant. Excellent for daily drivers where durability is crucial.
- Fiberglass: Cost-effective but heavier; often used in budget-friendly kits with painted finishes.
- ABS Plastic: Factory-like finish, paintable, and moderately durable for street use.
Note: Carbon fiber offers superior heat resistance compared to urethane in high-speed applications.
Style Coordination with Vehicle Design
Your lip spoiler should visually integrate with the overall aesthetic of your Charger. The goal is to create a cohesive look that enhances the car’s muscular profile without appearing tacked on.
- For classic body lines, consider smooth curves and minimal angles
- Modern Chargers benefit from sharp edges and angular contours
- Performance-oriented styles often include canards or dive planes for added aerodynamic effect
Design Insight: Look at factory options like the Widebody package for inspiration on integrating aftermarket lips.
Color Options and Customization
While black remains the most popular color due to its contrast and subtle appearance, many manufacturers offer customization options to match your specific paint code or personal preference.
- Black gloss or matte finishes provide a timeless look
- Custom-painted lips blend seamlessly with your body color
- Two-tone options add visual interest when paired with accent colors
- Exposed carbon fiber weave offers a race-inspired aesthetic
Recommendation: If planning future repainting, choose a removable lip spoiler to avoid repainting costs.
Height and Thickness Considerations
The dimensions of your lip spoiler directly influence aerodynamic performance and ground clearance. Finding the right balance ensures functional benefits without compromising usability.
- Street Use: 2–3 inch height with 0.5–1 inch thickness provides subtle downforce without scraping
- Track/Circuit: 4–6 inch height with reinforced structure for maximum airflow control
- Drift/Show Builds: Extended lips with exaggerated angles for visual impact
Caution: Taller lips may reduce approach angle—consider driveway inclines and parking situations.
Determine Primary Purpose
Understanding whether your focus is on aesthetics, performance, or a combination of both will guide your choice in design and material selection.
- Aesthetic Focus: Prioritize design integration, color matching, and visual harmony
- Performance Focus: Look for wind tunnel-tested designs with CFD (Computational Fluid Dynamics) validation
- Dual Purpose: Choose a balanced design that doesn’t compromise either aspect
Key Insight: Some well-designed lips offer both visual appeal and measurable downforce gains.
Budgeting Advice: When setting your budget, factor in installation costs, potential painting requirements, and any additional hardware needed. Investing in a higher-quality lip spoiler initially often pays off through better fitment, longer lifespan, and superior performance characteristics.
| Use Case | Recommended Material | Typical Price Range | Estimated Lifespan |
|---|---|---|---|
| Daily Driver | Polyurethane or ABS Plastic | $99 - $250 | 3-5 years |
| Show Car | Carbon Fiber or Painted Fiberglass | $250 - $500 | 5+ years |
| Street Performance | Hybrid Polyurethane-Carbon Fiber | $300 - $600 | 4-6 years |
| Race/Track Use | Full Carbon Fiber or Reinforced Urethane | $500 - $1000+ | Varies with intensity |
Research & Recommendations: Before purchasing, explore online forums such as Charger Forums or Reddit’s r/DodgeCharger. Engage with owners who have experience with specific brands and models. Look for real-world feedback on fitment, longevity, and customer service responsiveness. Many manufacturers offer test-fit videos or downloadable templates to preview how the lip will sit on your vehicle.
DIY Replacement Guide for Dodge Charger Lip Kits
Installing or replacing a Dodge Charger lip can significantly enhance the vehicle's front-end aesthetics while improving aerodynamics. While some complex lips may require professional installation, many modern kits are designed with straightforward DIY procedures. This guide provides detailed steps to help you install your lip kit successfully at home.
Safety Reminder: Always work in a well-ventilated area and wear protective gloves and eyewear when handling adhesives, cutting tools, or power equipment like drills.
Step-by-Step Installation Guide
- Preparation and Workspace Setup
- Park your Dodge Charger on level ground in a clean, dry, and well-lit workspace
- Unbox the entire lip kit and verify that all components are included (e.g., lip spoiler, screws, adhesive strips, mounting brackets if applicable)
- Clean the front bumper thoroughly using soap and water, followed by rubbing alcohol to remove wax, grease, and contaminants for better adhesion
- Gather necessary tools such as screwdrivers, drill bits, utility knife, measuring tape, and cleaning supplies
- Dry Fitment and Alignment Check
- Before applying any adhesive or drilling holes, position the lip against the bumper to check fitment
- Begin from one side of the bumper and gradually align it along the contour to the other end
- If the lip has pre-drilled mounting holes, mark them lightly on the bumper with a pencil for reference
- Ensure symmetry and even gaps between the lip and the bumper before proceeding
- Cutting and Drilling Adjustments
- If custom modifications are needed, use a fine-tooth saw or sharp utility knife to carefully cut the lip to match the bumper shape
- For drilling, select a drill bit slightly smaller than the screw diameter to prevent over-enlarging the holes
- Drill slowly and apply gentle pressure to avoid cracking the plastic bumper or warping the lip material
- Use a test piece or scrap material first to ensure proper fit before drilling into your vehicle
- Adhesive Application and Mounting
- If your lip uses automotive-grade adhesive, apply it evenly along the contact surface of the lip
- Peel off the backing from double-sided foam tape if included, and press firmly onto the bumper
- Hold the lip in place for several seconds to allow initial bonding, especially with adhesive-backed designs
- Wipe away excess adhesive immediately with isopropyl alcohol before it dries
- Securing with Screws or Bolts
- Align the lip’s mounting holes with those marked or existing on the bumper
- Insert the provided screws or bolts and tighten securely without over-tightening, which can crack the lip or strip the threads
- Consider using nylon-insert lock nuts or threadlocker to prevent vibration-related loosening
- Check alignment again after securing each fastener to maintain consistent positioning
- Final Inspection and Finishing Touches
- Walk around the vehicle to visually inspect the lip from multiple angles
- Ensure there are no gaps, uneven edges, or visible adhesive residue
- Give the installed area a final wipe down to remove fingerprints or smudges
- Allow adhesive to cure fully according to manufacturer instructions before driving at high speeds
| Installation Phase | Key Actions | Common Pitfalls | Essential Tools |
|---|---|---|---|
| Preparation | Verify components, clean bumper, gather tools | Misplacing small parts, skipping cleaning step | Rubbing alcohol, microfiber towel, screwdriver set |
| Fitment Test | Dry-fit lip, check alignment, mark holes | Incorrect positioning, asymmetry | Measuring tape, pencil, helper for alignment |
| Cutting/Drilling | Cut to size, drill holes carefully | Overcutting, cracked bumper | Utility knife, drill, sandpaper |
| Mounting | Apply adhesive/tape, secure with fasteners | Uneven pressure, adhesive drying too fast | Clamps, zip ties, rubber mallet |
| Finishing | Inspect, clean, let cure | Driving too soon, missed imperfections | Detailing spray, soft cloth, patience |
Pro Tip: For best results, install the lip during moderate temperatures (between 60°F–85°F). Cold weather can reduce adhesive effectiveness, while extreme heat may cause premature curing.
Troubleshooting Common Issues
- Lip not flush with bumper: Recheck alignment and consider adding shims or adjusting fasteners
- Adhesive failure: Ensure the surface was properly cleaned and allowed to dry completely before application
- Vibration or rattling: Add foam padding or sound-dampening material between the lip and bumper
- Uneven gaps: Use spacers or adjust clamps while adhesive sets
Enhancement Suggestion: Consider painting the lip to match your vehicle’s color or choosing a carbon fiber finish for added visual appeal. Many lips come unpainted, offering customization options.
Dodge Charger Lip FAQ
Yes, the Dodge Charger lip does require regular maintenance to ensure it remains in optimal condition and continues to perform its protective functions effectively. Routine care includes:
- Cleaning: Use mild automotive soap and water to clean the lip regularly, removing road grime, brake dust, and environmental contaminants.
- Inspection: Periodically check for signs of wear such as cracks, warping, or discoloration that could affect performance or aesthetics.
- Repairs: If minor damage is found, address it promptly with appropriate repair kits or consult a professional to prevent further degradation.
Maintaining your Charger's lip not only enhances the vehicle’s appearance but also preserves its aerodynamic efficiency and protects the front end from debris and stone chips, especially at highway speeds.
Absolutely—many owners choose to customize their Dodge Charger lip through painting or modification to better match their personal style or vehicle color scheme. Here are some key considerations:
- Painting: Most lips are made from thermoplastic or ABS plastic, so using automotive-grade paint compatible with these materials is essential. Proper surface preparation (cleaning, sanding, and priming) ensures lasting adhesion.
- Customization Options: Beyond simple color matching, enthusiasts often add stripes, carbon fiber wraps, or even LED lighting integrated into the lip for a unique look.
- Functionality: Any modifications should not compromise the lip's structural integrity or aerodynamic purpose. Avoid adding excessive weight or altering its shape significantly.
For best results, consider having custom work done by a professional automotive painter or body shop experienced with aftermarket components.
The Dodge Charger lip is designed specifically for each generation and trim level of the Charger lineup. While many lips may appear similar across models, there can be subtle differences in:
- Bumper profile dimensions
- Mounting points and attachment systems
- Aerodynamic tuning specific to engine output and model year
To ensure proper fitment and functionality, always verify compatibility with your exact Charger model, including:
- Production year (e.g., 2014 vs. 2024)
- Trim level (SE, SXT, R/T, Scat Pack, Hellcat, etc.)
- Whether the vehicle has factory performance packages or widebody modifications
If you're unsure about fitment, consult the manufacturer's specifications or contact customer support before purchasing. Choosing the correct lip guarantees seamless installation and optimal performance benefits like improved downforce and front-end protection.