


Types of 3-Inch Projector Shrouds
A 3-inch projector shroud is an essential component for headlight customization, enhancing both aesthetics and functionality. These specialized covers come in various designs to suit different preferences and applications:
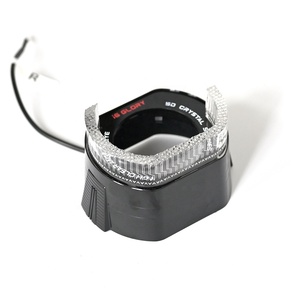
Universal Shrouds
These versatile shrouds are designed to fit various projector housings with minimal modification.
Best for: Quick installations and compatibility with multiple projector types
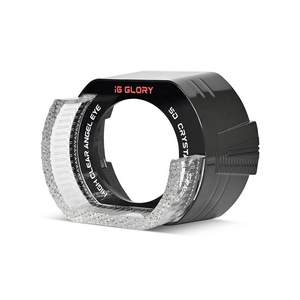
Mini Shrouds
Featuring a compact design with smaller diameter, perfect for vehicles with limited headlight space.
Best for: Compact vehicles and installations with space constraints
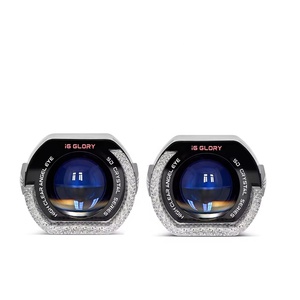
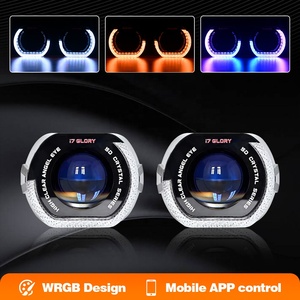
LED Illuminated Shrouds
Integrated with LED lighting elements for enhanced visibility and striking aesthetic appeal.
Best for: Creating distinctive DRL effects and improving vehicle presence
Carbon Fiber Shrouds
Premium option featuring authentic or textured carbon fiber for a high-performance look.
Best for: Sports cars and performance vehicles seeking lightweight, durable materials
Custom Shrouds
Tailored to specific requirements with unique shapes, designs, and materials.
Best for: Specialty vehicles and unique lighting projects requiring personalization
Halo Shrouds
Distinctive ring-shaped design that creates an eye-catching halo effect around the projector.
Best for: Creating dramatic lighting effects and enhancing nighttime visibility
Expert Tip: When selecting a 3-inch projector shroud type, consider both the aesthetic impact and the functional requirements of your vehicle. LED illuminated shrouds can serve dual purposes as both style elements and safety features by increasing your vehicle's visibility.
| Shroud Type | Appearance | Installation Complexity | Typical Price Range |
|---|---|---|---|
| Universal | Standard, adaptable | Low | $20-$50 |
| Mini | Compact, subtle | Low | $15-$40 |
| LED Illuminated | Modern, tech-forward | Medium-High | $50-$120 |
| Carbon Fiber | Premium, sporty | Low | $60-$150 |
| Custom | Unique, personalized | Varies | $80-$200+ |
| Halo | Distinctive, eye-catching | Medium | $40-$100 |
Specifications and Technical Details
Understanding the specifications of 3-inch projector shrouds is essential for ensuring proper fit, performance, and longevity. Here's a comprehensive breakdown of key technical aspects:
Standard 3-inch diameter (76.2mm) designed to fit precisely around standard projector lenses. Inner diameter typically ranges from 2.8-3.1 inches to accommodate various lens types.
Common materials include aluminum (lightweight, heat-resistant), ABS plastic (affordable, good heat resistance), polycarbonate (impact-resistant), and carbon fiber (premium, lightweight).
Available in multiple styles from minimalist to complex geometric patterns. Design affects both aesthetics and light output characteristics.
Options include chrome, polished metal, black matte, gunmetal gray, and textured finishes. Choose based on compatibility with vehicle styling.
May include integrated brackets, screws, clips, or adhesive mounting. Some require adapter rings for custom fitment.
Designed for specific projector models. Universal options available with adapter rings to ensure proper fit.
Quality shrouds should withstand temperatures up to 200°C (392°F) to handle projector heat output without warping or degradation.
Typically range from 50-250g depending on material and design complexity. Carbon fiber options are lightest while metal variants are heavier.
| Material | Heat Resistance | Durability | Weight | Price Point |
|---|---|---|---|---|
| Aluminum | Excellent (300°C+) | High | Medium | Mid-range |
| ABS Plastic | Good (105°C) | Medium | Light | Budget |
| Polycarbonate | Very Good (125°C) | High | Light | Mid-range |
| Carbon Fiber | Excellent (400°C+) | Very High | Very Light | Premium |
Maintenance and Care
Proper maintenance of your 3-inch projector shrouds ensures longevity and optimal performance. Follow these expert recommendations to keep your shrouds in pristine condition:
Regular Cleaning
Use a soft microfiber cloth with mild soap solution to remove dust, dirt, and road grime. For chrome or metal shrouds, apply specialized metal cleaner to maintain shine.
Frequency: Monthly or after exposure to harsh conditions
Inspection Routine
Examine shrouds for cracks, scratches, discoloration, or heat damage. Check mounting points for security and proper alignment.
Frequency: Quarterly or after significant temperature changes
Pro Tip: Apply a thin layer of automotive-grade UV protectant to plastic shrouds every 3 months to prevent yellowing and degradation from sun exposure. For carbon fiber shrouds, use specialized carbon fiber protectant to maintain the distinctive weave pattern and finish.
Maintenance Schedule
| Maintenance Task | Frequency | Materials Needed | Notes |
|---|---|---|---|
| Basic Cleaning | Monthly | Microfiber cloth, mild soap | Avoid abrasive cleaners |
| Hardware Check | Quarterly | Appropriate tools for tightening | Ensure all mounting points are secure |
| Polishing (Metal) | Every 6 months | Metal polish, soft cloth | Use automotive-grade products |
| UV Protection | Every 3 months | UV protectant spray | Focus on surfaces exposed to sunlight |
| Deep Cleaning | Annually | Specialized cleaners for material type | May require removal from housing |
How to Choose the Right 3-Inch Projector Shrouds
Selecting the perfect projector shrouds for your headlight upgrade requires careful consideration of several factors. This comprehensive guide will help you make an informed decision:
Compatibility Assessment
Ensure the shrouds match your specific projector lens dimensions and mounting points. Check manufacturer specifications and vehicle requirements before purchase.
Key Consideration: Measure your projector lens diameter precisely
Aesthetic Integration
Select shrouds that complement your vehicle's design language and personal style preferences. Consider how the finish will match or contrast with other exterior elements.
Key Consideration: Match vehicle's design theme for cohesive look
Choose high-grade materials that can withstand heat, UV exposure, and road conditions. Premium materials may cost more initially but offer better longevity and performance.
Consider your technical skills and available tools. Some shrouds require simple snap-on installation while others need complex wiring or modification.
Evaluate how the shroud might affect light output. Some designs can enhance focus and beam pattern while others might create unwanted shadows.
Set a realistic budget considering both initial cost and potential long-term value. Premium shrouds may offer better durability and satisfaction.
Selection Tip: Before purchasing, research customer reviews specifically mentioning your vehicle model. This can provide valuable insights about fit, installation challenges, and real-world performance that manufacturer specifications might not cover.
| Selection Factor | Why It Matters | What to Look For |
|---|---|---|
| Compatibility | Ensures proper fit and function | Exact size specifications, adapter availability |
| Material Quality | Determines durability and longevity | Heat resistance ratings, UV protection |
| Design & Aesthetics | Impacts overall vehicle appearance | Finish type, shape complementing vehicle style |
| Installation Requirements | Affects time and cost of setup | Included hardware, clear instructions |
| Light Performance | Influences visibility and safety | Design that enhances beam pattern |
| Budget | Ensures value for investment | Balance between cost and quality features |
| Reviews & Reputation | Provides real-world performance data | Consistent positive feedback, especially for your vehicle |
DIY Installation Guide
Installing 3-inch projector shrouds can be a rewarding DIY project that transforms your vehicle's appearance. Follow this comprehensive step-by-step guide for professional results:
Required Tools
Preparation
- Ensure vehicle is parked on level ground with ignition off
- Allow headlights to cool completely (at least 30 minutes after use)
- Organize tools and lay out all parts before beginning
- Take photos of original setup for reference
Installation Process
Turn off vehicle ignition and disconnect battery to prevent electrical shorts during installation. Ensure the headlights have cooled completely to avoid burns.
Access the headlight assembly by removing necessary plastic panels, grille components, or covers using appropriate trim tools and screwdrivers.
Locate and remove mounting hardware securing the headlight assembly using socket wrench or screwdriver. Carefully disconnect any electrical connectors by pressing release tabs.
Remove headlight assembly by gently pulling it forward, taking care not to damage surrounding paint or components. Place on clean, soft surface.
Access the projector lens by separating headlight housing if necessary (may require heating sealant with heat gun at 175-200°F/80-95°C and gentle prying).
Remove existing shroud (if present) by unscrewing fasteners or releasing clips. Clean projector lens surface thoroughly with microfiber cloth.
Install new 3-inch shroud by aligning with projector lens and securing with provided hardware. Ensure snug fit without overtightening.
Reassemble headlight housing if separated, applying appropriate sealant around edges. Allow sealant to cure according to manufacturer specifications.
Reinstall headlight assembly into vehicle, reconnecting all electrical connections and securing mounting hardware to proper torque specifications.
Replace all trim panels and covers, ensuring proper alignment and secure attachment. Reconnect battery and test headlight function.
Verify alignment and function of headlights. Make adjustments as necessary to ensure proper beam pattern and projection.
Important Safety Notice: Always disconnect the vehicle's battery before working on electrical components. Wear appropriate safety gear including gloves and eye protection. If you're uncomfortable with any aspect of the installation, consult a professional automotive technician.
Installation Tip: For headlights with sealed housings, warming them in an oven at 200°F (93°C) for 10-15 minutes can make separating the housing easier. However, this should only be attempted by experienced DIYers as improper heating can damage components.
Frequently Asked Questions
No, not all 3-inch projector shrouds are universal. While many are designed to accommodate standard 3-inch projector lenses, there can be significant variations in mounting mechanisms, depth requirements, and compatibility with specific projector brands or models. Some shrouds labeled as "universal" may include adapter rings or adjustable mounting hardware, but you should always verify compatibility with your specific projector model before purchasing. For optimal fit and performance, it's advisable to choose shrouds designed specifically for your projector type whenever possible.
The primary difference between 3-inch and 2.5-inch projector shrouds is their internal diameter, which corresponds to different projector lens sizes. 3-inch shrouds (76.2mm) accommodate larger projector lenses, offering more substantial light output and often creating a more prominent visual impact. 2.5-inch shrouds (63.5mm) are designed for smaller projector systems, making them ideal for compact headlight housings or vehicles with limited space. Additionally, 3-inch projectors typically produce wider beam patterns and sometimes greater light output, while 2.5-inch systems may offer more focused beams. The choice between sizes should primarily be determined by your existing projector lens dimensions.
Projector shrouds are manufactured using various materials, each offering different benefits:
- Aluminum: Excellent heat resistance, lightweight yet durable, and offers premium appearance. Commonly used in high-end applications.
- ABS Plastic: Cost-effective, lightweight, and reasonably heat-resistant. Popular for budget-friendly options with good durability.
- Polycarbonate: Superior impact resistance with good heat tolerance and optical clarity. Often used where strength is critical.
- Carbon Fiber: Premium material offering exceptional strength-to-weight ratio, heat resistance, and distinctive aesthetic appeal. Used in high-performance applications.
- Metal Alloys: Various alloys provide specialized properties like enhanced corrosion resistance or improved heat dissipation for extreme applications.
Material selection should consider factors like heat exposure, desired appearance, weight considerations, and budget constraints.
Yes, projector shrouds can significantly influence headlight beam patterns. The design, depth, and internal finish of a shroud can alter how light exits the projector lens. Properly designed shrouds with appropriate internal dimensions maintain the projector's engineered beam pattern while reducing stray light. However, shrouds with restrictive openings, improper depth, or highly reflective internal surfaces can create unwanted shadows, hot spots, or diffusion effects that compromise visibility. Performance-oriented shrouds often feature anti-reflective internal coatings and optimized geometries to enhance beam distribution while maintaining the distinctive aesthetic enhancement.
Yes, most 3-inch projector shrouds can be painted or customized to match your vehicle's aesthetics. For optimal results, follow these guidelines:
- Thoroughly clean and degrease the shroud surface before painting
- Apply appropriate primer designed for the shroud's base material (plastic primer for ABS/polycarbonate, metal primer for aluminum)
- Use high-temperature automotive paint rated for at least 300°F (149°C) to prevent heat damage
- Apply multiple light coats rather than one heavy coat for better adhesion and finish
- Consider clear coat protection for durability and enhanced appearance
Beyond painting, shrouds can be customized with vinyl wraps, hydro-dipping, powder coating (for metal shrouds), or aftermarket decals. Some enthusiasts also modify shrouds with additional LED elements or custom cutouts for unique lighting effects. Always ensure modifications don't compromise the structural integrity or heat resistance of the shroud.