


Types of Wheel Alignment Tools
A wheel alignment tool is designed to assist mechanics and technicians in achieving proper wheel alignment, which is critical for optimal vehicle performance, safety, and tire longevity. Below are the primary tools used for professional and DIY wheel alignment.
Why Proper Alignment Matters: Correct wheel alignment ensures even tire wear, improved handling, better fuel efficiency, and extends the life of your vehicle's suspension components.
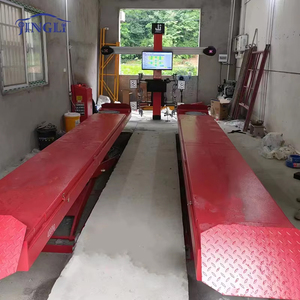
Alignment Lift
A specialized lift that raises vehicles off the ground, providing technicians with adequate space to work on wheel alignment. Features include:
- Secure locking mechanisms for vehicle stability
- Height adjustment capabilities
- Weight capacities ranging from 7,000-12,000 lbs
- Built-in safety features to prevent accidents
Electronic Measuring System
Advanced system that uses specialized sensors to measure wheel angles with precision:
- Wireless sensors attach to each wheel
- Real-time digital readings displayed on monitor
- Accuracy within 0.01 degrees
- Allows for dynamic adjustments during alignment
Alignment Computers
Sophisticated systems that analyze data from measuring devices:
- Pre-loaded with manufacturer specifications
- Detailed visual representations of alignment angles
- Step-by-step adjustment guidance
- Before/after comparison reporting
Camber Gauge
Measures the angle of wheels in relation to the vertical axis:
- Precision bubble level indicators
- Measurement scale with 0.1° increment accuracy
- Magnetic attachment options for steel wheels
- Critical for handling and even tire wear
Castor Gauge
Measures the steering axis angle affecting stability and handling:
- Adjustable arms that align with suspension points
- Digital or analog measurement displays
- Critical for steering feel and straight-line stability
- Typically accurate within 0.25 degrees
Toe Plates
Measures the toe angle - how parallel wheels are to each other:
- Calibrated scales for precise measurement
- Typically available in millimeter or degree increments
- Affects straight-line stability and tire wear
- Entry-level option for hobbyists and small shops
Alignment Turntables
Placed under front wheels to simulate real driving conditions:
- 360-degree rotation capability
- Low-friction surface for realistic measurements
- Built-in locks for securing during adjustments
- Weight capacity typically between 1,000-2,500 lbs per plate
| Tool Type | Primary Function | Typical Accuracy | Best For | Price Range |
|---|---|---|---|---|
| Electronic Systems | Complete alignment measurement | ±0.01 degrees | Professional shops | $5,000-$25,000 |
| Camber/Castor Gauges | Specific angle measurement | ±0.1 degrees | Small shops, DIYers | $100-$500 |
| Toe Plates | Toe angle measurement | ±1mm | Hobbyists, basic checks | $50-$200 |
| Laser Tools | Visual alignment reference | ±0.5mm | Racing teams, specialty shops | $300-$2,000 |
| String Method | Basic alignment reference | ±1mm | Budget DIY solutions | $20-$50 |
Specifications of Wheel Alignment Tools
Understanding the specifications of wheel alignment tools is essential for optimal performance and accurate results. Each tool has unique characteristics designed for specific applications and vehicle types.
Wheel Alignment Machine
- Accuracy Level: Up to 1/1000 of an inch precision
- Calibration System: Self-calibrating with reference points
- Vehicle Range: Cars, light trucks, SUVs, motorcycles
- Portability: Mobile cabinet designs available
- Sensor Technology: CCD or 3D imaging systems
- Data Output: Printable reports, digital storage
Alignment Gauges
- Weight: 2-3kg for handheld units
- Calibration: Manual or digital zeroing
- Measurement Accuracy: ±0.1 degrees
- Range: Typically -5° to +5° for camber
- Construction: Aluminum or steel frames
- Display Type: Digital LCD or analog dial
Castor Camber Gauge
- Accuracy Level: ±0.1 degrees
- Calibration: Tool-specific calibration plates
- Measurement Range: -7° to +7° for most models
- Weight: 1-4kg depending on construction
- Materials: Aircraft aluminum or composite
- Attachment Method: Rim grip or magnetic mount
Laser Alignment Tool
- Accuracy Level: ±0.5mm
- Laser Class: Class 2 (eye-safe) or Class 3R
- Battery Life: 8-12 hours continuous use
- Range: Up to 50ft measurement distance
- Calibration: Factory calibrated, field adjustable
- Environmental Rating: IP54-IP65 for durability
Comparative Technology Analysis
| Technology Type | Accuracy | Setup Time | Durability | Cost-Effectiveness |
|---|---|---|---|---|
| 3D Imaging Systems | Excellent (±0.01°) | Fast (3-5 min) | High | Premium investment |
| CCD Electronic Systems | Very Good (±0.02°) | Moderate (5-8 min) | Very Good | High value |
| Laser Technology | Good (±0.5mm) | Moderate (5-10 min) | Good | Moderate value |
| Mechanical Gauges | Acceptable (±0.1°) | Slow (10-15 min) | Moderate | Budget-friendly |
| String Method | Basic (±1mm) | Very Slow (15+ min) | Low | Extremely economical |
Maintenance of Wheel Alignment Tools
Regular maintenance of wheel alignment tools is crucial for optimal performance, precision, and longevity. Each tool requires specific care routines to ensure accurate readings and reliable operation.
Warning: Neglecting proper maintenance of alignment tools can lead to inaccurate readings, resulting in poor vehicle alignment, premature tire wear, and compromised handling characteristics.
Alignment Machine Maintenance
- Regular Calibration: Follow manufacturer's schedule (typically quarterly)
- Cleaning: Dust-free sensors and cameras using recommended products
- Software Updates: Install latest updates for vehicle specifications
- Hardware Check: Inspect cables, connectors, and mounts monthly
- Sensor Protection: Store sensors in designated holders when not in use
Alignment Gauges Maintenance
- Accuracy Verification: Check against known references monthly
- Cleaning: Wipe down with non-abrasive cleaner after each use
- Storage: Keep in padded case away from temperature extremes
- Moving Parts: Lubricate pivot points with recommended lubricant
- Visual Inspection: Check for damage or wear before each use
Castor Camber Gauge Maintenance
- Calibration: Verify on flat surface monthly
- Cleaning: Remove debris from contact points after each use
- Storage: Hang or store flat to prevent warping
- Bubble Level: Check for damage or fluid leakage regularly
- Hardware: Tighten any loose screws or components
Toe Plates Maintenance
- Accuracy Check: Verify measurements against reference monthly
- Cleaning: Remove dirt and debris after each use
- Storage: Stack flat or hang vertically to prevent warping
- Scale Verification: Check for readability and damage
- Edge Protection: Inspect for dents or damage that could affect accuracy
String Alignment Maintenance
- String Replacement: Replace when frayed or stretched
- Hardware Check: Tighten pulleys and brackets regularly
- Cleaning: Wipe down components after use
- Storage: Keep string wound properly to prevent tangling
- Tension Verification: Check string tension system functionality
Laser Alignment Tool Maintenance
- Calibration: Professional calibration annually
- Lens Cleaning: Use optical lens cleaner monthly
- Battery Care: Remove batteries during extended non-use periods
- Storage: Keep in protective case away from dust and moisture
- Mount Inspection: Check stability of mounting hardware regularly
Pro Tip: Create a maintenance log for each alignment tool to track calibration dates, repairs, and regular maintenance activities. This documentation helps ensure all tools remain in optimal working condition and identifies when tools may need replacement.
How to Choose Wheel Alignment Tools
Selecting the right wheel alignment tools requires careful consideration of several key factors to ensure you get equipment that meets your specific needs, budget, and technical requirements.
Accuracy Considerations
The precision of your alignment tool directly impacts vehicle performance:
- High-precision tools (±0.01°) for performance vehicles
- Standard precision (±0.1°) for everyday passenger vehicles
- Consider repeatability - consistent results across measurements
- Verify calibration certification and standards compliance
- Digital readouts often provide better precision than analog
Key Point: Even small measurement errors can lead to significant alignment problems, especially at highway speeds.
Ease of Use Factors
User-friendly equipment saves time and reduces errors:
- Intuitive interface with clear instructions
- Quick setup time with minimal calibration requirements
- Automated measurement processes when possible
- Clear visual displays or digital readouts
- Consider training requirements for technicians
Key Point: Complex tools might offer more features but can slow down workflow if difficult to operate.
Portability Assessment
Consider where and how you'll use the alignment tools:
- Fixed installation for dedicated alignment bays
- Mobile systems for multi-bay or off-site service
- Weight and size impact transportation ease
- Storage requirements when not in use
- Power requirements (battery vs. outlet dependent)
Key Point: Mobile mechanics may prioritize compact, battery-powered systems over stationary options.
Durability & Quality
Investment in quality pays dividends over time:
- Materials: aircraft-grade aluminum vs. plastic components
- Environmental resistance (dust, moisture, temperature)
- Drop and impact resistance for portable tools
- Warranty length and coverage details
- Availability of replacement parts and repairs
Key Point: Professional-grade tools typically offer longer service life despite higher initial cost.
| User Type | Recommended Tool Types | Key Features to Prioritize | Budget Range |
|---|---|---|---|
| Professional Shop | 3D or CCD Alignment System | Speed, accuracy, comprehensive vehicle database | $8,000-$25,000+ |
| Small Garage | Basic Electronic System or Laser Tools | Value, durability, ease of use | $2,000-$8,000 |
| Racing Team | Precision Gauges or Custom Systems | Extreme accuracy, quick adjustments, portability | $1,000-$15,000 |
| DIY Enthusiast | Gauges, Toe Plates, String Method | Affordability, simplicity, storage size | $100-$1,000 |
| Mobile Mechanic | Portable Laser Systems or Gauges | Portability, battery life, durability | $500-$3,000 |
Buying Tip: Consider purchasing slightly higher-grade equipment than your immediate needs require. This provides room for business growth, handles a wider range of vehicles, and typically offers better long-term value despite the higher initial investment.
DIY Wheel Alignment: Installation and Replacement Guide
While professional alignment is recommended for optimal results, DIY wheel alignment can be performed with the right tools and careful attention to detail. Follow these steps for basic wheel alignment procedures.
Safety Warning: Always ensure the vehicle is properly secured before performing any alignment work. Never work under a vehicle supported only by a jack - always use appropriate jack stands rated for your vehicle's weight.
Prepare the Vehicle
- Park on a flat, level surface (concrete preferred over asphalt)
- Position the vehicle with wheels straight ahead
- Check tire pressure and adjust to manufacturer specifications
- Inspect for and replace any worn suspension components
- Remove any excessive weight from the vehicle
- Set up alignment tool around the vehicle according to manufacturer instructions
- Calibrate the alignment tool to ensure accurate readings
Attach and Adjust Tools
- Securely attach alignment tools to front and rear wheels
- Ensure proper connection without damaging wheels or tire sensors
- Adjust the arms or racks to make light contact with wheels
- Take initial measurements and record baseline readings
- Compare readings to manufacturer's specifications for your vehicle model
- Identify which angles require adjustment
Make Alignment Adjustments
- Locate adjustment points for camber, caster, and toe
- Loosen the appropriate bolts for the angle being adjusted
- Make incremental adjustments while monitoring alignment readings
- Adjust one angle at a time in this recommended order: camber, caster, then toe
- Tighten bolts to manufacturer's torque specifications after adjustments
- Recheck measurements after tightening to ensure settings haven't shifted
Verify and Test
- Take final measurements to confirm all angles meet specifications
- Ensure measurements are symmetrical between left and right sides
- Double-check that all adjustment bolts are properly torqued
- Remove alignment tools carefully
- Take the vehicle for a test drive on a straight, level road
- Check for steering wheel centering and straight-line tracking
- Make additional fine-tuning adjustments if necessary
DIY Pro Tip: Take "before" photos of your suspension components and adjustment points before making any changes. These references can be invaluable if you need to restore original positions or track the impact of specific adjustments.
Common DIY Mistakes to Avoid
- Skipping pre-inspection - Worn parts must be replaced before alignment
- Working on uneven surfaces - Creates false readings and poor alignment
- Incorrect tool calibration - Leads to inaccurate measurements
- Over-tightening adjustment bolts - Can strip threads or break components
- Adjusting multiple angles simultaneously - Creates confusion about what changed
- Not accounting for vehicle load - Alignment should be done at normal ride height
Frequently Asked Questions
Wheel alignment should be checked approximately every 5,000 miles (8,000 km) as a preventative measure. Additionally, alignment should be inspected after any of these events:
- Hitting significant potholes or road hazards
- After any suspension repair or modification
- When installing new tires
- If you notice uneven tire wear patterns
- When experiencing pulling to one side while driving
- Following an accident, even a minor one
Regular alignment checks help maximize tire life and maintain optimal vehicle handling characteristics.
Wheel misalignment can result from various factors including:
- Road Impacts: Hitting potholes, curbs, or road debris
- Normal Wear: Gradual loosening of suspension components
- Component Replacement: Installing new tires, suspension parts, or steering components
- Vehicle Modifications: Changing ride height or suspension characteristics
- Accidents: Even minor collisions can affect alignment
- Load-induced Settling: Regularly carrying heavy loads
- Manufacturing Variations: Some vehicles may need alignment adjustments when new
Even normal driving over time can cause gradual misalignment due to stress on suspension components.
Yes, DIY wheel alignment is possible with the right tools and knowledge, but there are important considerations:
| DIY Alignment | Professional Alignment |
|---|---|
|
|
While DIY alignment is possible for enthusiasts with proper tools, professional alignment is recommended for daily drivers, performance vehicles, and when precise specifications must be met. A trained technician can ensure all manufacturer-specified angles are correctly set, which is especially important for vehicles with advanced driver assistance systems that depend on proper alignment.
Several symptoms indicate potential alignment issues that should be addressed:
- Vehicle pulls to one side when driving on a level road
- Steering wheel is not centered when driving straight
- Uneven or rapid tire wear, especially on edges
- Squealing tires during normal driving
- Steering wheel vibration or looseness
- Vehicle feels unstable or "wandering" on the highway
- Reduced fuel efficiency due to increased rolling resistance
Addressing alignment issues promptly can prevent accelerated tire wear and improve safety.
"Tracking" typically refers to a basic toe adjustment only, while a full wheel alignment includes:
- Toe Adjustment: Ensures wheels are parallel to each other
- Camber Adjustment: Corrects the vertical tilt of the wheels
- Caster Adjustment: Sets the steering axis angle for proper handling
- Thrust Angle Correction: Ensures the rear wheels are properly aligned with the front
- Steering Wheel Centering: Aligns the steering wheel to the straight-ahead position
A basic tracking service is less expensive but doesn't address all potential alignment issues. A full alignment provides comprehensive adjustment of all relevant angles for optimal handling and tire wear characteristics.